We now have the Dually Cooly under codename “Icefish” in the devel section of the Lulzbot devel site. You can find the most recent iterations here I recently put out revision 10 and it is performing great:
Oh, I forgot to mention that the most recent versions are printable without support thanks to a suggestion to insert a built in support wall inside the fans. Seems to be printing well this way so far.
At what speed are people running the dually cooly fans? I can run the single extruder fan at full speed w/out issue, but when I run the dually cooly fans (only one at a time is on) at full speed my layers are not bonding very well.
I have been running my fans at about 75% each without adverse effects. I also run my prints a little slower than normal, usually 50mm/s max speed, 30 more ideally.
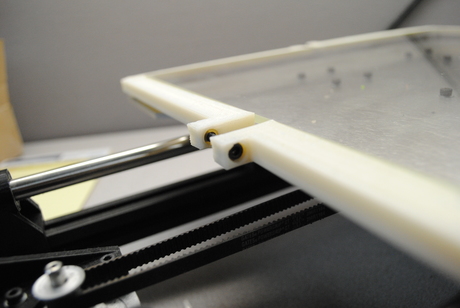
The fans on the DC will indeed hit the bed fingers on the right side of the printer, as can the E1 head on the front left. To solve this problem, I developed and alternative bed corner design that needs no fingers, but instead squeezes the glass on all sides to hold it tight in place. See the Corner Squeezer Bracket STL attached. These require 4 M3 x 14 screws and 4x M3 brass heat inserts. I have been running this full time for about 2 months without any issues.
Looking at the STL, I see what looks like 1 of four corners with 3 holes in it. How does that square with 4 screws and 4 inserts? Could you post a photo of your machine with the gripper installed?
Certainly! I should have done that sooner. See those photos here. I have just a bare piece of glass in there at the moment. It has leveled like a charm just like the standard bed corners so far.
Also, it looked like that last file I uploaded was indeed incomplete. See the correct file here. 150121CornerSqueezerBracket3x3.stl (407 KB)
Seconded the request for source files. .stl’s are not editable (or even able to be re-exported as .stl’s!) in SW2016 and I’d REALLY like to attempt to make this work for the flexydually I’m modding to be a metal hex head flexible extruder and std extruder (flexy-hexy cooly?)
I’d really appreciate it and I’d be happy to share my work and source files after done with the class…
thanks,
dizzle
P.S.- I’m new to the board and I’m wondering what the protocol is for new members, I want to be a contributing member, not a leach or troll, so is there a “new member intro” section I should be posting in?
have been following this thread on and off for the past year, finally have something to contribute:
i had a TAZ 5 with the first generation FlexyDually, which I modded with the DuallyCooly/Icefish thanks to contributors here. recently the 4.7 Ohm resistor on the non-flexy hot end failed, so I decided to re-fit the FlexyDually with 2 Hexagon hot-ends i had spare (have a second TAZ 5 with a first generation Dual Extruder).
few thoughts on the experience:
there is a significant height difference between the Buda and Hexagon tips when mounted. can’t see a mixed setup working without a full redesign of the extruder mount.
the metal mounting plate for the Hexagon is not flat on the top side, and requires a recess in the extruder mount to sit flush. this isn’t a problem for the non-flexy part, i just transplanted the Hexagon extruder components onto the FlexyDually and swapped the motor (Hexagon motor is too large for the dual extruder). the flexy extruder requires a custom mount in order to sit flush on the metal mounting plate for the newer hot end. this raises the position of the flexy extruder, but the nozzles remain level.
since the Hexagon tips are shorter the DuallyCooly/Icefish will not work. i modded the DuallyCooly STL with a lower profile and to accept two 40mm fans on opposite sides, and wired them together so they share a single power supply/control. i also mounted both microfans on the underside of the modded DuallyCooly, and also wired these to share a single power supply/control.
having previously blown a fuse on the RAMBO with a similar double fan setup on my other TAZ (thus had spare fuses), i preemptively exchanged the 5A F3 fuse for a 10A fuse.
you will bottom out your Z-axis before the nozzles hit the bed, and you will bump into screws in the process of trying. using the V2 FlexyDually installation instructions as a guide, i replaced the culprit screw on the frame, removed the Z-level screw and mounted it upside down, and was able to get the nozzles low enough to get the bed level.
the V2 FlexyDually comes with new corner mounts for the heated bed. i used some fender washers and low profile M3 screws as a serviceable alternative.
flashed the TAZ 5 with firmware for the V2 FlexyDually. tested up to 290, clearance across the bed surface is actually improved, and I suspect the combined weight is lower than having both Budas on there!
waiting on some 0.5mm Hexagon nozzles, 0.35 is too small for my taste (jam city) and not ideal for the flexible stuff, although i had modest initial success with some ABS-NINJA prints.
As mentioned in the most recent post, this mod doesn’t seem to work with hex hotends. I attempted to apply this to a dual extruder v2 and the fan shrouds sit 10mm below the nozzles, effectively making the mod unusable. Has anyone modded this?