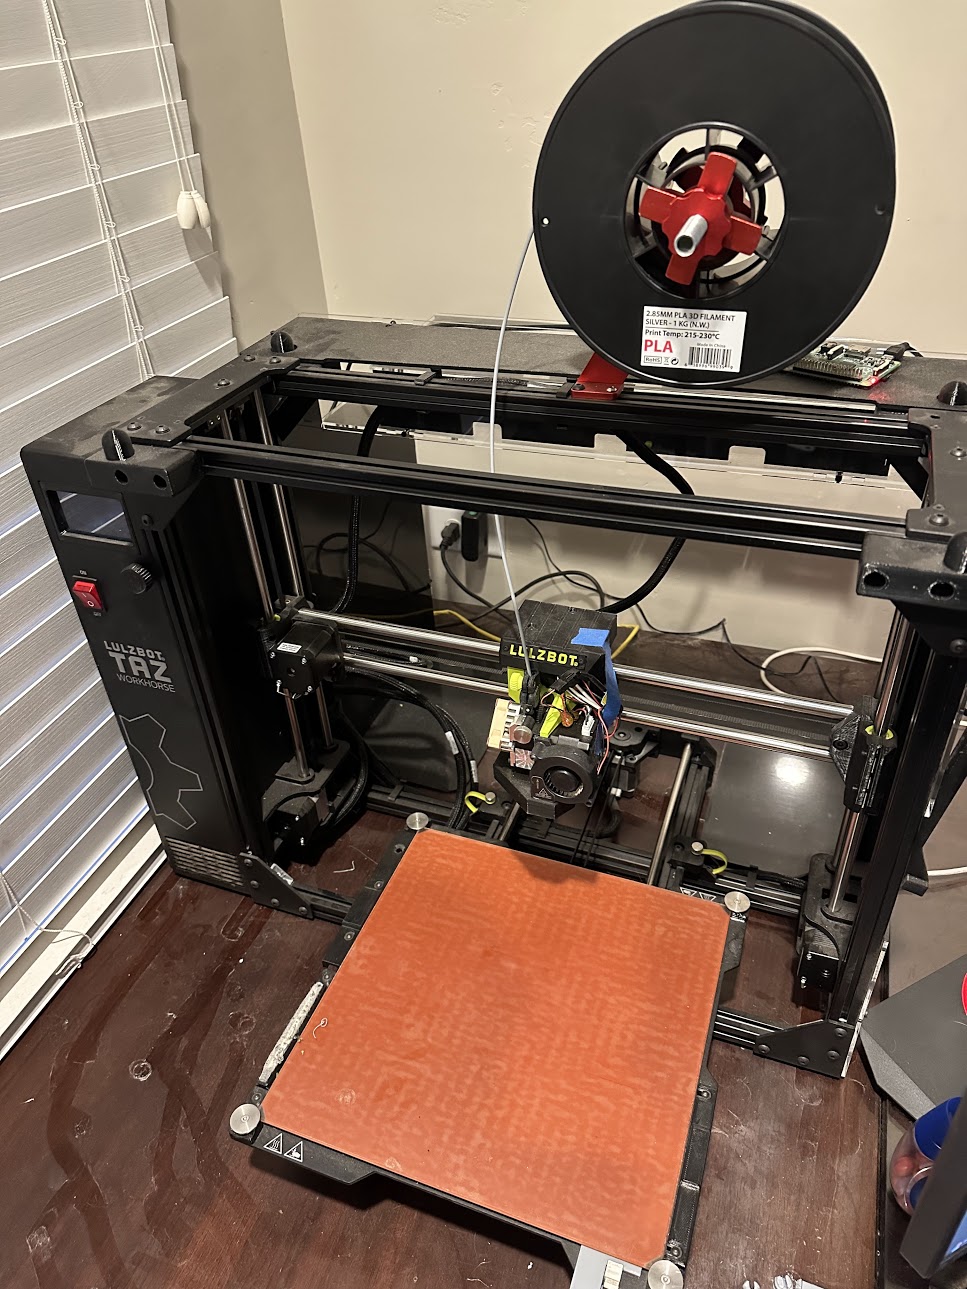
I bought a Taz Workhorse second hand last year in March. I’ve made a few fixes (PEI on the bed was gone when I bought it, you try printing for the first time ever straight on smooth clean glass) and adjusted a few things based on the OHAI pages. The printer came with an Octograb plate, but no magentic bed, and seems to have a different (wrong?) glass plate and bed heater. I am not sure the history of this printer, and have debated sending it in to Lulzbot to have them just do a once over and tune-up on it. There were several missing screws on the print head assembly, some of the belts were over tightened, and a few other issues (including the hot end fan) that I’ve replaced/worked through. Here’s a picture of the printer as it sits (the hot end is the Aerostruder one with the hardened steel nozzle). I’m just not sure if anything else was replaced/modified before I bought it. The person who I bought it from on eBay didn’t mention any of this, and their highly rated at the time account is now banned.
The rest of the printer looks stock-ish. I suspect that print head duct isn’t origional, but the nice thing about a workhorse is they are pretty solid machines as long as you have functioning electronics. Things to check on any used Taz style machine:
are the IGUS bearings on the smooth rods worn. Lift up on the x axis and the bed. You should not be able to move them much more than a fraction of 1mm. if they do move excessivly, you can adjust the bearing holders in or out to minimize that play, but if they are too worn, you may need to replace the 10mm Igus bearings. 2. Check the rods themselves for any scoring, pitting. If the rods feel like they ever had lubrication on them, chances are the Igus bearings are done. (even oil turns into an abrasive slurry with a bit of print dust in it). 3. Check the wire harness ends on the extruder. Are there any signs of wear, any chafing or badly done crimps? Can be a sign of a home buillt extruder passed off as genuine lulzbot hardware. Check the idler arm on the hotend for any signs of cracking or wear, replacement E3D components are cheap and easy to source so thats not a huge deal to deal with. Belt wear, if there is any sign of heavy printer use also consider pulling the belts and checking the 608zz bearings in the idlers on X and Y. Z doesn’t move as much or as fast, so you can usually ignore the components there unless you see a problem.
I think the bed is not original or from this model. The bed heater appears to be adhered to the glass plate, but it is a Lulzbot part. I did find a picture of another Workhorse with the red colored bed, so I’m not clear on that. I think the bearings need replaced the rods are great. I am concerned that the belts might be a bit overtight. The extruder is legit.
I did some bearing checking and found that the bearings below the bed need to be replaced, found a motor with a missing screw, another with loose screws (for bed/extruder movement).
There’s also loose screws on the bearings on the side by the control panel.
This is the bed that is on the printer. It has the heater element glued to the glass plate, and I think was for a different model.
The bed has a foil with 1cm spaced grid and the glass on top is not glued in – it just rests on the foil and the corner washers hold it down – you can flip it over to print on glass vs. PEI surface.
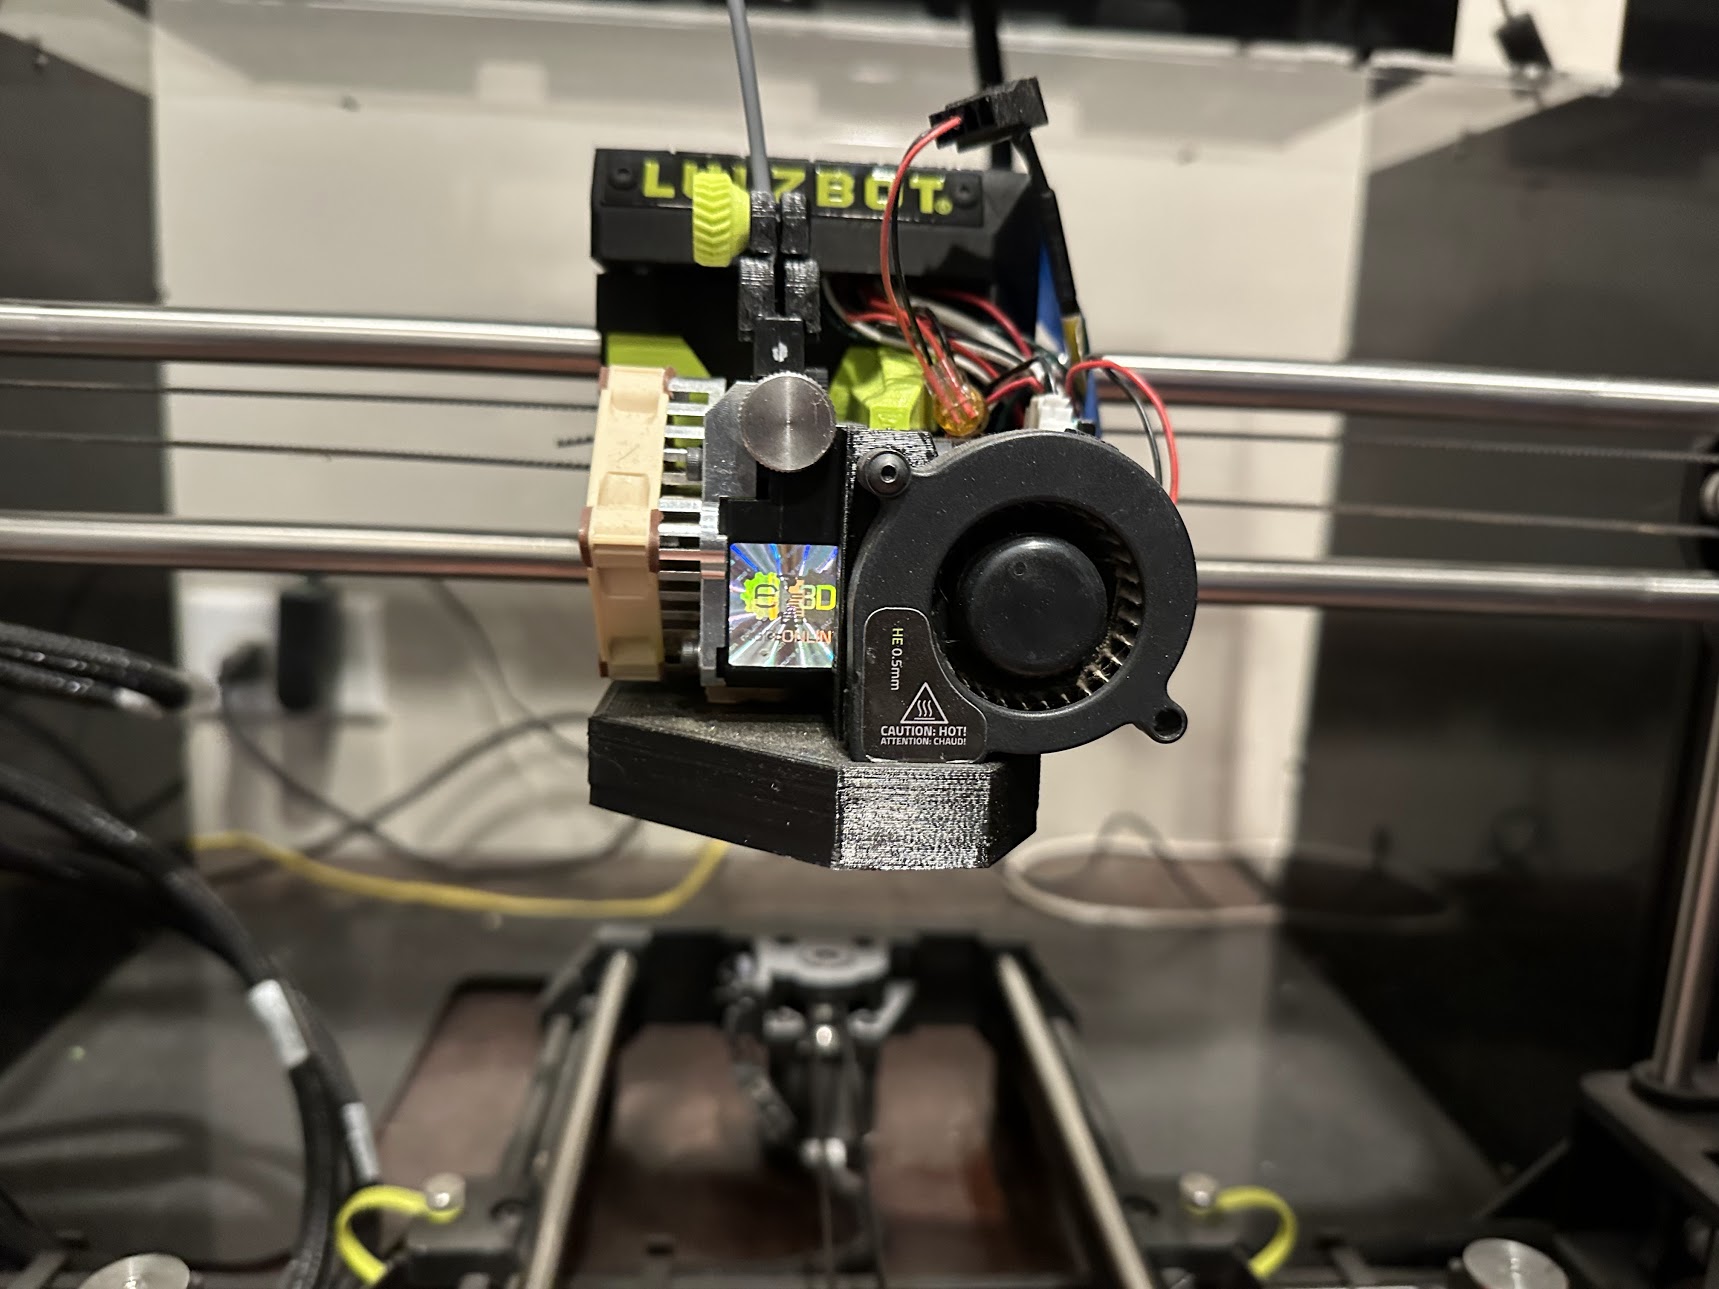
As for the printhead…
There are two cooling fans on a printhead. One is the “part” cooling fan and that’s the variable speed fan that the slicer can control. The other … cools the cold-end of the extruder (to avoid it getting too hot and having filament melt before it reaches the “hot” end of the extruder. That fan is always running whenever the printer is powered on and it is not a variable speed fan.
It looks like the previous owner removed the factory fan and replaced it with a Noctua brand fan. Noctua make good fans. But it looks like they just cut and spliced the wiring to make the fan work. So the wiring isn’t tidy … but as long as the fan is both (a) working and (b) blowing in the correct direction (it should be mounted so that it is blowing air into the aluminum heat sink on the cold end) it should be ok.
I can’t imagine why someone would swap a TAZ Workhorse bed for a TAZ 6 bed. I’m guessing the previous owner may have damaged the bed and happened to be able to get an old TAZ 6 bed – and it does fit. But that’s a wild guess.
You can also get a magnetic flex bed (there are two of them … one has a textured surface). But to do that you basically use the original TAZ Workhorse bed (which you no longer have), remove the glass and replace it with the magnetic base plate – then the surface is placed on top of that. (You also have to update the Z-offset if you switch to a magnetic bed because the magnetic bed sits higher than the glass bed.)
I think I’m going to order a full set of bearings and take the whole thing apart. One of the rods on the bed part moves in the part it goes into by about 1mm, so I need to fix that. I’m going to order the magnetic bed thing and the correct glass bed, along with a few other parts. The fan modification was me when I was struggling with some filament.
The bed (and also the X-axis) glides on stainless steel rods using DryLin bearings. These are self-lubricated bearings (never oil or grease the rods).
They do last a long time but eventually need to be replaced when they have worn enough. My TAZ Workhorse finally is showing some slop on the DryLin bearings so I ordered 2 sets (one to install now and one to keep as spares. The TAZ 5, 6, Workhorse, and Pro all use the same size on the Y-axis.
The part for the BED is:
The X-axis also uses DryLin bearings but they are not the same size (and there are only 3 on the X-axis vs. 4 on the Y-axis bed).
Parts are ordered, new glass plate, new bed heater, magnetic bed because why not, bushings and new nozzle wiper strips. I’ll find any screws at the local hardware store.
New parts are installed. Here is what my prints are looking like. The printer sounds smoother, but prints are bumpy. Anyone have any idea what might need adjusting here?
We need more details on your printer settings. Do you know what size nozzle you have? What was the layer height for the above print? What slicer are you using?
Sure, sorry. Cura 4.13 Beta 2. Nozzle is the .5 Hardened Steel, Taz Workhorse. Using the .3 layer height. Close up of layers from the side is attached here. It’s bumpy all over as in the layers are not smooth lines. I added printed at 235c print temperature higher than recommended on the filament, based on a temperature tower print and the hardened nozzle requiring higher temps. The filament is Inland PLA.
Happy to show more settings, but these bumps in the print lines started after I replaced all the bushings in the printer (X and Y) which were ABSOLUTELY warn out. The Y axis had several mm of play in it before the bushings were replaced.
How about printing something simple like a cube, maybe 10x10x10mm or 20x20x20mm. While it is printing monitor the print for bumps and make note of how the printer sounds and acts, i.e. Is it pausing at the bumps? Is the movement jerky? Do the bumps occur on just one side of the cube? Is the filament dry (if not, you can hear it pop and spit as it is extruding)?
You could reduce the height of the cube to maybe 3mm (10 layers are your current layer height) and take a video with a cell phone (ideally with a tripod).
No popping while extruding, it has been wetter here than normal, but it’s all been snow outside and I have central heating. I will try the cube thing and before I changed the bushings I made an arm for octoprint to time lapse the prints. I’m going to set that up to record a video of the cube. Thanks for always being helpful!