So I may have kind of bought a thermal cam module, and I wanted to see what my Taz looks like under temperature. My intent is to replace the glass heated bed with an aluminum plate once the replacement parts get here (to enable inductive auto leveling amongst other benifits) so I wanted to get a good baseline. I also still have my buddaschnozzle attached even though i do have the parts to make a hexagon hotend on my desk. So, I figured I would get a baseline of that. If anyone would be interested I could take video as well, or specific shots of whatever components. My Taz started out life as a 3, upgraded most of the way to 4/5 spec. So the heated bed itself at this point is the one that would have shipped with a 3, with a different PEI coating, etc. These pictures may or may not be representative of the bed in a 4 or a 5 at this point. I don’t think the parts have changed all that much, but I don’t have one to compare it with either.
Overall findings so far:
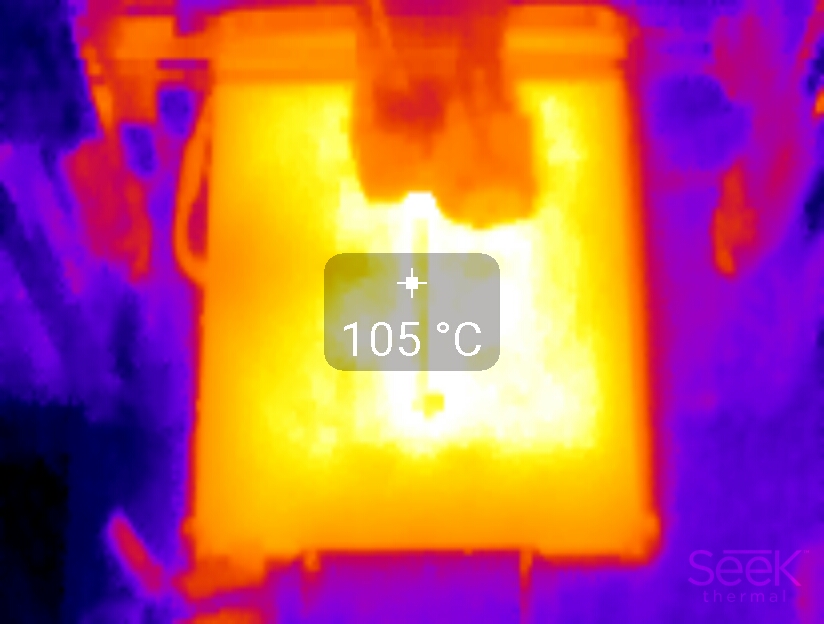
There is a cold spot on my bed in the exact center, and following the cable back from the center to the edge. It is on average 20 degrees F (6 degrees c) cooler in that spot.
The cables in my Taz operate at about 70 degrees F overall.
The heated bed when set to 92c is reaching 86c at its hotest points. located at in from the corners about 50mm on all 4 sides.
The heated bed cable is probably acting as a heat sink.
The bottom of the extruder motor and the cables to the hot end get warm.
I’m not great yet at taking thermal pictures with a cell phone.
This was static, not in motion at all so no air movement is in effect
Holding a thermal camera at an angle makes one side of the bed look colder, when it actually isn’t (other than the aformentioned cold spot)
There was no sign of a zig zag grid initial heat pattern in the heated bed as seen in the heated bed review that someone else posted on the reddit forum a while back.
Here’s a partial transparancy of the bed picture fit over the heated bed. It’s pretty close except for the corner I am missing, but don’t assume it is 100% to scale
If your thermal camera has an adjustable emissivity setting, you should calibrate the camera to the emissivity of the surface you are measuring. Emissivity can change with temperature so, make the adjustment at operating temps if you can.
An easy way to do this is to place black electrical tape, which has an emissivity of about 0.97, on the surface you want to measure. Set the emissivity on the camera to 0.97 and measure the temperature on the tape. Then, look at the temperature adjacent to the tape and adjust the emissivity the value on the camera until the temperature reading matches what you saw on the tape. That will be the emissivity of the surface you want to measure.
In the case of surfaces that are to hot or cold curvy for the tape, substitute black tempura paint for the tape.
This procedure will help ensure you are seeing accurate temps with the camera.
Here is a link to emissivity values for common materials.
I’m pretty sure this one doesn’t have manually adjustable emmissivity yet. It uses the onboard temperature sensor of the phone to get the base ambient temperature, beyond that the temperatures might have some fluctuation. I spot checked some things with my point and shoot infrared thermometer, but it may have the same exact inherant issues.
I’ll try the other proceedure and see if I can figure out a manual offset for the numbers if nothing else.
So, interesting follow up. I purchased a second heated bed unit to use with my new Aluminum heated bed plate test. The existing one was a Taz 3 era unit, the new one is Taz 5 equivelent. Ignore the spots, those are air bubbles I haven’t removed from the surface material yet, but the main takeaway is that the new bed doesn’t have the cold spot the old one has.
I don’t believe this is due to the aluminum bed. The aluminum bed might transfer heat differently, but it would still show a temperature differential in that spot if one existed. So, now i’m puzzled. Is there a model difference in the actual bed heater between the 3 and the 5? They look about the same. Is my 3 bed partially burned out?
Yes, The time at which that picture was taken was about the same. it’s wierd though, the other bed as it heats up has that spot that is just colder all over. The new one heats up evenly from the start. If they weren’t so expensive I’d be half tempted to get another heat bed and replace the heater on the bottom of the glass bed.
This thing will do video too if anyone would be interested to see a full heat cycle.
I think its the aluminum causing more uniform heating. I took a quick pic while I was printing an object, and the bed seems to have distinctive hotspots also. This is a newly replaced bed due to the PEI bubbling. If you flip the bed around, you can see faint outlines of the nichrome wire pattern.
Huh. Interesting to see the stock 5 bed there for comparison. What temperature did you have the bed set at there? Mine were only at 80 in those pictures.
The aluminum bed is a little thicker than the glass bed, I wonder if it takes a bit longer to get up to temperature for that reason. It seems to hold heat well enough and get all the way to temperature after a bit though.
The aluminum bed on my Printrbot Simple varies from the heatbed thermister by ~8C. The glass and PEI seems to be about ~5C. As for speed to reach temp, its hard for me to evaluate since they use different PSU voltages… The PSM’s 8x8 print bed required ~12 minutes to get to 100C vs the TAZ which is only ~8 minutes.