@ Anson, ya I have no idea really, maybe it doesn’t like the extra heat… but I must say, if you’re using slurry with PEI, really defeats the purpose to begin with, there’s got to be something going on there. I’ve had nothing but successful prints since I put in my PEI, literally kinda shocked at how well it worked right off the bat, I was expecting some drama to get it dialed in but no…
I know a lot of other people love it also…if you read through the threads, first layer height seems like a critical issue with PEI, BUT even at that, when I had the mini on loan, that thing would mash in the first layer so hard that the bottom of the finished part looked like an injection molded plastic part, and it would just pop off with ease after a 30min cool down…
just replaced my PEI sheet, and it is definitely behaving differently. Not sure what the difference was from the original sheet, but I’ve done several prints already and only used isopropyl alcohol to clean the bed. The PEI works beautifully! Maybe a faulty sheet?
Yeah, no idea, oh well, good to hear it’s working now though…
In my PEI adventures, I’ve tried a couple different sheets to see which ones work best. I really like the one I got from Mcmaster Carr, but one side of it definitly is less effective than the other. There is a Shiny side and a Matte side. The Matte side seems to work best.
For those interested in needing a new PEI sheet, I ordered this one http://catalog.cshyde.com/item/ategories-tapes-with-adhesive-specialty-film-tapes/ultem-tape-with-adhesive/ultem-tape-36-10a-12-x-12?&bc=100. It has the adhesive on there already which is really nice and works much better than my original one
So I work in a lab at the university I attend, and was able to use our thermal camera to examine around this enclosure and see how well it does at containing the heat from a thermal standpoint. There are a few spots that will need to be addressed to help make this enclosure more efficient (upper back fan and lower back opening where the cables come out), but overall the high contrast of blue and white show that it’s containing that heat well. For those interested, I did take an old bike tube and cut out a piece of rubber and put it in between the top printed piece and wood. I cut a slit to allow the filament tube to move around. You can see from the top picture that it works well in keeping the heat in. I would suggest to anyone building this enclosure to do the same to trap the heat from escaping through the top. Very happy with this enclosure!
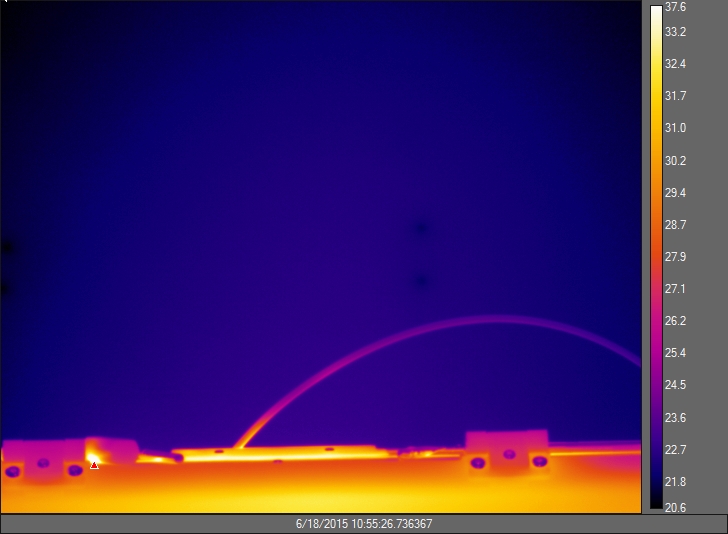


Anson,
Pretty cool man, thanks for the free analysis of the current design  …
…
I think it would be interesting to see how hot it could get with some modifications to some of the stock parts, I think if the box were fully closed, like completely closed, with out the ebox vent and some of the other holes and air gaps, it could probably get pretty hot, maybe push 50C…BUT keep in mind, the hotter you go, the harder it is on components, so I think the current heat capacity at around 40C is as high as one should be going without extra modifications for cooling components, it’s a nice balance of good hot printing environment while not being too hard on parts…
I’m still waiting for someone to do a fully watercooled version with an extra heater inside to push temps into the 70C range!!! who will be the first, don’t make me try it. If you are going to try that, some things to think about would be having the steppers water cooled (would require specially made heatsinks for the steppers)…you’d need to replace all the 3D printed parts with CNC machined aluminum, which would not be cheap but within reason. Would probably have to locate the ebox to the outside of the unit, probably the biggest complication of a build like that…
I actually have a bunch of leftover water cooling pumps, water blocks and equipment. I’ve just never been able to bring myself to add all that extra mass to the X Carriage.
I’ve also thought about building a heat capture plenum chamber under the heated bed to try and get more even heat to the edges. It’s nice to see that heater higher temperature spot in the middle isn’t just my imagination.
I need a FLIR cam!
Extra mass???
My whole idea was to have custom aluminum water blocks machined with CNC, each block would be able to be screwed or coupled to a stepper motor and would have an in and an out port for hosing…??? honestly that wouldn’t be that much extra mass would it?..then you just run all your tubing to each block and a series and connect it to a PC water cooler…2. swap all the ABS parts for CNC machined parts, 3. Somehow wire things up so the ebox can remain outside the enclosure. 4. add an extra heat source of your choice and push those temps up as high as you can get them without frying the steppers 
I was thinking you would want to cool the upper end of the hotend in place of the always on cooling fan. You would have to run a water line out to the hot end and back, plus some sort of water block or metal tube around the air cooling fins. The motors can get a bit warm, but only time I have ever had one get excessively hot was when a bearing failed on the old Y axis motor from my AO-100. You could cool all the motors really easily. The X, Y and extruder motors are the only ones that move enough on a regular basis to generate any heat though.
So you’re thinking with the higher temperatures of an excessively heated box, it might affect the hotend? That’s interesting, never thought of that…I’m pretty sure the X, Y and E steppers would need some sort of cooling also. Maybe make some kind of heatsink system for the extruder and E stepper, have them connected by tubing and or just have one block for both with the hosing going out from there…
yes, you could probably just get away with some small fans on the Z steppers, might not need water cooling, especially since they’re down so low also. I’m super tempted to experiment but I need a spare Taz, just don’t have the guts to play around with my perfectly awesome working taz atm. 
Finally got the door today and installed.
Need some lower density weather stripping, the stuff I used is a little too stiff and doesn’t make a perfect seal.


My uncle finally got his laser cutter fixed up and just cut these bad boys out today. His max dimension is 24" so if you look closely some parts were cut with a dovetail and pieced together which I will seal from the inside to get rid of any heat creep.


Guys, seriously, I’m impressed.
@ Catz, WOW, how good does that look with the paint… looks like you added a few custom touches, love it!
@ nbm, super nice also, did you read a few posts back about how I made a mistake with the drill hole size for four the magnet closure holes…the four small wood screws we provided for that probably won’t work. All you have to do is just substitute four machine bolts with a flat head, if they’re too long, just cut them. Or you can use a slightly larger flat headed tapered machine screw and it might catch the acrylic and make some threads…there are definitely options.
So how much did it cost to have everything laser cut?? I think a lot of people would like to go that route as it would cut down on a lot of work… who knows, maybe we can work something out that will make you a bit of money also, if we continue to sell more kits. Let’s chat here or PM if you want.
So anyway, it’s really awesome to see these finished builds guys, thanks for posting all your work! it’s a real trip to see people following the instructions and coming out with a nice finished product! IDK, to me, just takes the taz to a whole new level…turns it into a kick ass semi-industrial work station! Cleans it up, makes it look purposeful.
So we sold out of our original batch of kits and we’re debating whether to order more… so if you’re interested, please let me know here or PM. I’d be looking for another 10-20 interested people and I would go ahead and do the ordering. They will however be a little more expensive this time around. Slightly underestimated the amount of prep and work involved in the whole process with the first round of kits
Finished up my build this weekend too. Not as pretty as some of the other ones, but I’m still glad to have this one!

Bah, looks fine! looks like some slight personalization also with the rear fan mounted in the center instead of off to the side…cool! Thanks for the share!
I only paid for the materials and got my uncle to cut them out, not sure he has the free time to be cutting a bunch of these out for people. I didn’t see the post about the size, I guess they were too big? Looks like I am going to have to make a stop at the hardware store.
Ok I see, thought they were cut by a shop. No ofcourse, if it was just a favor then forget it.
Well, when you get to the point of installing the magnet plates, see how it works and let me know. Like I mentioned a few posts prior. If you have to buy new screws to get things to work, I can paypal you a refund for that cost of the screws. Just let me know when you get there.