SENT: M503
SENT: M105
READ: echo:busy: processing
busy: processing
SENT: M105
READ: echo:busy: processing
busy: processing
SENT: M105
READ: X:-18.10 Y:303.50 Z:15.00 E:0.00 Count X:-2010 Y:30350 Z:24000
READ: ok P13 B0
READ: ok P13 B0
READ: ok T:20.50 /0.00 B:20.82 /0.00 @:0 B@:0
READ: ok T:20.62 /0.00 B:20.99 /0.00 @:0 B@:0
READ: echo:  G21    ; Units in mm (mm)
G21    ; Units in mm (mm)
READ: echo:  M149 C ; Units in Celsius
M149 C ; Units in Celsius
READ:
READ: echo:; Filament settings: Disabled
; Filament settings: Disabled
READ: echo:  M200 S0 D2.85
M200 S0 D2.85
READ: echo:; Steps per unit:
; Steps per unit:
READ: echo: M92 X100.00 Y100.00 Z1600.00 E426.21
M92 X100.00 Y100.00 Z1600.00 E426.21
READ: echo:; Maximum feedrates (units/s):
; Maximum feedrates (units/s):
READ: echo:  M203 X300.00 Y300.00 Z5.00 E40.00
M203 X300.00 Y300.00 Z5.00 E40.00
READ: echo:; Maximum Acceleration (units/s2):
; Maximum Acceleration (units/s2):
READ: echo:  M201 X9000.00 Y9000.00 Z100.00 E9000.00
M201 X9000.00 Y9000.00 Z100.00 E9000.00
READ: echo:; Acceleration (units/s2): P<print_accel> R<retract_accel> T<travel_accel>
; Acceleration (units/s2): P<print_accel> R<retract_accel> T<travel_accel>
READ: echo:  M204 P500.00 R3000.00 T500.00
M204 P500.00 R3000.00 T500.00
READ: echo:; Advanced: B<min_segment_time_us> S<min_feedrate> T<min_travel_feedrate> X<max_x_jerk> Y<max_y_jerk> Z<max_z_jerk> E<max_e_jerk>
; Advanced: B<min_segment_time_us> S<min_feedrate> T<min_travel_feedrate> X<max_x_jerk> Y<max_y_jerk> Z<max_z_jerk> E<max_e_jerk>
READ: echo:  M205 B20000.00 S0.00 T0.00 X8.00 Y8.00 Z0.40 E10.00
M205 B20000.00 S0.00 T0.00 X8.00 Y8.00 Z0.40 E10.00
READ: echo:; Home offset:
; Home offset:
READ: echo:  M206 X0.00 Y0.00 Z0.00
M206 X0.00 Y0.00 Z0.00
READ: echo:; Auto Bed Leveling:
; Auto Bed Leveling:
READ: echo:  M420 S0 Z0.00
M420 S0 Z0.00
READ: echo:  G29 W I0 J0 Z2.42300
G29 W I0 J0 Z2.42300
READ: echo:  G29 W I1 J0 Z2.05787
G29 W I1 J0 Z2.05787
READ: echo:  G29 W I0 J1 Z2.04687
G29 W I0 J1 Z2.04687
READ: echo:  G29 W I1 J1 Z1.37625
G29 W I1 J1 Z1.37625
READ: echo:; Material heatup parameters:
; Material heatup parameters:
READ: echo:  M145 S0 H200.00 B65.00 F0
M145 S0 H200.00 B65.00 F0
READ: echo:  M145 S1 H245.00 B110.00 F0
M145 S1 H245.00 B110.00 F0
READ: echo:; PID settings:
; PID settings:
READ: echo:  M301 P22.12 I1.94 D63.59
M301 P22.12 I1.94 D63.59
READ: echo:  M304 P162.00 I17.00 D378.00
M304 P162.00 I17.00 D378.00
READ: ; Controller Fan
READ: echo:  M710 S255 I120 A1 D60 ; (100% 47%)
M710 S255 I120 A1 D60 ; (100% 47%)
READ: echo:; Power-Loss Recovery:
; Power-Loss Recovery:
READ: echo:  M413 S0
M413 S0
READ: echo:; Retract: S<length> F<units/m> Z<lift>
; Retract: S<length> F<units/m> Z<lift>
READ: echo:  M207 S3.00 W13.00 F2700.00 Z0.00
M207 S3.00 W13.00 F2700.00 Z0.00
READ: echo:; Recover: S<length> F<units/m>
; Recover: S<length> F<units/m>
READ: echo:  M208 S0.00 W0.00 F480.00
M208 S0.00 W0.00 F480.00
READ: echo:; Auto-Retract: S=0 to disable, 1 to interpret E-only moves as retract/recover
; Auto-Retract: S=0 to disable, 1 to interpret E-only moves as retract/recover
READ: echo:  M209 S0
M209 S0
READ: echo:; Z-Probe Offset (mm):
; Z-Probe Offset (mm):
READ: echo:  M851 X0 Y0 Z-0.06
M851 X0 Y0 Z-0.06
READ: echo:; Linear Advance:
; Linear Advance:
READ: echo:  M900 K0.05
M900 K0.05
READ: echo:; Stepper motor currents:
; Stepper motor currents:
READ: echo:  M907 X175 Y175 Z200 E160 B0
M907 X175 Y175 Z200 E160 B0
READ: echo:; Filament load/unload lengths:
; Filament load/unload lengths:
READ: echo:  M603 L40.00 U50.00
M603 L40.00 U50.00
READ: echo:; Backlash compensation:
; Backlash compensation:
READ: echo:  M425 F0.00 X0.00 Y0.00 Z0.00 S3.00
M425 F0.00 X0.00 Y0.00 Z0.00 S3.00
READ: echo:; Filament runout sensor:
; Filament runout sensor:
It looks set to S0 Z0.00
So fade isn’t enabled, it’s not that.
The front-right corner seems like an outlier, but that wouldn’t cause a difference between layer 1 and 4.
Also, an aside, I find it amusing they subdivide the leveling grid from four points. Does nothing but take up some of the limited memory.
Yeah this one is very intriguing.
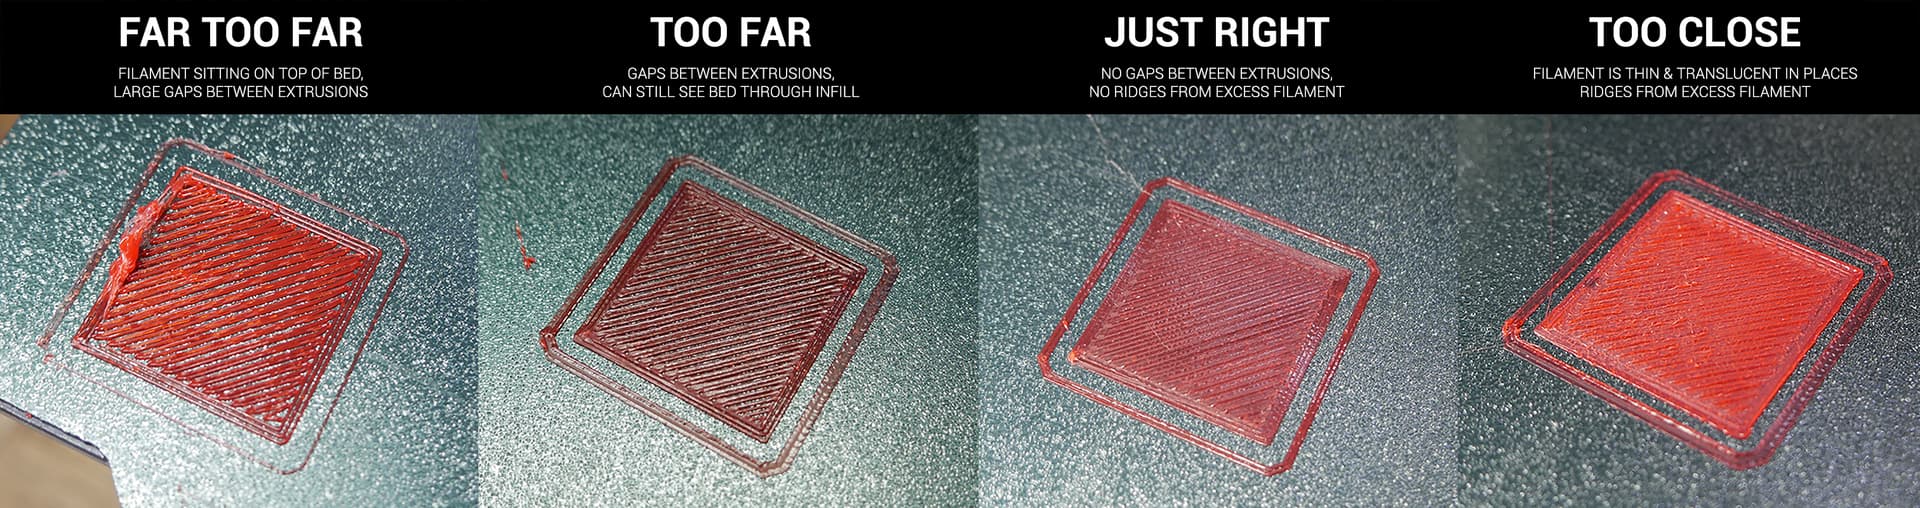
As I adjust the Z offset, i go from big ridges of material to gaps in lines on the first layer.
I have a long rectangle test print I like to do. That gives me plenty of time to make some changes while printing and seeing how it is going.
I’m printing at 210C and as I mentioned, mostly defaults.
As I start the print, it looks as though I am printing too close as the beads smoosh out the material to the sides, causing those tall ridges. As I slowly bring the nozzle away, trying to get that smoother layer, I can start to see the gaps between lines.
To those following along and wondering what we’re trying to dial in, here’s a graphic I grabbed elsewhere
I seem to be either at Too Far or Too Close. I’m struggling for the sweet spot!
The only other thing I’d mention is I am using the magnetic Wham Bam spring steel surface. But that’s worked just fine for other prints.
I am a bit curious about the leveling this machine does. I don’t feel like it’s totally accurate - I really miss my BL Touch! 
If you want to swap to BLTouch and keep the M175v2 on the Taz 6, I’ve got firmware and a modified shroud for doing just that. My Taz6 at home is heavily modified, but the one here at work is still Rambo + BLTouch + Magnetic print surface + M175v2.
Yeah I would be interested in that, teach us how that’s done!
Modified firmware: Taz6-BLTouch-M175v2_firmware.hex - Google Drive
The default offsets are set for the (preferred) front mount using my modified M175v2 blower shroud:

https://www.printables.com/model/508624-lulzbot-m175v2-bltouch-toolhead-adapters
I use a BLTouch and an extended wiring kit, which connects to the board like this - wire colors may not match your extended wiring! Check your manual if you use a clone
Does this require a motherboard upgrade?
Nope. This is on the factory rambo board, as per the diagram.
Well now I have to go buy some matching filament!
Nah, make it your own!
Sadly, the only PETG I had at work was black, so it looks boring. I think I’m going to find a signature color to do all the modified parts on these machines here, just so it’s obvious what is my parts.
A couple other notes on that firmware - I have the X-twist wizard enabled, as well as bed skew correction, so go through those steps to get the 6 even more dialed in.
I forgot the modified startup gcode, I’m no longer at the machine, so it’ll have to wait until tomorrow to get the right one.
Ah yes probably not a good spot for PLA. I have some ColorFab nGen High Temp I could use
Well, I think I am going to use ABS since looking at my pile of materials, that would print with ease on my Ultimaker 2+. I do have some of the Taz Green Polylite after all. And for just a mount and shroud - I am really tempted to go green, since that’s what’s probably on there now?
Well I dug through my parts containers and thankfully found a super long BL Touch wire. Anytime I buy stuff from Filastruder, I also include a few spares since they always have them handy
I have a BL Touch 3.1 but I think I pulled this from a machine and wasn’t sure if it was good or not. Maybe I’ll just go place an order for a new one!
I routed the BL Touch wire through the extender wire bundle and into the back plate. Will this touting cause any noise? Next up is to remove the side plate at attach it as per the diagram.
I downloaded your “front” version of the mount since I’m pretty much just copying your setup 
Startup GCODE for PRUSASLICER!
;This G-Code has been generated specifically for the LulzBot TAZ 6 with BL Touch and M175v2
M73 P0 ; clear GLCD progress bar
M75 ; start GLCD timer
M107 ; disable fans
M420 S0 ; disable leveling matrix
G90 ; absolute positioning
M82 ; set extruder to absolute mode
G92 E0 ; set extruder position to 0
M140 S{first_layer_bed_temperature[0]} ; start bed heating up
M104 S{first_layer_temperature[0] - 60} ; start bringing nozzle temp up before probing
G28 XYZ ; home all
M109 R{first_layer_temperature[0] - 60} ; wait for extruder to reach probe temp
; start ABL sequence for used area
G29 ; probe bed
M420 S1 ; enable leveling matrix
M204 S500 ; restore standard acceleration
G1 Z15 F5000 ; Raise Z

M300 P214 S147 ;tones for level complete
M300 P214 S440
M300 P214 S294
M300 P214 S349
M300 P214 S220
M300 P214 S330
M300 P214 S440
M300 P214 S349

M400 ; wait for moves to finish
M117 Heating... ; progress indicator message on LCD
M109 R{first_layer_temperature[0]}  ; wait for extruder to reach printing temp
M190 R{first_layer_bed_temperature[0]} ; wait for bed to reach printing temp
M117 Heating... ; progress indicator message on LCD

G0 Z5; lift Z
M117 BLulzot Printing... ; progress indicator message on LCD
End GCODE for PRUSASLICER
M400                                      ; wait for moves to finish
M140 S40 ; start bed cooling
M104 S0                                   ; disable hotend
M107                                      ; disable fans
G91                                       ; relative positioning
G1 E-1 F300                               ; filament retraction to release pressure
G1 Z20 E-5 X-20 Y-20 F3000                ; lift up and retract even more filament
G1 E6                                     ; re-prime extruder
M117 Cooling please wait                  ; progress indicator message on LCD
G90                                       ; absolute positioning
G1 Y0 F3000                               ; move to cooling position
;M190 R40                                  ; wait for bed to cool down to removal temp temp disabled
G1 Y280 F3000                             ; present finished print
M140 S0                                   ; cool down completely
M77					  ; stop GLCD timer
M84                                       ; disable steppers
G90                                       ; absolute positioning
M117 Print Complete.                      ; print complete message
After layer change code for PRUSASLICER
; LAYER:{layer_num}
M117 Layer: {layer_num +1} / [total_layer_count]
Color change GCODE for PRUSASLICER
M400 ; ensure all movements are complete
M600 B10 X115 Y-10 Z10 ; move nozzle up 10mm, and in front of bed
M190 S{bed_temperature[0]} ; ensure heat is restored in case case of delayed change
M109 S{temperature[0]}
That should be all you need to get it going.
Yeah I don’t use Prusa Slicer.
Just Cura or S3D
Here’s the placeholders modified for CuraLE:
;This G-Code has been generated specifically for CuraLE the LulzBot TAZ 6 with BL Touch and M175v2
M73 P0 ; clear GLCD progress bar
M75 ; start GLCD timer
M107 ; disable fans
M420 S0 ; disable leveling matrix
G90 ; absolute positioning
M82 ; set extruder to absolute mode
G92 E0 ; set extruder position to 0
M140 S{material_bed_temperature_layer_0}    ; start bed heating up
M104 R{material_probe_temperature}          ; start heating extruder during probe
G28 XYZ ; home all
; start ABL sequence for used area
G29 ; probe bed
M420 S1 ; enable leveling matrix
M204 S500 ; restore standard acceleration
G1 Z15 F5000 ; Raise Z

M300 P214 S147 ;tones for level complete
M300 P214 S440
M300 P214 S294
M300 P214 S349
M300 P214 S220
M300 P214 S330
M300 P214 S440
M300 P214 S349

M400 ; wait for moves to finish
M117 Heating... ; progress indicator message on LCD
M109 R{material_print_temperature_layer_0}  ; wait for extruder to reach printing temp
M190 R{material_bed_temperature_layer_0}    ; wait for bed to reach printing temp
M117 Heating... ; progress indicator message on LCD

G0 Z5; lift Z
M117 BLulzot Printing... ; progress indicator message on LCD
End GCODE is unchanged from PrusaSlicer
CuraLE doesn’t give you options to customize color change or layer change gcode, so startup is the only change.
Thanks
Part of my goal with this is to make a video about it, so sticking with the existing Cura LE slicer is important.
I’m at work still but looking at the M175, it looks like I just remove the 3 screws from the bondtech, place the new duct in, then reattach?
EDIT - well maybe not? I am looking at the OHAI assembly and it’s a bit vague how the blower duct attaches?
Just a single screw. Lower back bondtech screw.
1 Like