then I restored failsafe > beep confirmation
then I entered factory defaults from factory
Esteps/mm: 0830 > 0846.0 > beep confirmation
zoffset : -1.5 > -1.361 > beep confirmation
Same result:
build plate endstop–>wipe–>front left–>front right–>rear right–>**not rear left (new behavior -->heat up nozzle position
reachs prints temp
moves to print position
nozzle will hit bed b4 reaching print location.
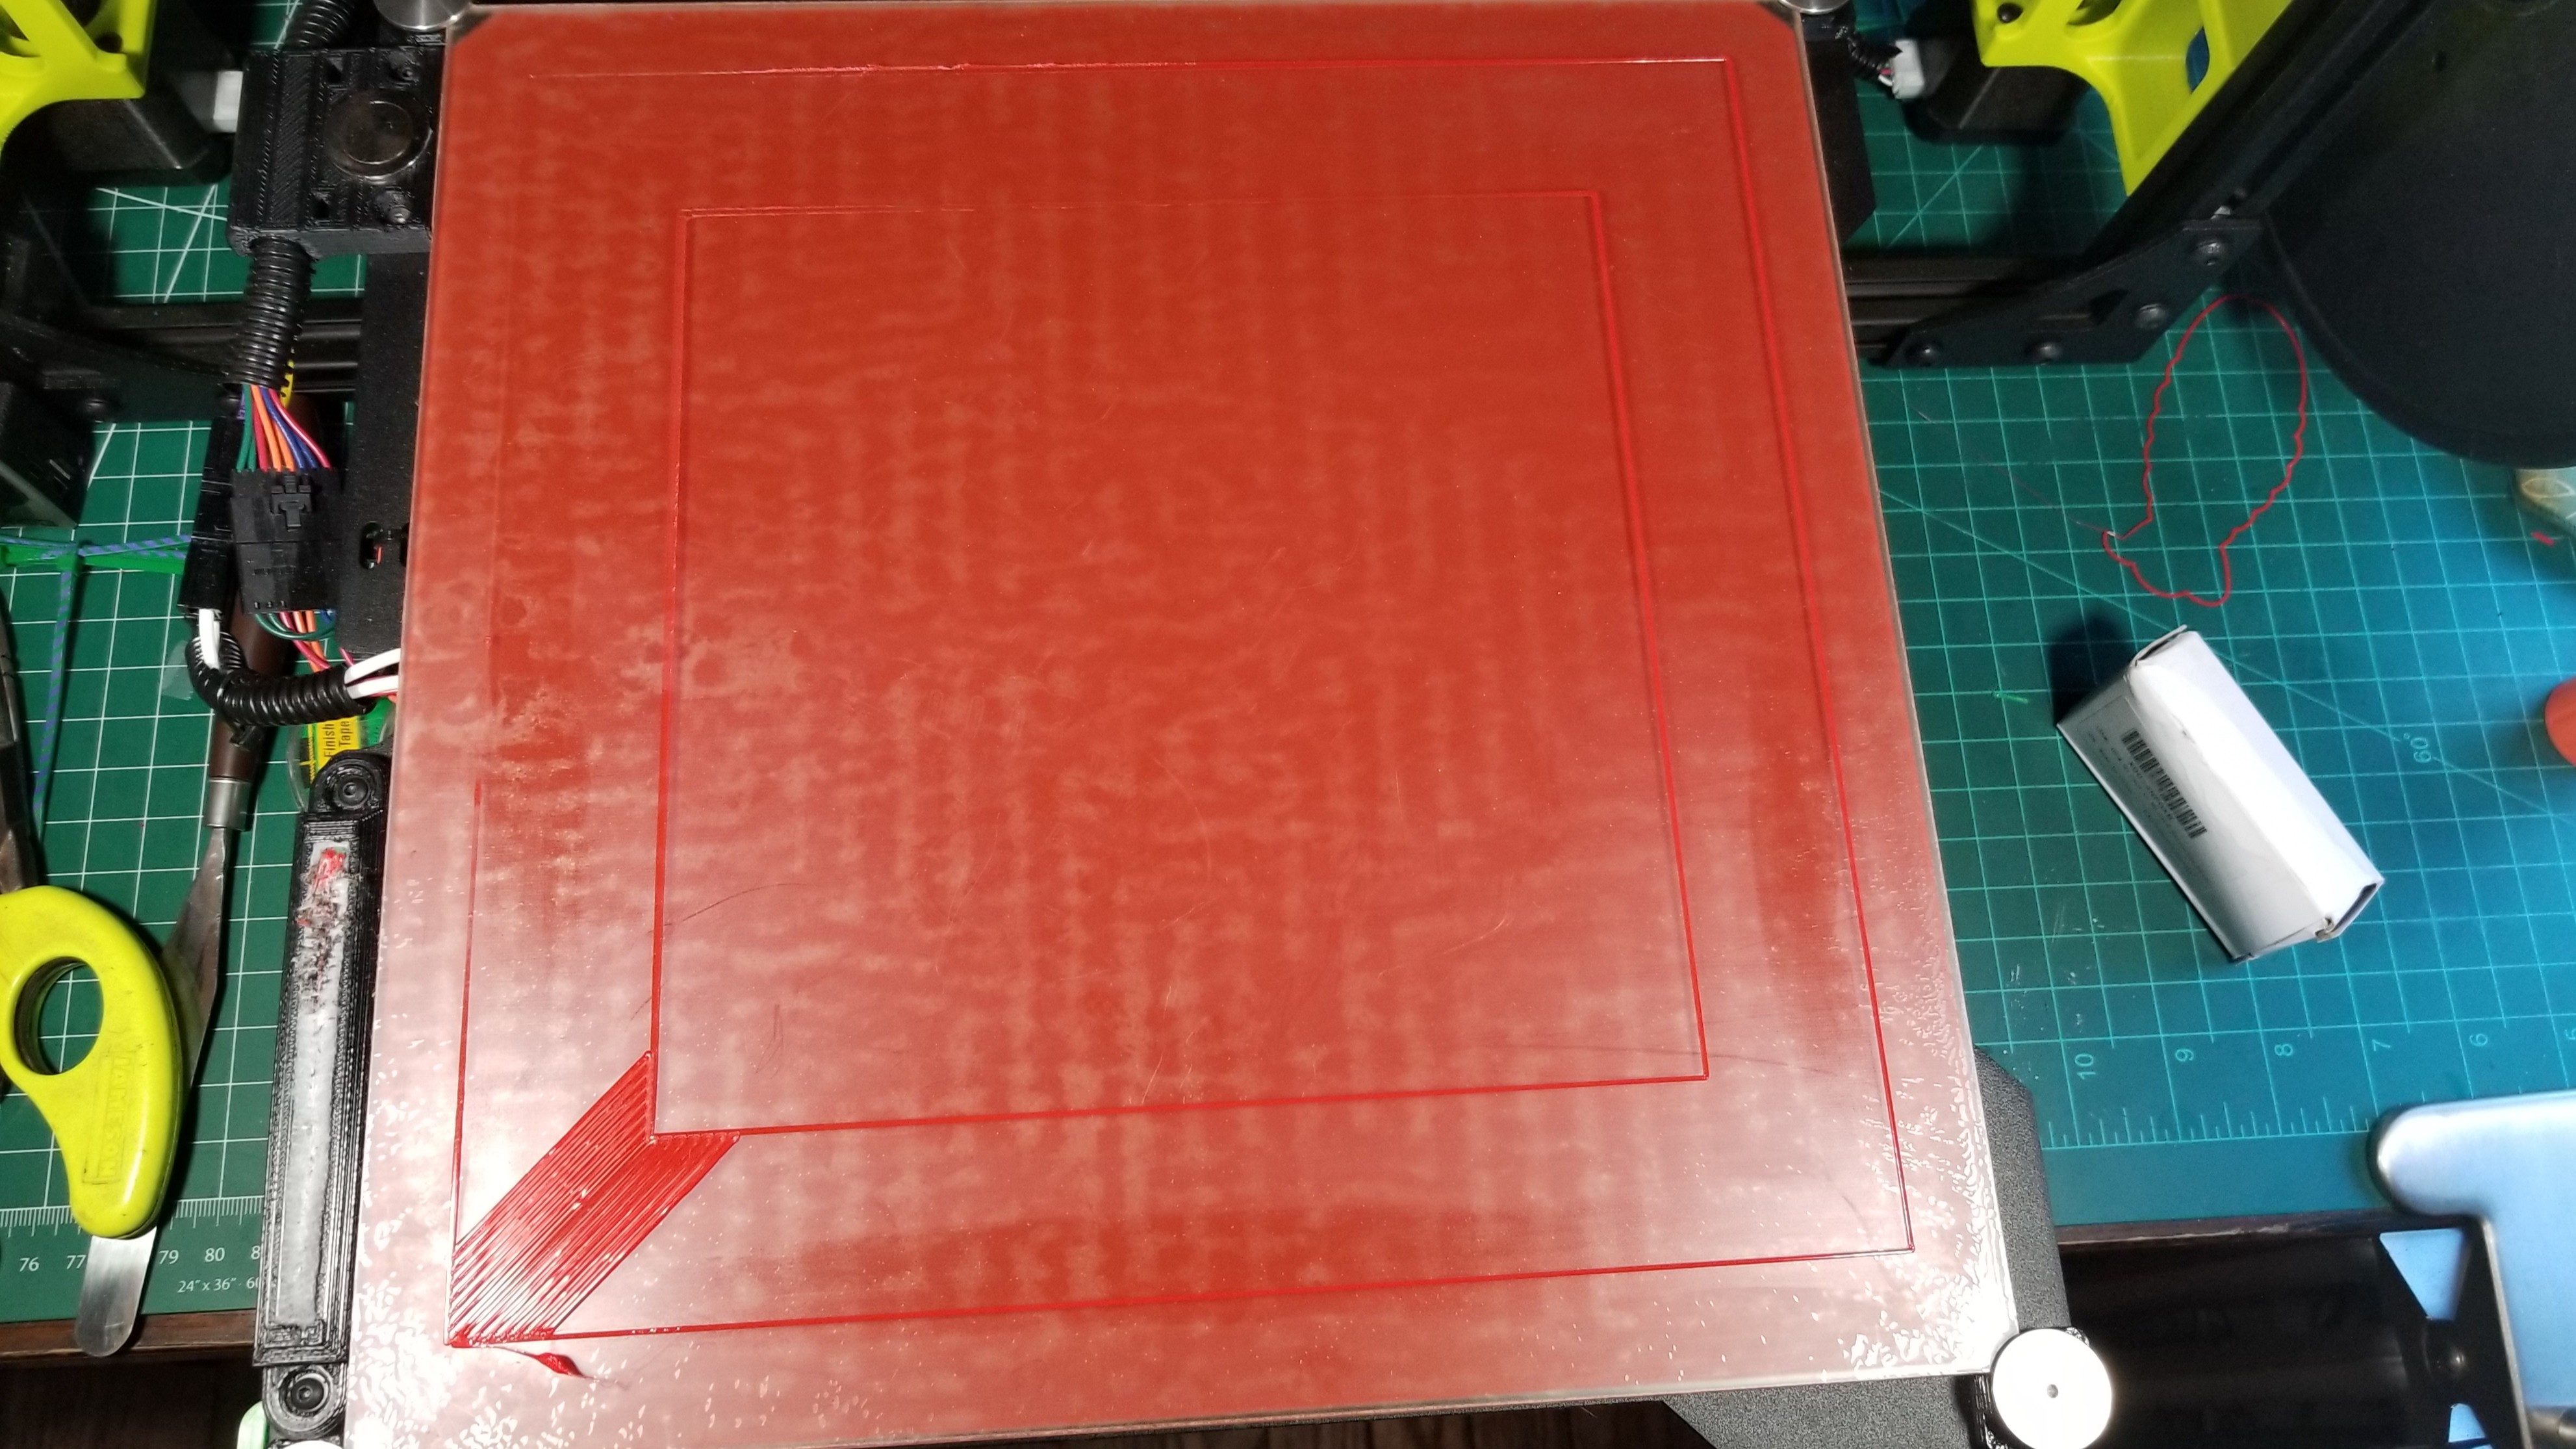
Print head did not crash into bed this time. First layer is too close to bed, but I can adjust it up away from bed.
So seems if upgrading to new firmware, factory calibrated settings no longer valid?
I’ll keep the estep settings from factory until I get over or under extrusion.
Ok I’m printing away. I dont know what issue i had at first. May have been not loading the failsafes 1st. But i’ve adjusted my z height and I seem to be back in business.
Is m600 filament change not impletmented yet?
I cant find in printer menu’s. When Octoprint issued command (M600 Z50) during a test print nothing happened. Print head stayed on print. When I look in console the command was received by printer, which returned “ok” back to console.
I have different printer from another manufacturer (prusa mk2s) with a newer version of marlin. When it gets a change filament command during print from lcd or Octoprint:
Prusa MK2S
it tells me on lcd - finishing section or layer cant remember (awesome)
Hotend moves away from model
retracts filament
turns off power to hot end (key feature)
leaves hot bed on to keep adhesion.
When I return, I heat up extruder, load filament, extrude a little to prime nozzle
then I can hit resume on Octoprint which issuse’s command M601 and printer resumes.
Lulzbot Taz 6 old firmware.
I hit change filament in lcd or Octoprint
Hotend stops where ever it is in model (bad)
Hotend moves away from print
retracts filament
leaves hotend on
leaves hot bed on.
When I return, I load new filament, extrude a little to prime nozzle, then I must hit resume on both printer and resume on Octoprint.
I must say I prefer the 1st approach. I’m using this feature with a filament sensor. Once a break in filament is detected a change filament command is issued to the printer. So having the hotend cook the filament until I return to change it is far from ideal. It can lead to jams and other issues. I wish you would consider this case use when filament change is implemented. Also the place it chooses in the gcode to pause is another point to consider. Maybe during infill or at least finish a section/layer with a retraction not where ever.
Anytime I paused the Taz 6 under the old firmware it seems it always picks a wall layer to pause at, which makes an unattractive surface finish. The hotend sits on the model just long enough to melt a small portion of model before it moves away. So I have to try and be very careful where I pause with Taz 6.
Couldnt find “change filament” during printing.
“pause print”, stops printhead as soon as you click the wheel. That will melt nozzle shape into your model
Had a look @ the “Configuration_adv.h” in the Lulzbot dev tree. I don’t know whats priority for the firmware team, but please implement at least the old functionality of pause until we can get the juicy new pause features.
/**
 * Advanced Pause
 * Experimental feature for filament change support and for parking the nozzle when paused.
 * Adds the GCode M600 for initiating filament change.
 * If PARK_HEAD_ON_PAUSE enabled, adds the GCode M125 to pause printing and park the nozzle.
 *
 * Requires an LCD display.
 * This feature is required for the default FILAMENT_RUNOUT_SCRIPT.
 */
//#define ADVANCED_PAUSE_FEATURE
#if ENABLED(ADVANCED_PAUSE_FEATURE)
  #define PAUSE_PARK_X_POS 3                  // X position of hotend
  #define PAUSE_PARK_Y_POS 3                  // Y position of hotend
  #define PAUSE_PARK_Z_ADD 10                 // Z addition of hotend (lift)
  #define PAUSE_PARK_XY_FEEDRATE 100          // X and Y axes feedrate in mm/s (also used for delta printers Z axis)
  #define PAUSE_PARK_Z_FEEDRATE 5             // Z axis feedrate in mm/s (not used for delta printers)
  #define PAUSE_PARK_RETRACT_FEEDRATE 60      // Initial retract feedrate in mm/s
  #define PAUSE_PARK_RETRACT_LENGTH 2         // Initial retract in mm
                                              // It is a short retract used immediately after print interrupt before move to filament exchange position
  #define FILAMENT_CHANGE_UNLOAD_FEEDRATE 10  // Unload filament feedrate in mm/s - filament unloading can be fast
  #define FILAMENT_CHANGE_UNLOAD_LENGTH 100   // Unload filament length from hotend in mm
                                              // Longer length for bowden printers to unload filament from whole bowden tube,
                                              // shorter length for printers without bowden to unload filament from extruder only,
                                              // 0 to disable unloading for manual unloading
  #define FILAMENT_CHANGE_LOAD_FEEDRATE 6     // Load filament feedrate in mm/s - filament loading into the bowden tube can be fast
  #define FILAMENT_CHANGE_LOAD_LENGTH 0       // Load filament length over hotend in mm
                                              // Longer length for bowden printers to fast load filament into whole bowden tube over the hotend,
                                              // Short or zero length for printers without bowden where loading is not used
  #define ADVANCED_PAUSE_EXTRUDE_FEEDRATE 3   // Extrude filament feedrate in mm/s - must be slower than load feedrate
  #define ADVANCED_PAUSE_EXTRUDE_LENGTH 50    // Extrude filament length in mm after filament is loaded over the hotend,
                                              // 0 to disable for manual extrusion
                                              // Filament can be extruded repeatedly from the filament exchange menu to fill the hotend,
                                              // or until outcoming filament color is not clear for filament color change
  #define PAUSE_PARK_NOZZLE_TIMEOUT 45        // Turn off nozzle if user doesn't change filament within this time limit in seconds
  #define FILAMENT_CHANGE_NUMBER_OF_ALERT_BEEPS 5 // Number of alert beeps before printer goes quiet
  #define PAUSE_PARK_NO_STEPPER_TIMEOUT       // Enable to have stepper motors hold position during filament change
                                              // even if it takes longer than DEFAULT_STEPPER_DEACTIVE_TIME.
  //#define PARK_HEAD_ON_PAUSE                // Go to filament change position on pause, return to print position on resume
  //#define HOME_BEFORE_FILAMENT_CHANGE       // Ensure homing has been completed prior to parking for filament change
#endif
Seems everything related to pausing, advanced pausing and parking the head (M600 & M125) is commented out.
 * Implementation of linear pressure control
 *
 * Assumption: advance = k * (delta velocity)
 * K=0 means advance disabled.
 * See Marlin documentation for calibration instructions.
 */
#define LIN_ADVANCE

#if ENABLED(LIN_ADVANCE)
  #define LIN_ADVANCE_K 0
If you define LIN_ADVANCE_K default to 0, it won’t be used, but is available for those who want to experiment.
For me, I haven’t seen much differences (but it wasn’t bad either) apart from a bit more screeching from the extruder gears.
I can’t get a consistent skirt line around the perimeter of hot bed or print a small model in the rear left section of hot bed in new firmare only.
If I try to print a big model or position a small model in the rear left or right of print bed. My layer lines are almost flat in that section of the hot bed or indeed the nozzle hits the hot bed.
At first I thought it was my zoffset being wrong. When I brought this up before, Marcio suggested loading failsafes 1st. This indeed fixed my issue. but i think only because I also moved the model in slicer to front of hot bed. So the problem never was my zoffset. It was that I moved model location in slicer, and front section of hot bed prints ok new firmware.
In old firmare I can print whole hot bed a consistent skirt line around the print bed.
In new firmware I get issues with skirt line or models printed in rear left (same corner that is now skipped in bed leveling)
Have u printed objects in rear left with beta firmware?
Success?
What test model are you using to check whole print area/perimeter?
I own a Mini, bed = 15x15cm, so much less room for error in rear left. So far, first layer extrusion (skirt) is fine throughout the whole bed. I really think what you’re seeing is an amplification of what is already slightly wrong with your TAZ, the new 3-probe leveling just makes it more visible.
You ARE right to question if that’s a valid sacrifice, but I would also suggest you look into the correctness of your bed?
Thanks for the response. Appreciate it. I very well maybe doing something wrong.
I’ll do some farther test, maybe take some video or pics but I don’t have the issue in old firmware only new.
In both case I did the following:
End of Start code
G1 Z2 E10 F75;
G92 E0;
M117 TAZ Printing...
I extruded extra filament at start print because couldn’t do a skirt, testing perimeter.
Shouldnt there be a consistent filament width and height like old firmware.
Generated gcode from Cura 21.04, in attachments
Temp 205C
layer height 2.5
Polylite PLA LevelingPerimeterRectangle.gcode (225 KB)
Firmware 1.1.5.9
Advanced Pause/Filament Change for the WIN…THANK YOU SIR
Its interactive.
It beeps
It waits to finish the the section its doing (no abrupt halt with small pause - melting that point in model)
It parks head away from print
It cools head during filament change so filament doesn’t cook
It retracts old filament (a little much)
It primes nozzle interactively ( gives user chance to load more filament if needed)
It resumes at same point in print nicely
Well done !!!
Have to check how this feature behaves with octoprint or console issued filament change and resume.
Try adjusting your Z-Offset. Your first layer is too squished. Start a print, then while it is printing go under Control → Motion → Z Offset and turn the knob clockwise to raise the nozzle. Click to confirm. You want to tune it so the bead the printer is putting down on the first layer is not squished. It should have a nice raised appearance.
Thank you for the response. Maybe there is something I’m not doing right.
I flash new firmware
Load failsafes
Save
Enter factory settings:
Esteps
Zoffset.
Save
Print from Octoprint or sd card.
Only new firmware I have problems rear left.
Old firmware same gcode prints fine.
If my zoffset is wrong in new firmware I can adjust it up some. What I’m getting is an inconsistent error in the level around perimeter of bed on the rear left. If I had a bad zoffset for arguments sake, it should be consistently bad around whole perimeter, not just rear left?
In pics the bead is nice until is gets near the rear left corner but only new firmware, not the old firmware.
@ Marcio
I’ll assume this firmware is running consistent perimeters around the edge of print bed for you. Assume its an end user mistake. Need someone else with a Taz 6 to confirm my result or logically its just me. I’m happy to beta test because I can revert back to old firmware if problems.
What I suspect is happening is that bed leveling is not perfect, but generally the offset is small enough that the difference is not enough to see with the naked eye. The one instance in which it becomes visible is when the Z-offset is low enough that the nozzle drags on the bed. At that point, the nozzle catches momentarily and then releases and you get the telltale dot dot dot pattern as the flow of plastic is cut off and released.
We have determined that under the new Marlin the Z-offsets need to be different. On the older FW, a Z-offset of -1.500 was appropriate, but on the new FW the value needs to be around -1.200 for the TAZ (we will change the defaults soon).
I suspect you are using the defaults of -1.500 on the new FW, which is too low, so this makes any imprecision in bed leveling apparent. If you were to try the old firmware, but lowered your Z-offsets sufficiently so that the nozzle caught in the same manner, I suspect you would also see imperfections in leveling.
I do not understand the error you got with G28. Please post the exact error message from the console. Also, let me know whether you are using Cura 1 or Cura 2 Beta.
Ok I’m at work now. But part of the reason I was using such low offsets is because in new beta Cura software there is only initial line height.
In old Cura 21.04 they had initial layer height and initial line width. So in new Cura the only way i have to increase bed adhesion is closer zoffset.
In Cura 2.7 they added intial line width back in as per release notes.
Last night:
Once I flash new firmware restore failsafes, adjust esteps and zoffsets, save. I went straight to try and print a job. Firmware wouldn’t let me print. So i went to prepare > bed leveling. It did a procedure similar to the probing process. After that it allowed me to print.
That’s why I wanted to know if after loading new firmware does user have to bed level or do set home offsets B4 printing?
(Yea Im going to have to go below -2.0 for my offset but it got too late to nail down a perfect offset. I also spent 2 hours trying to make sure my frame was square, and my z gantry was parallel, same distance on lead screws etc. But I’m still have issues rear left of bed)
This should not happen. Let me know what the exact error was so I can try tracking it down.
You should be able to print directly from Cura. None of the steps you described should be necessary.
No, -2.00 is too low. I think you want to go higher, perhaps -1.200 or even -1.100 (note that the numbers are negative).
I just did the bed leveling you provided on Marlin 1.0.2.22 and Marlin 1.1.5.11. I used a Z-offset of -1.200 and the print was overly squished on both. Both FW versions showed differences between the best corner and the worst corner; in fact, the difference was more pronounced on the print from Marlin 1.0.2.22.
Overall, I think the conclusion is that bed calibration is not perfect. You need to adjust the Z-offset high enough so that the nozzle is far enough from the bed so that the leveling inaccuracy does not cause the head to drag. I suspect you have it set too low.

 -->heat up nozzle position