Has anyone printed with PET+ yet? I am not having the best of luck finding the right temperatures and print settings, any help would be greatly appreciated!
I’ve had reasonable success with the following, but it could certainly do with some tuning. The PET+ is a little oozy.
fine_PET_no-support_pt35nzl_pt14layer-6s.ini (3.2 KB)
Hey thanks, I will give your config a shot!
I am having a big oozing issue, I was able to print a ring that came great, but when I try to print something more complicated, it just ends up gobbed on the nozzle.
Your config worked, thank you!
I do have to say that I am not very happy with PET+, still kinda messy and leaves the print very rough… But at least it printed without clogging up.
Glad it worked, but it could certainly use more optimization. We have a Makerbot Replicator 2X, and PET+ prints from that machine generally have a much better finish using Made Solid’s provided profile. The Taz is capable of matching the Makerbot in ABS, so…I have some more work to do on the profile.
I picked up a few of the PET+ spools by Made solid. Black and Blue in color. I’ll be doing some testing this weekend with the manufacturers specifications placed over a lulzbot abs profile. I will post what works best as i figure it out but my starting point will be
Extrusion temp: 235C
30mm/s for perimeters/outlines
60mm/s for infill
Top/bottom (roof/floor) thickness: 4-6 solid layers.
Bed surface: Kapton Tape at a bed temperature: 60C
The goal is to figure out the fastest printing speeds with various levels of quality using the stock .35mm noz. Bridging is a whole different can of worms that’ll probably get opened later.
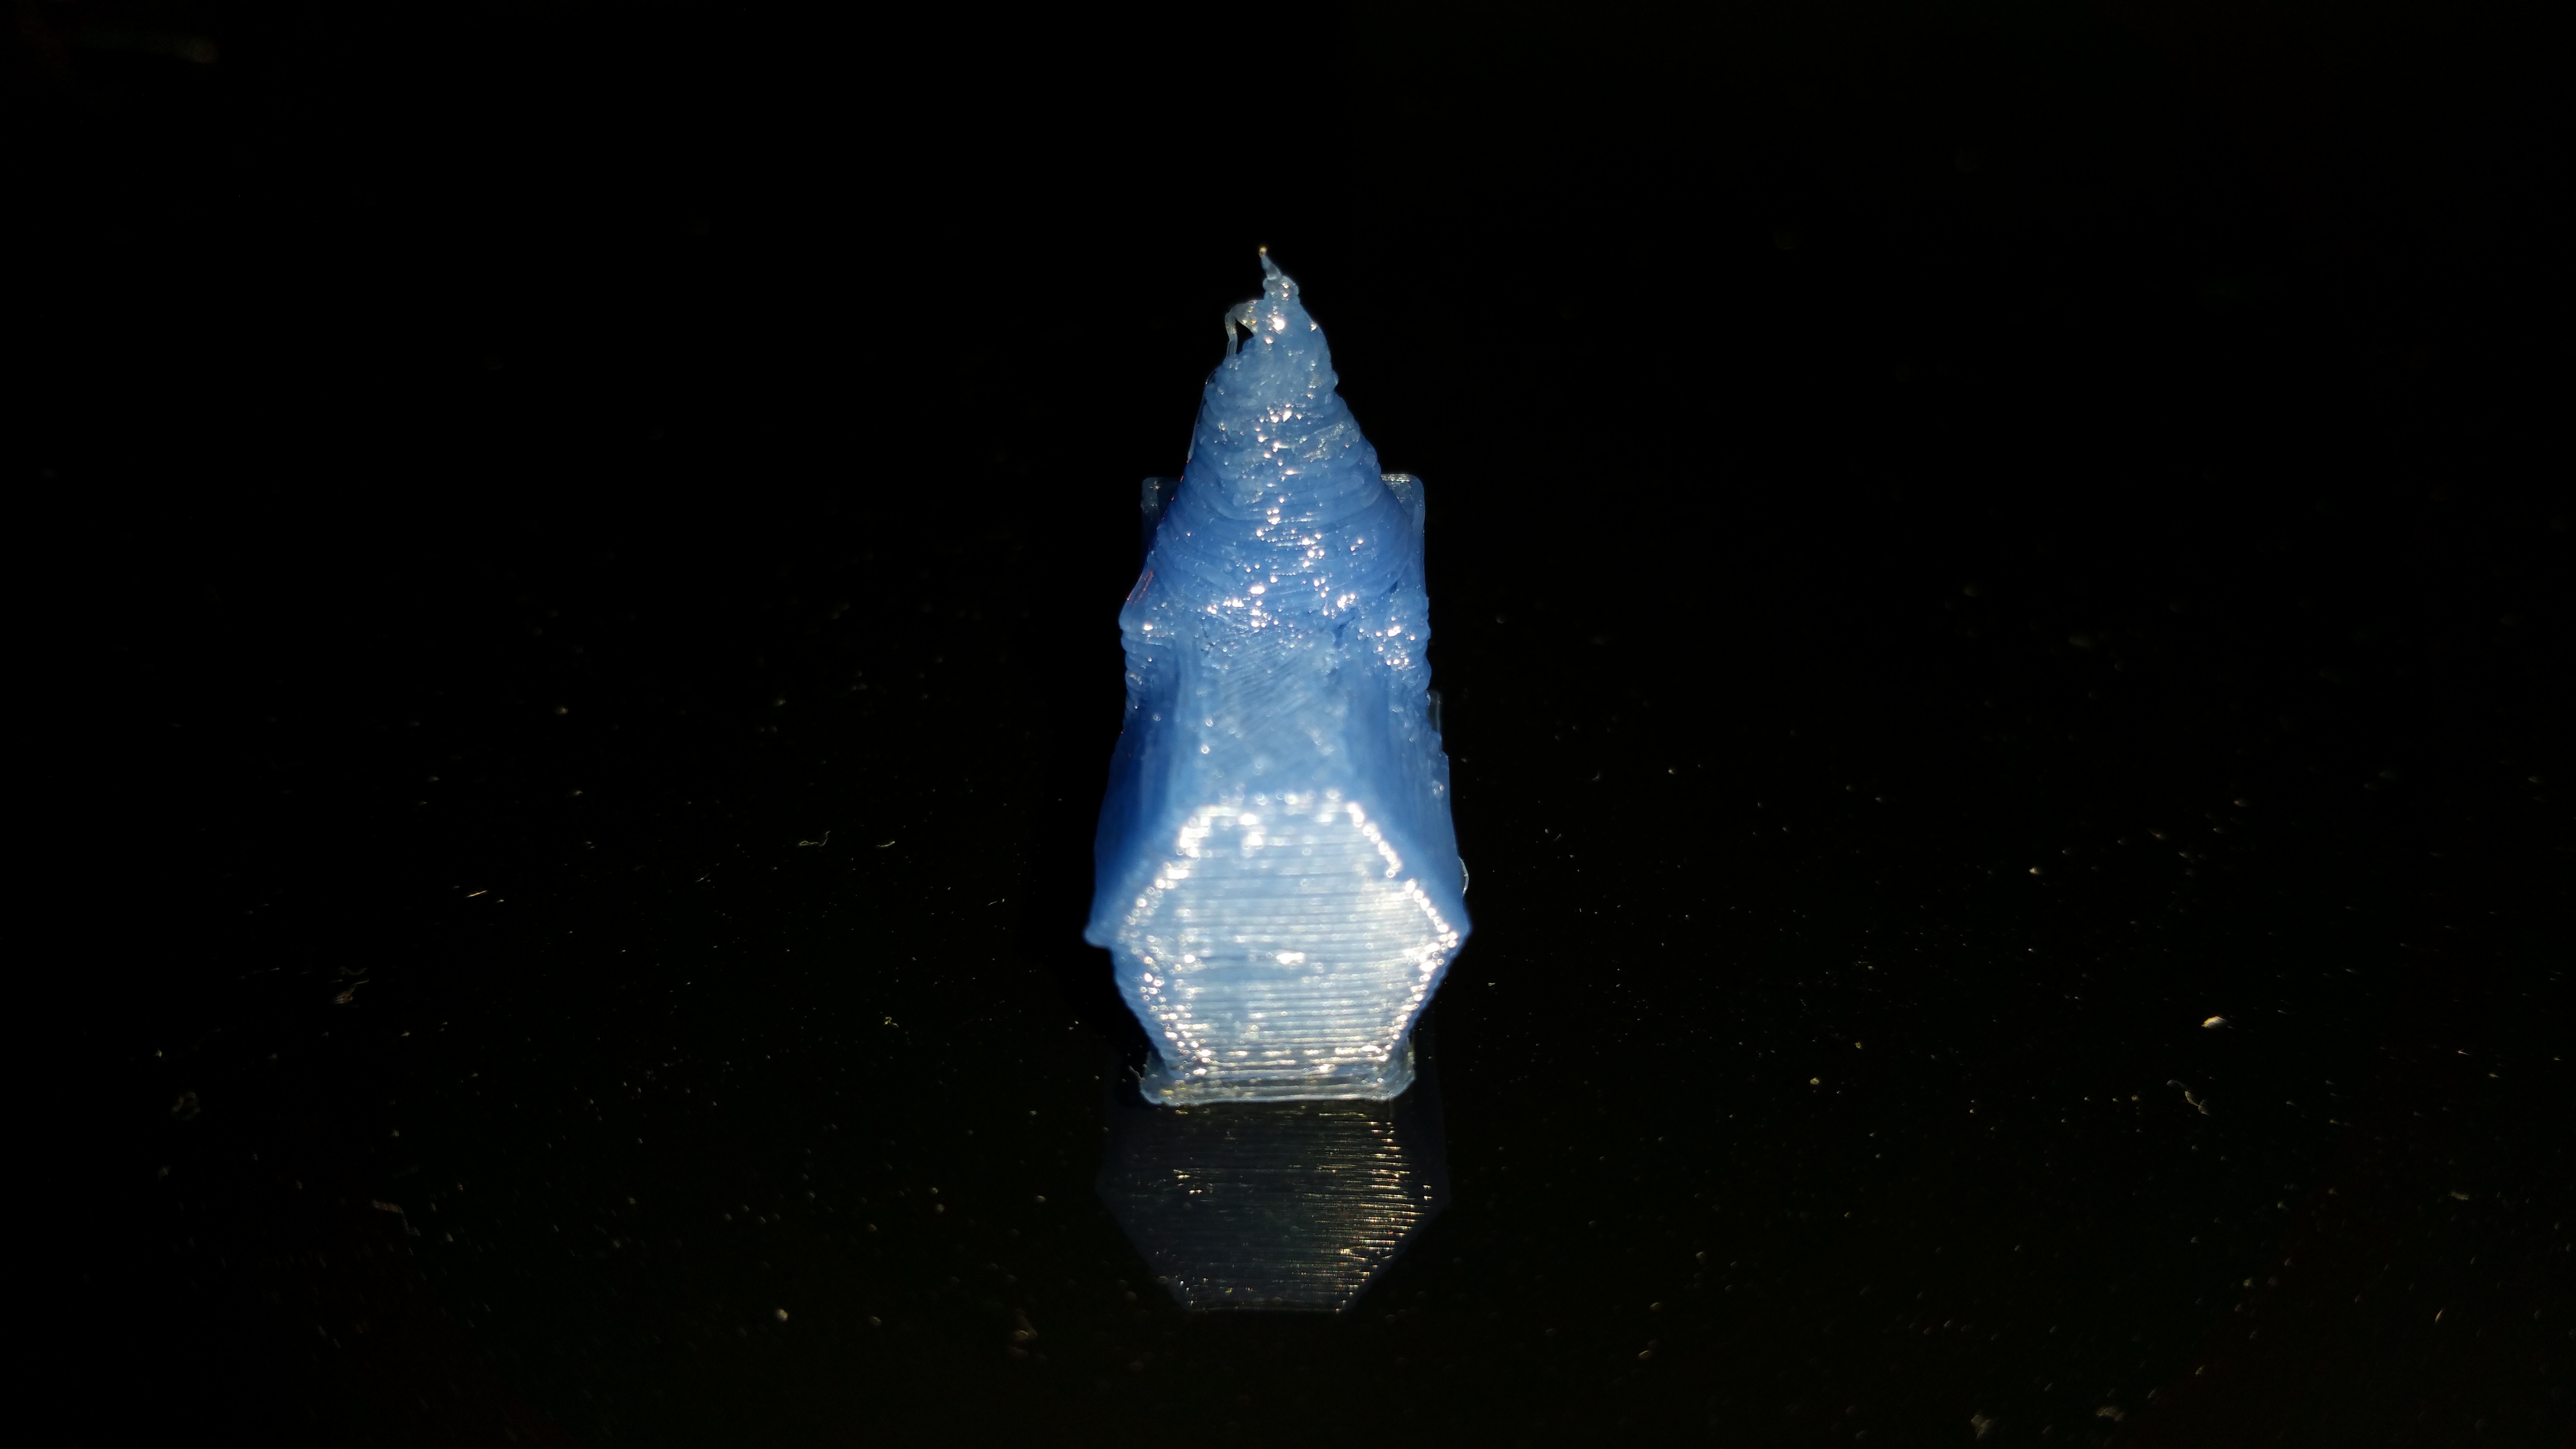
Initial run on my test object pictured below. Settings for the test were as described above with a .35mm layer height.
Based on the pictures I think the extrusion temperature may be too high due to the melting of some perimeters. although with the oversized layer height it may be of some benifit to reduce layer height to .25 and try again at the same temp.

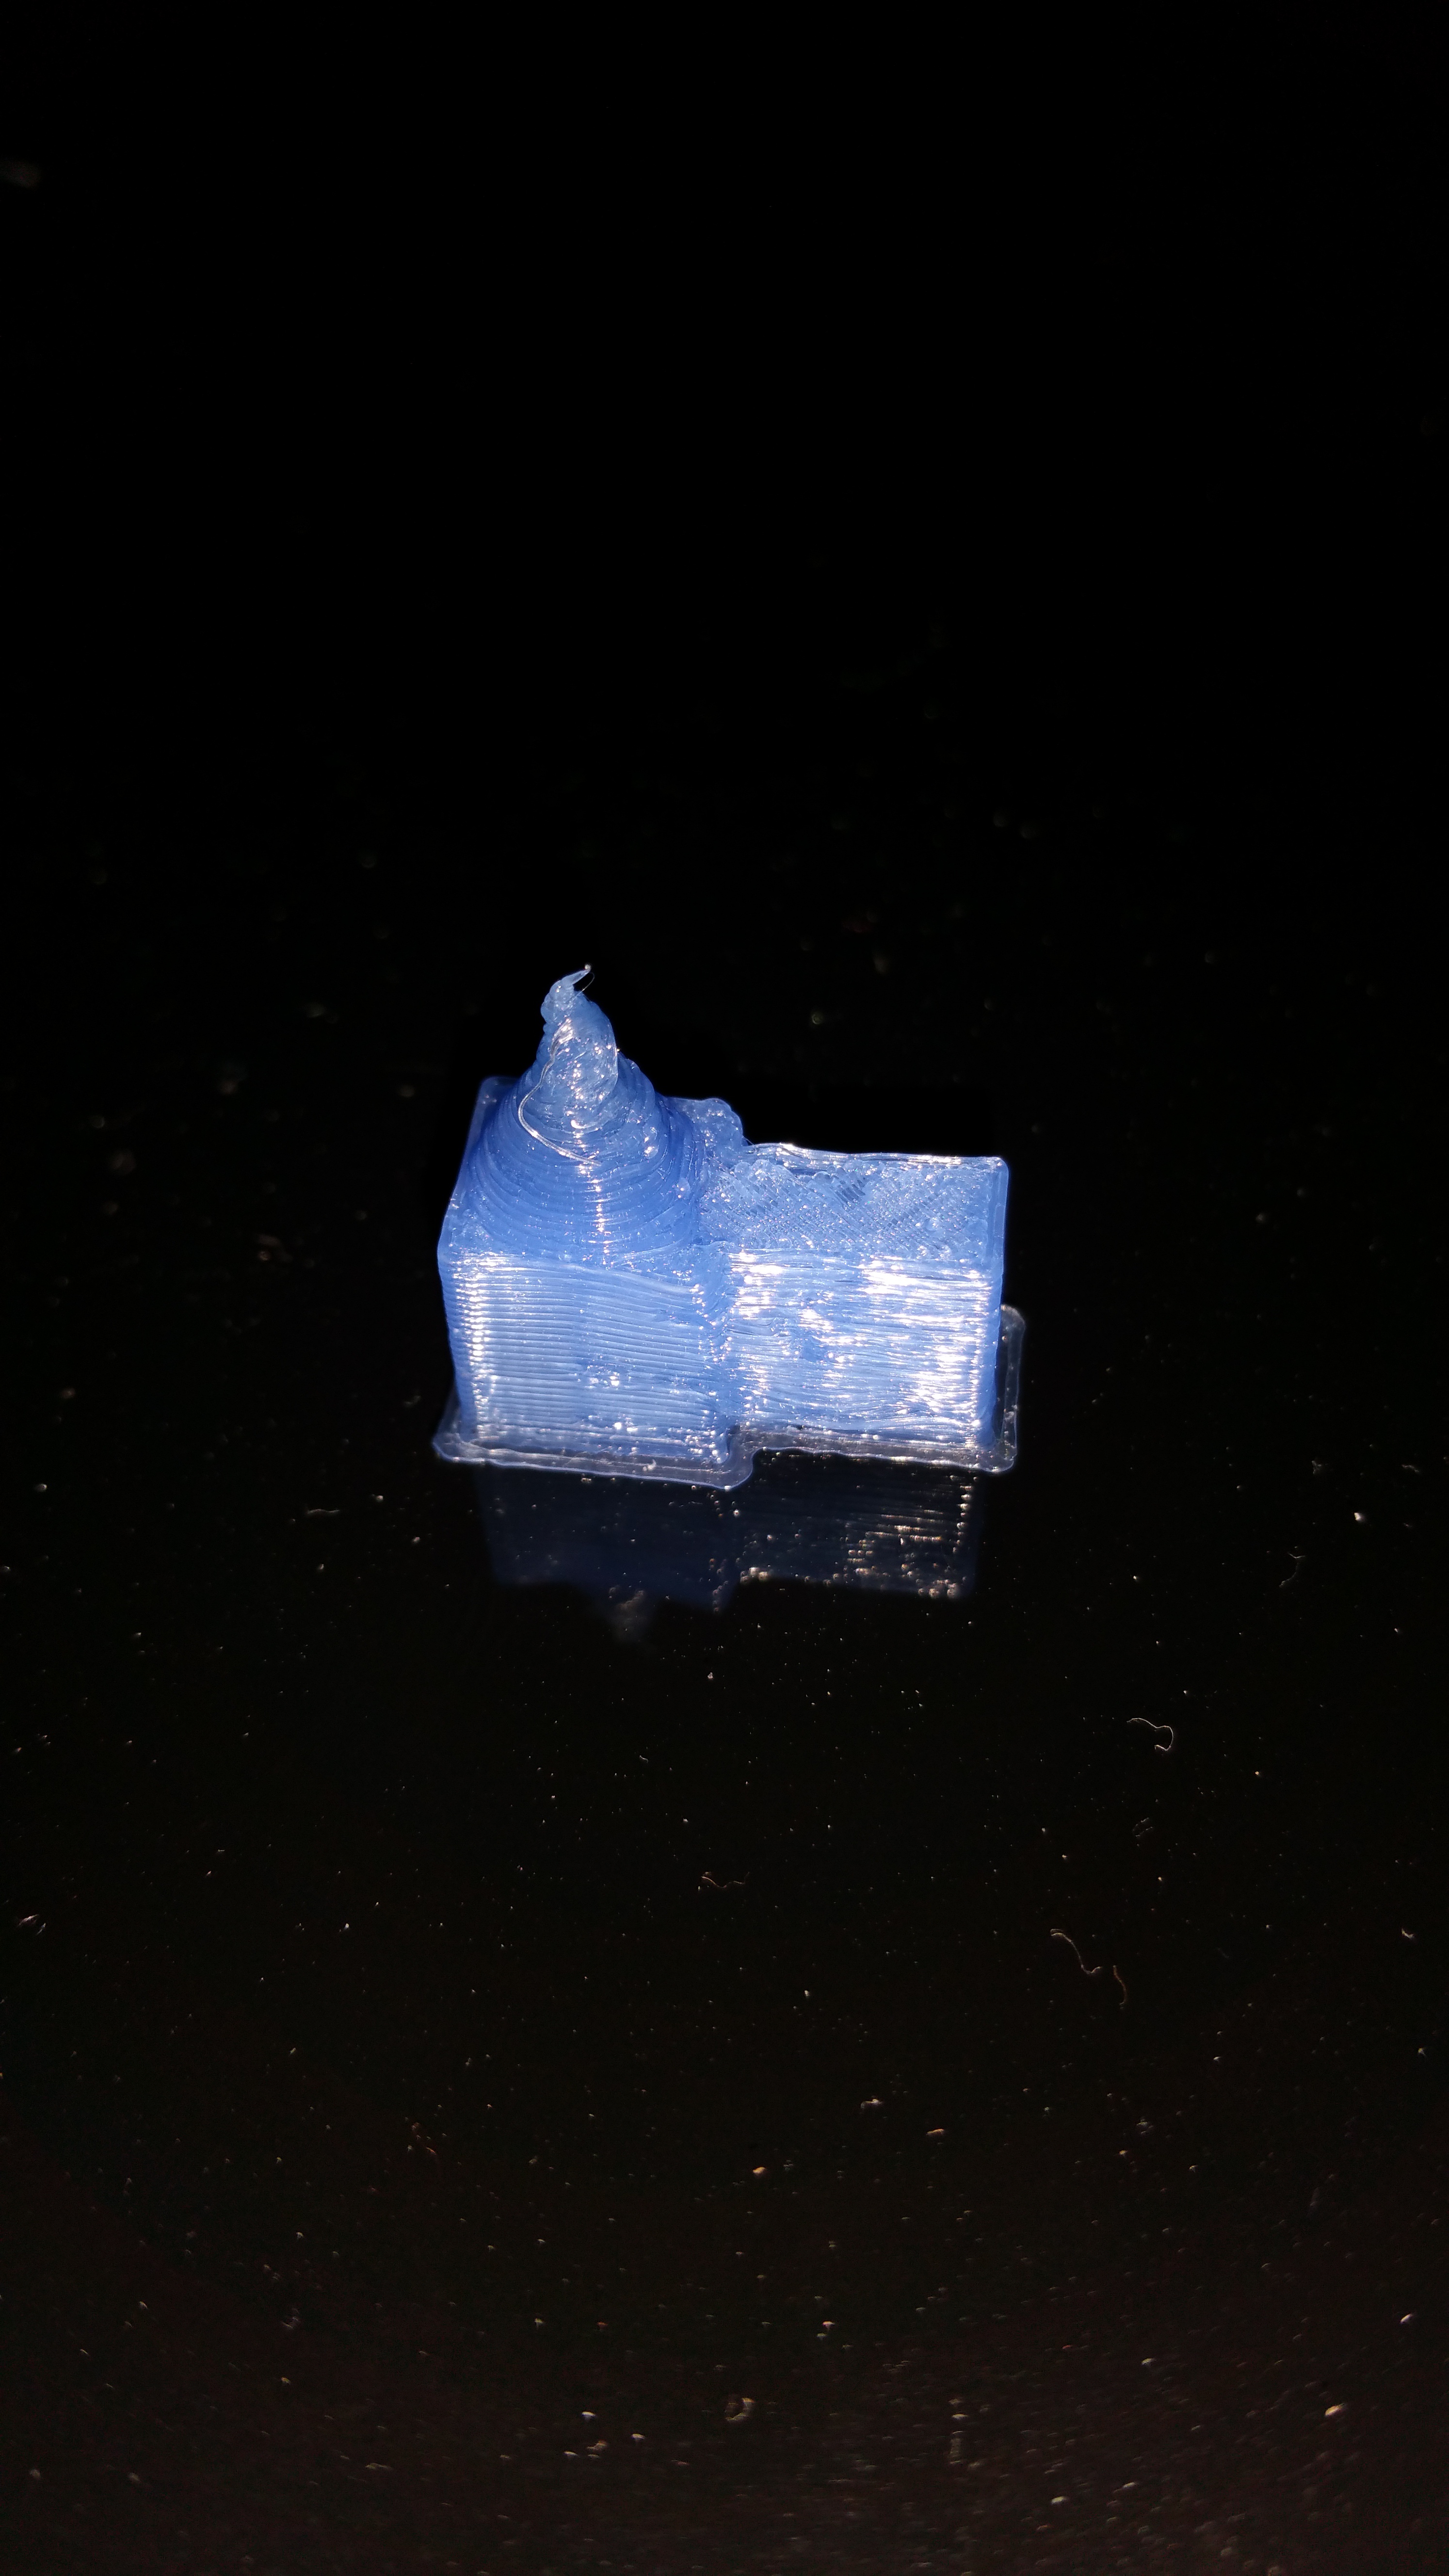
Test 2 was conducted with a reduced layer height to .25mm.
Current infill is 15% Recilinear
Some Observations during print:
-1st Layer adhesion is excellent with bed at 60C part easily removes from Kapton Tape
-During short / rapid movements of the nozzle the PET + Begins to melt underneath. During large movements the PET+ displays no heat fatigue probably due to nozzle temperature. This can easily be seen between the cone and the Polygon shape.
-The cone on top of the part is better on test #2 with fan operating at 100% (Cone part only). Melting can be observed as it gets closer to the top probably due to nozzle temperature.
-When part was removed layer adhesion appeared to be superb. Part toughness with only 15% infill was good.
Moving forward:
I will try another test lowering the nozzle temp by 5C
(If anybody’s been there or done this before let me know and i’ll add inputs to the config file to better help all.)

Test 3-4 had similar results with temperatures being reduced 5C per run
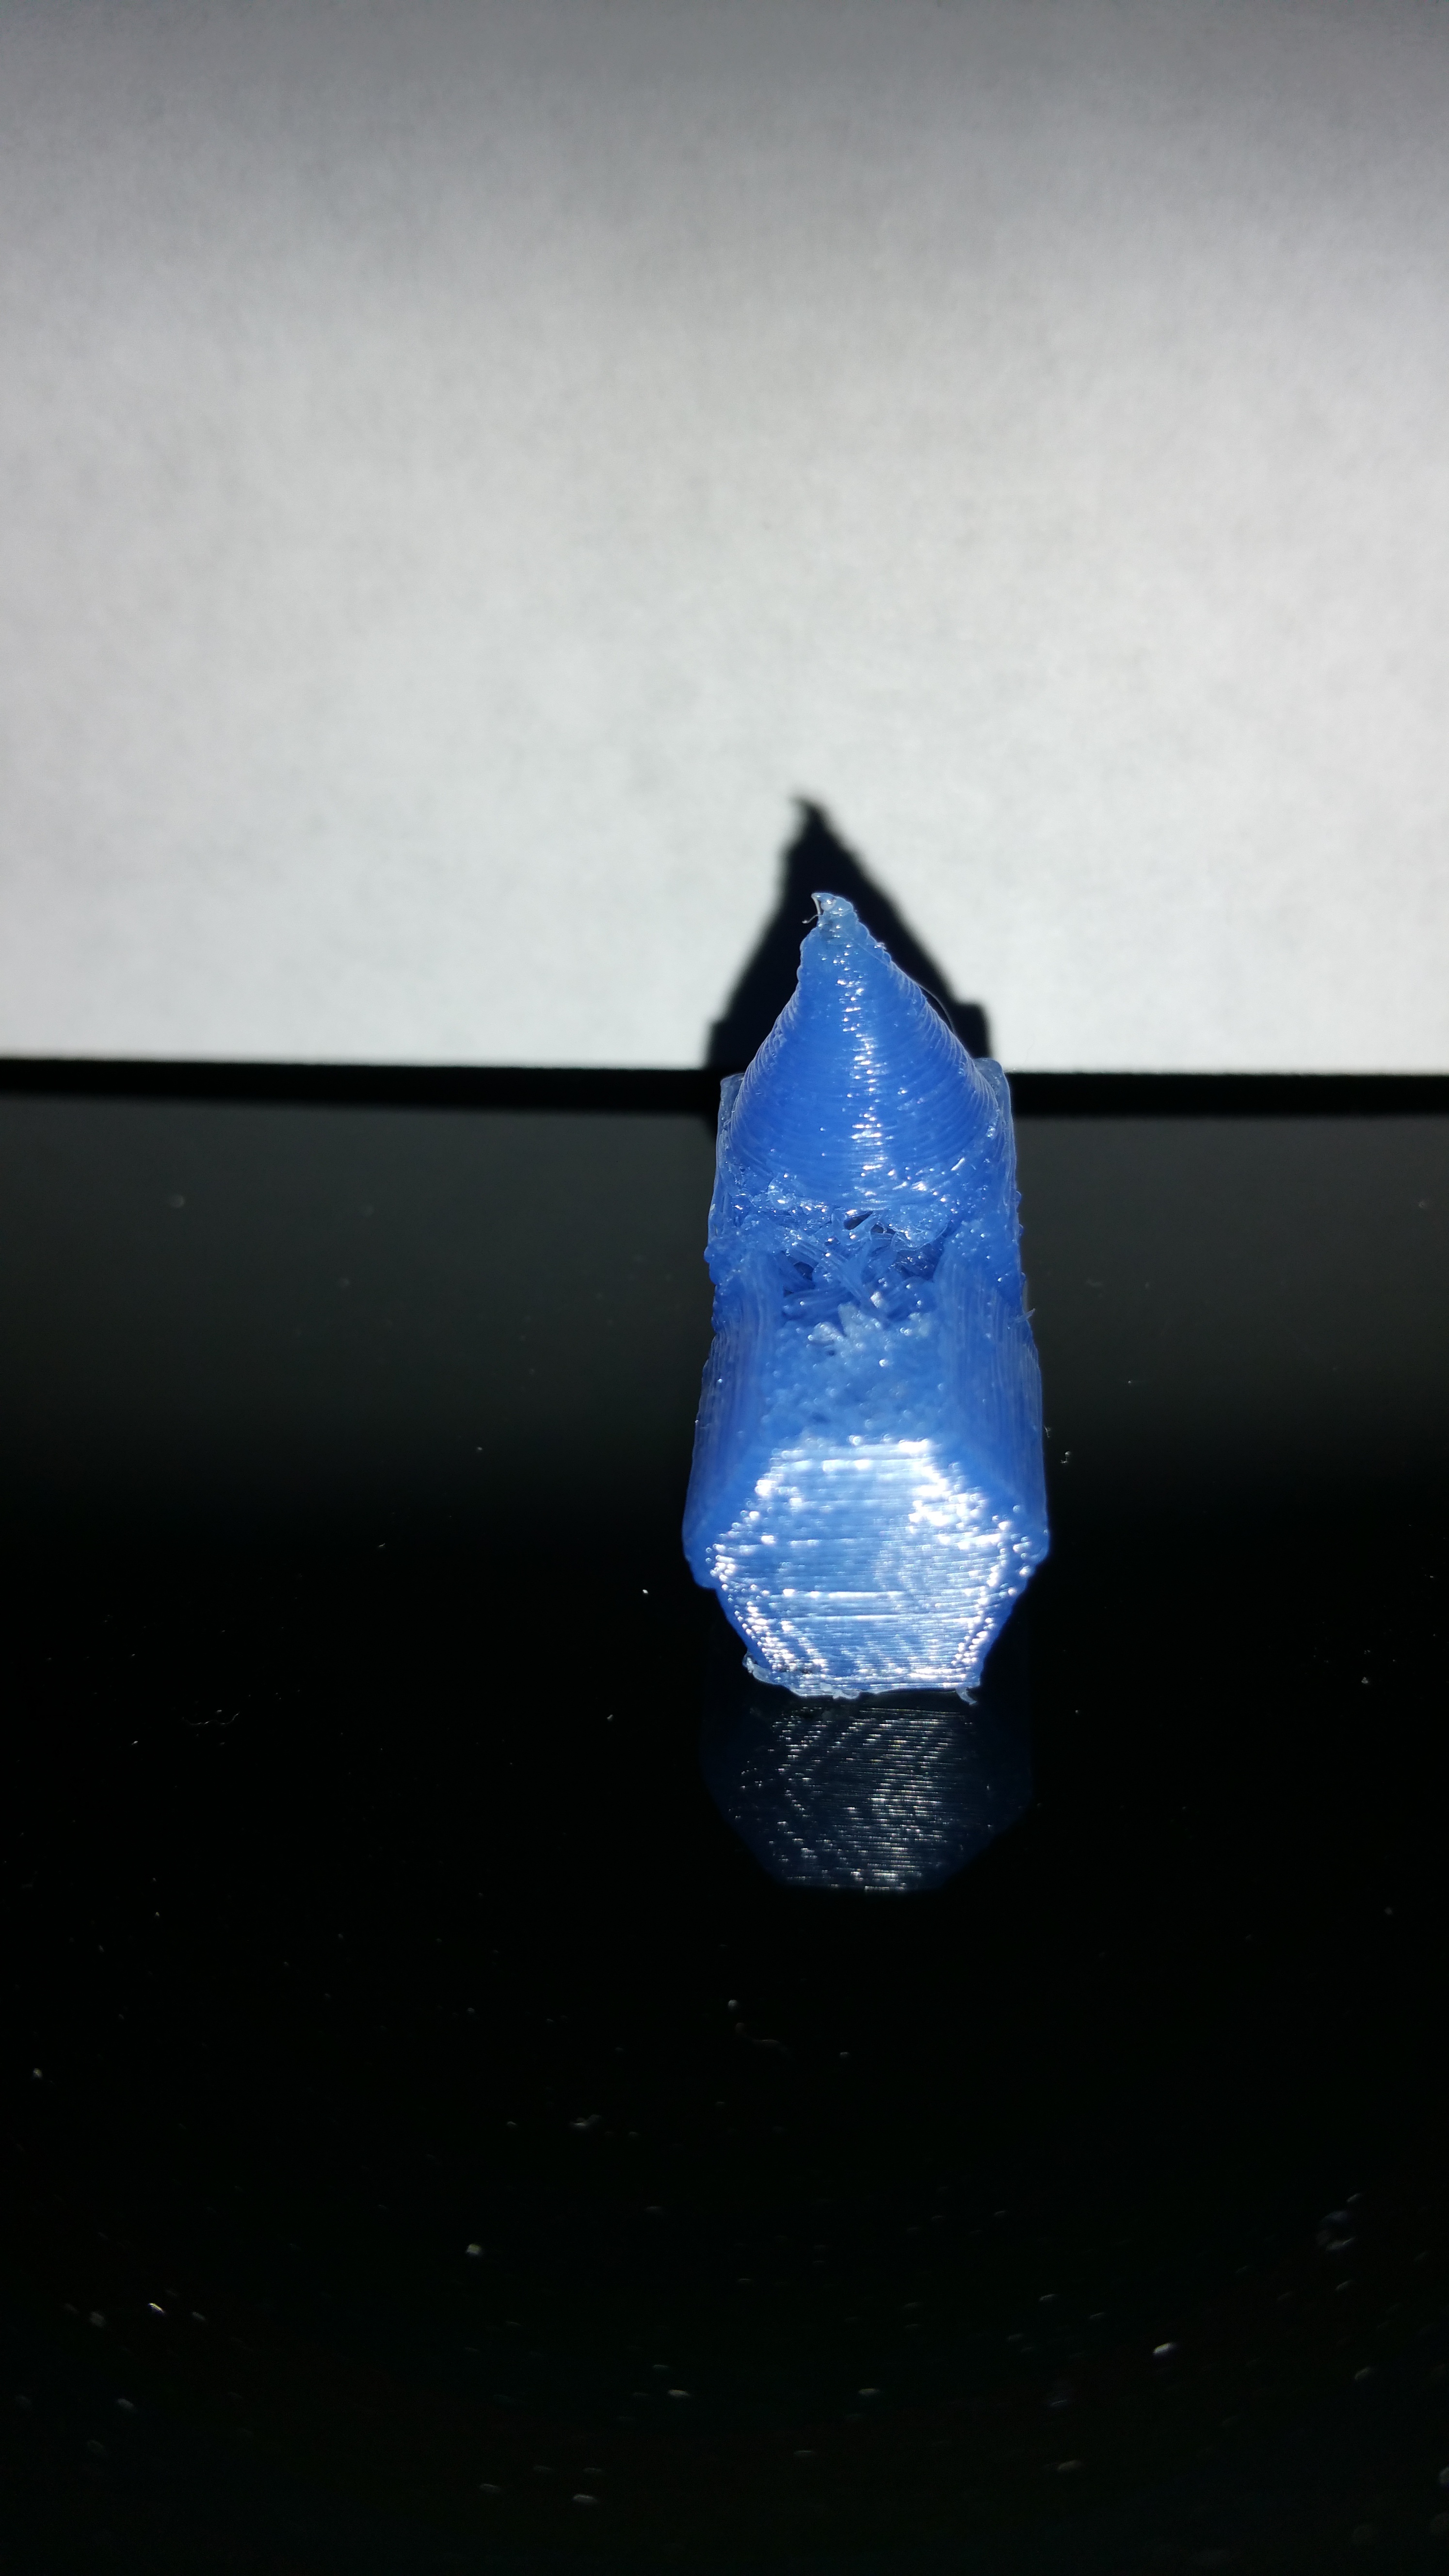
Test 5:
Changes:
Test was run with extruder at 225 for all layers
Fan speed 40% throughout test.
Observations:
- Perimeter melting IVO hot end was significantly reduced /eliminated with the introduction of the cooling fan at 40%.
- Part appears to still have good layer adhesion.
- Area IVO Upper cone significantly improved in appearance with addition of cooling fan. (No sunken cave)
- Part remains easily removed with hotbed still warm after print. (Could be due to small surface area of print)
- Nozzle oozing appears significant at >228C
- The filament is difficult to remove from hot end after oozing
Moving Forwards:
Bump Cooling speed to 50% on subsequent test in an attempt to reduce outer perimeter imperfections.
Keep Hot end temperature at 225 for first layer and try 220 for subsequent layers?
Assumptions:
-The slower the Hot end is moving with respect to the part the > Cooling must be to prevent melting. Speeds as advertised from manufacturer appear to be possible with cooling only.
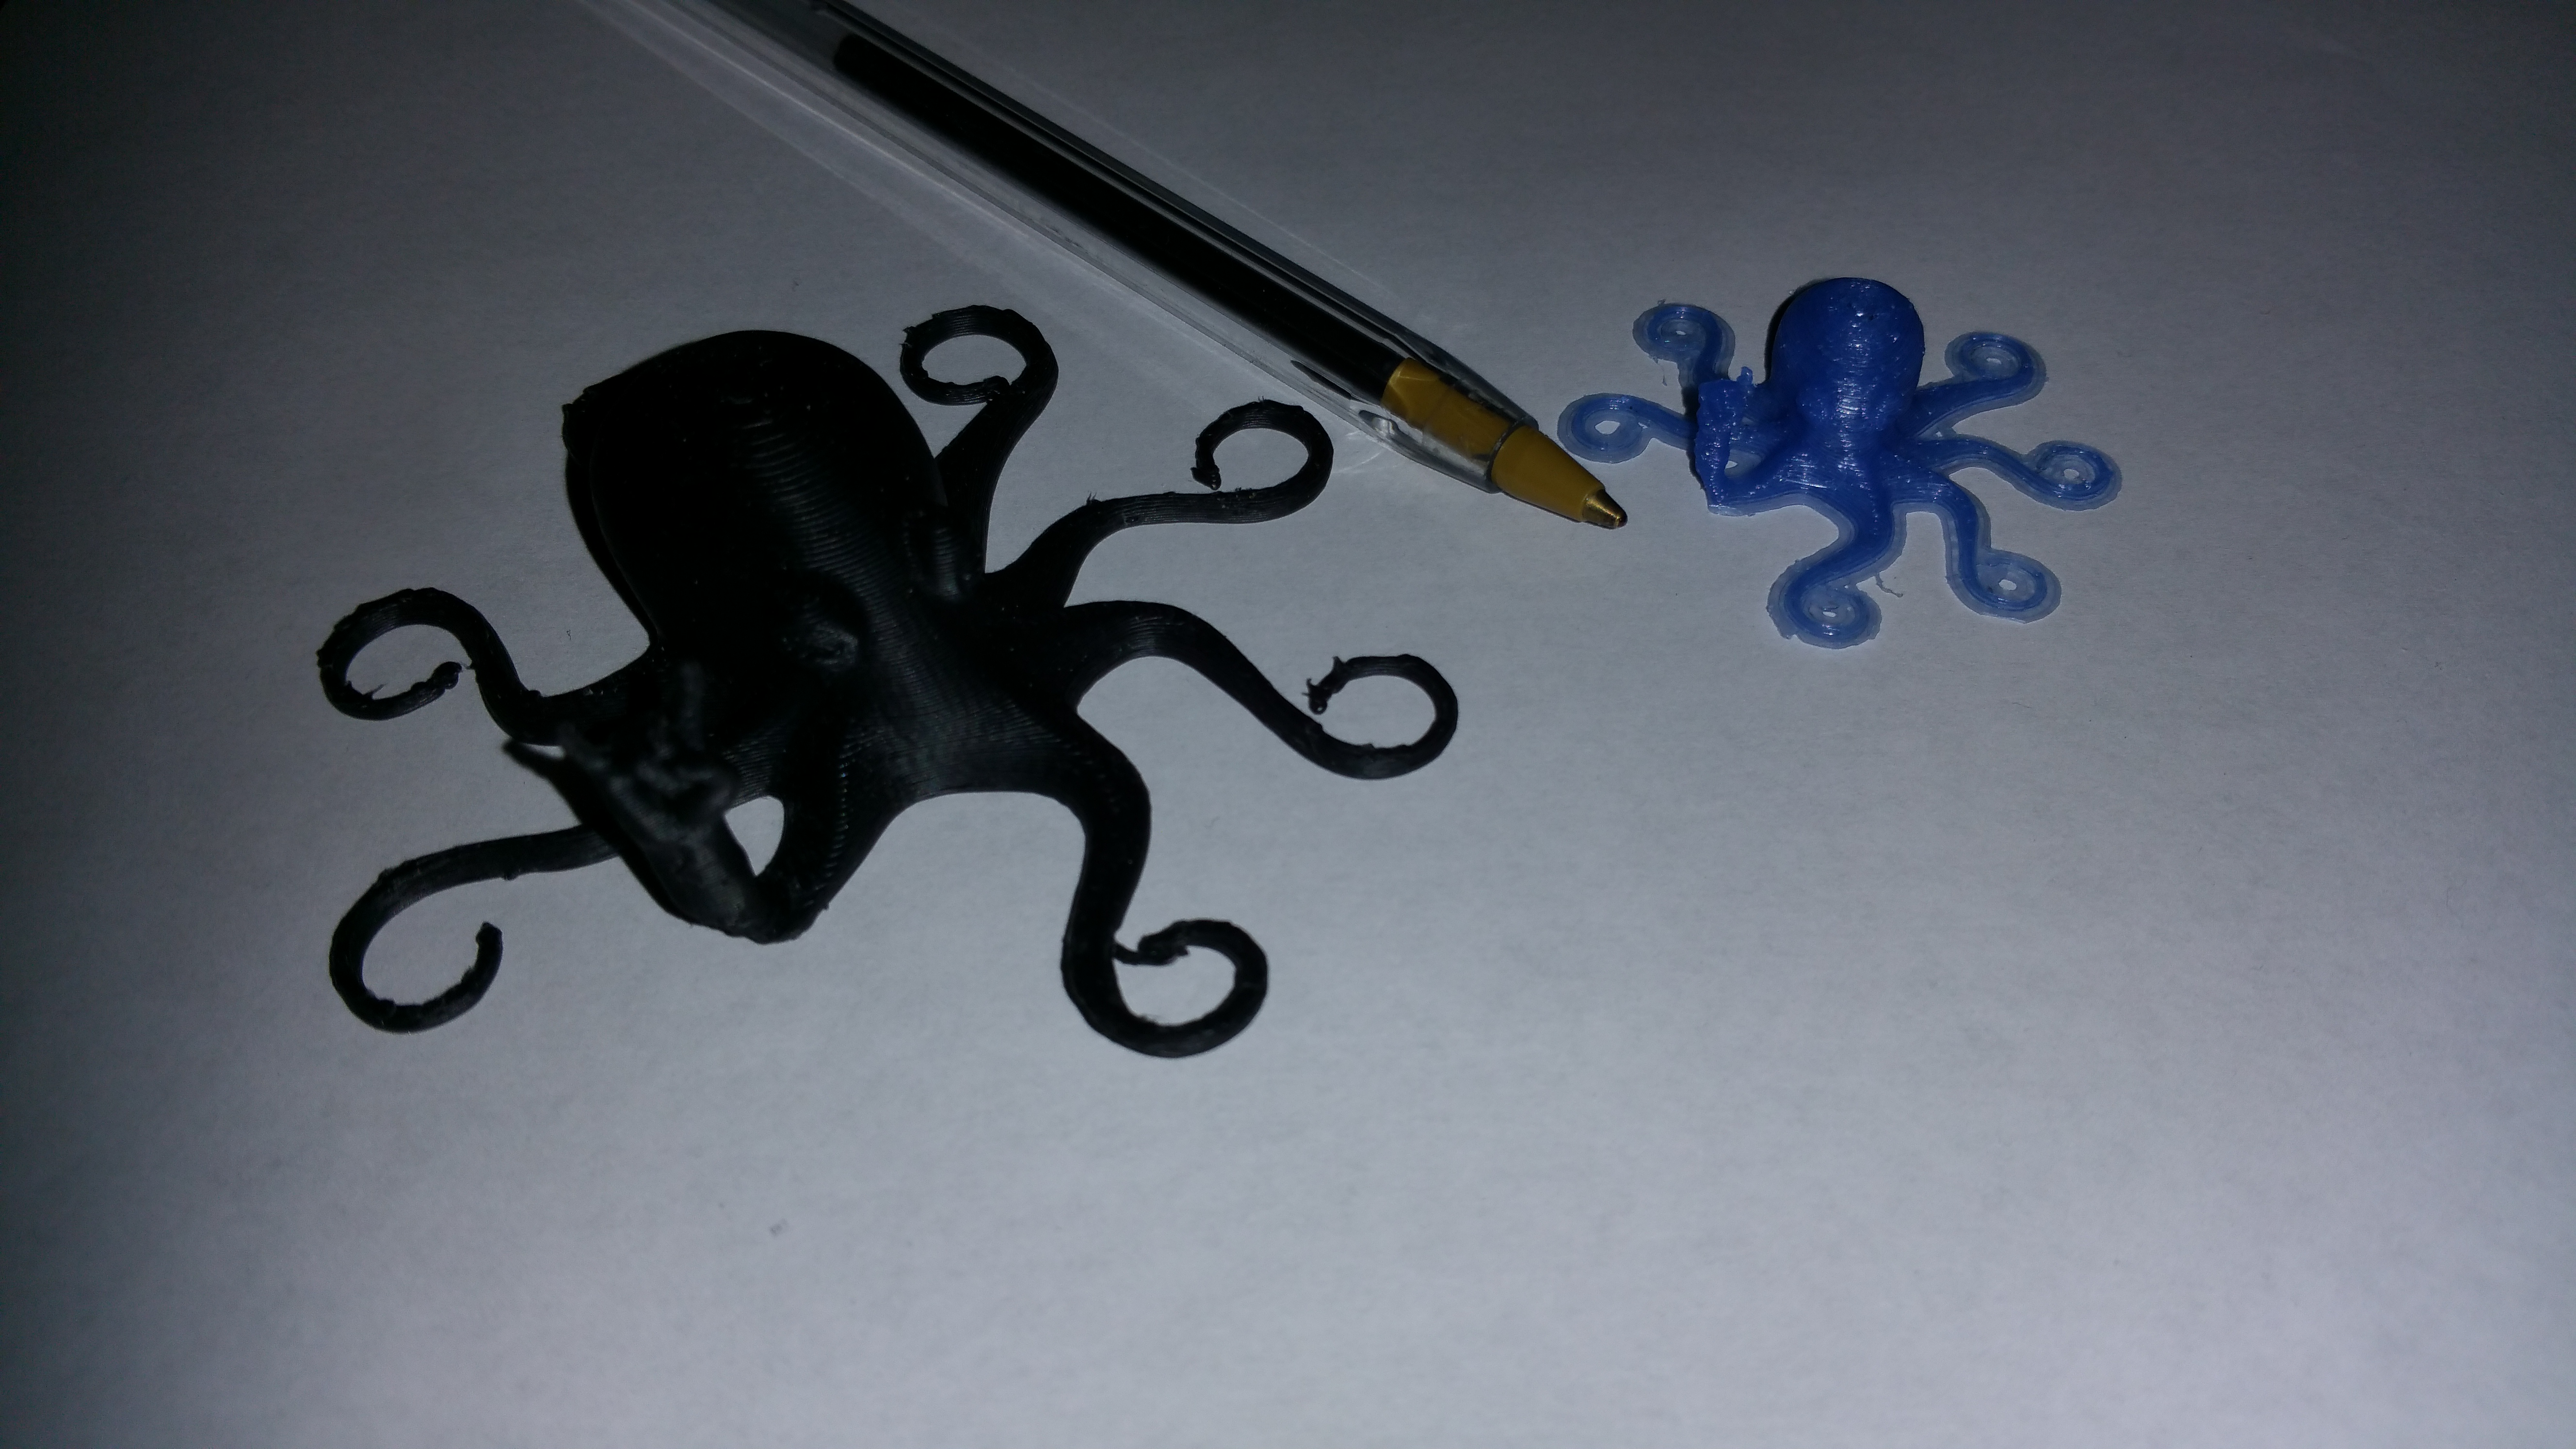
Based on this Layer height and cooling ratio the next test will be a standard Rocktopus.


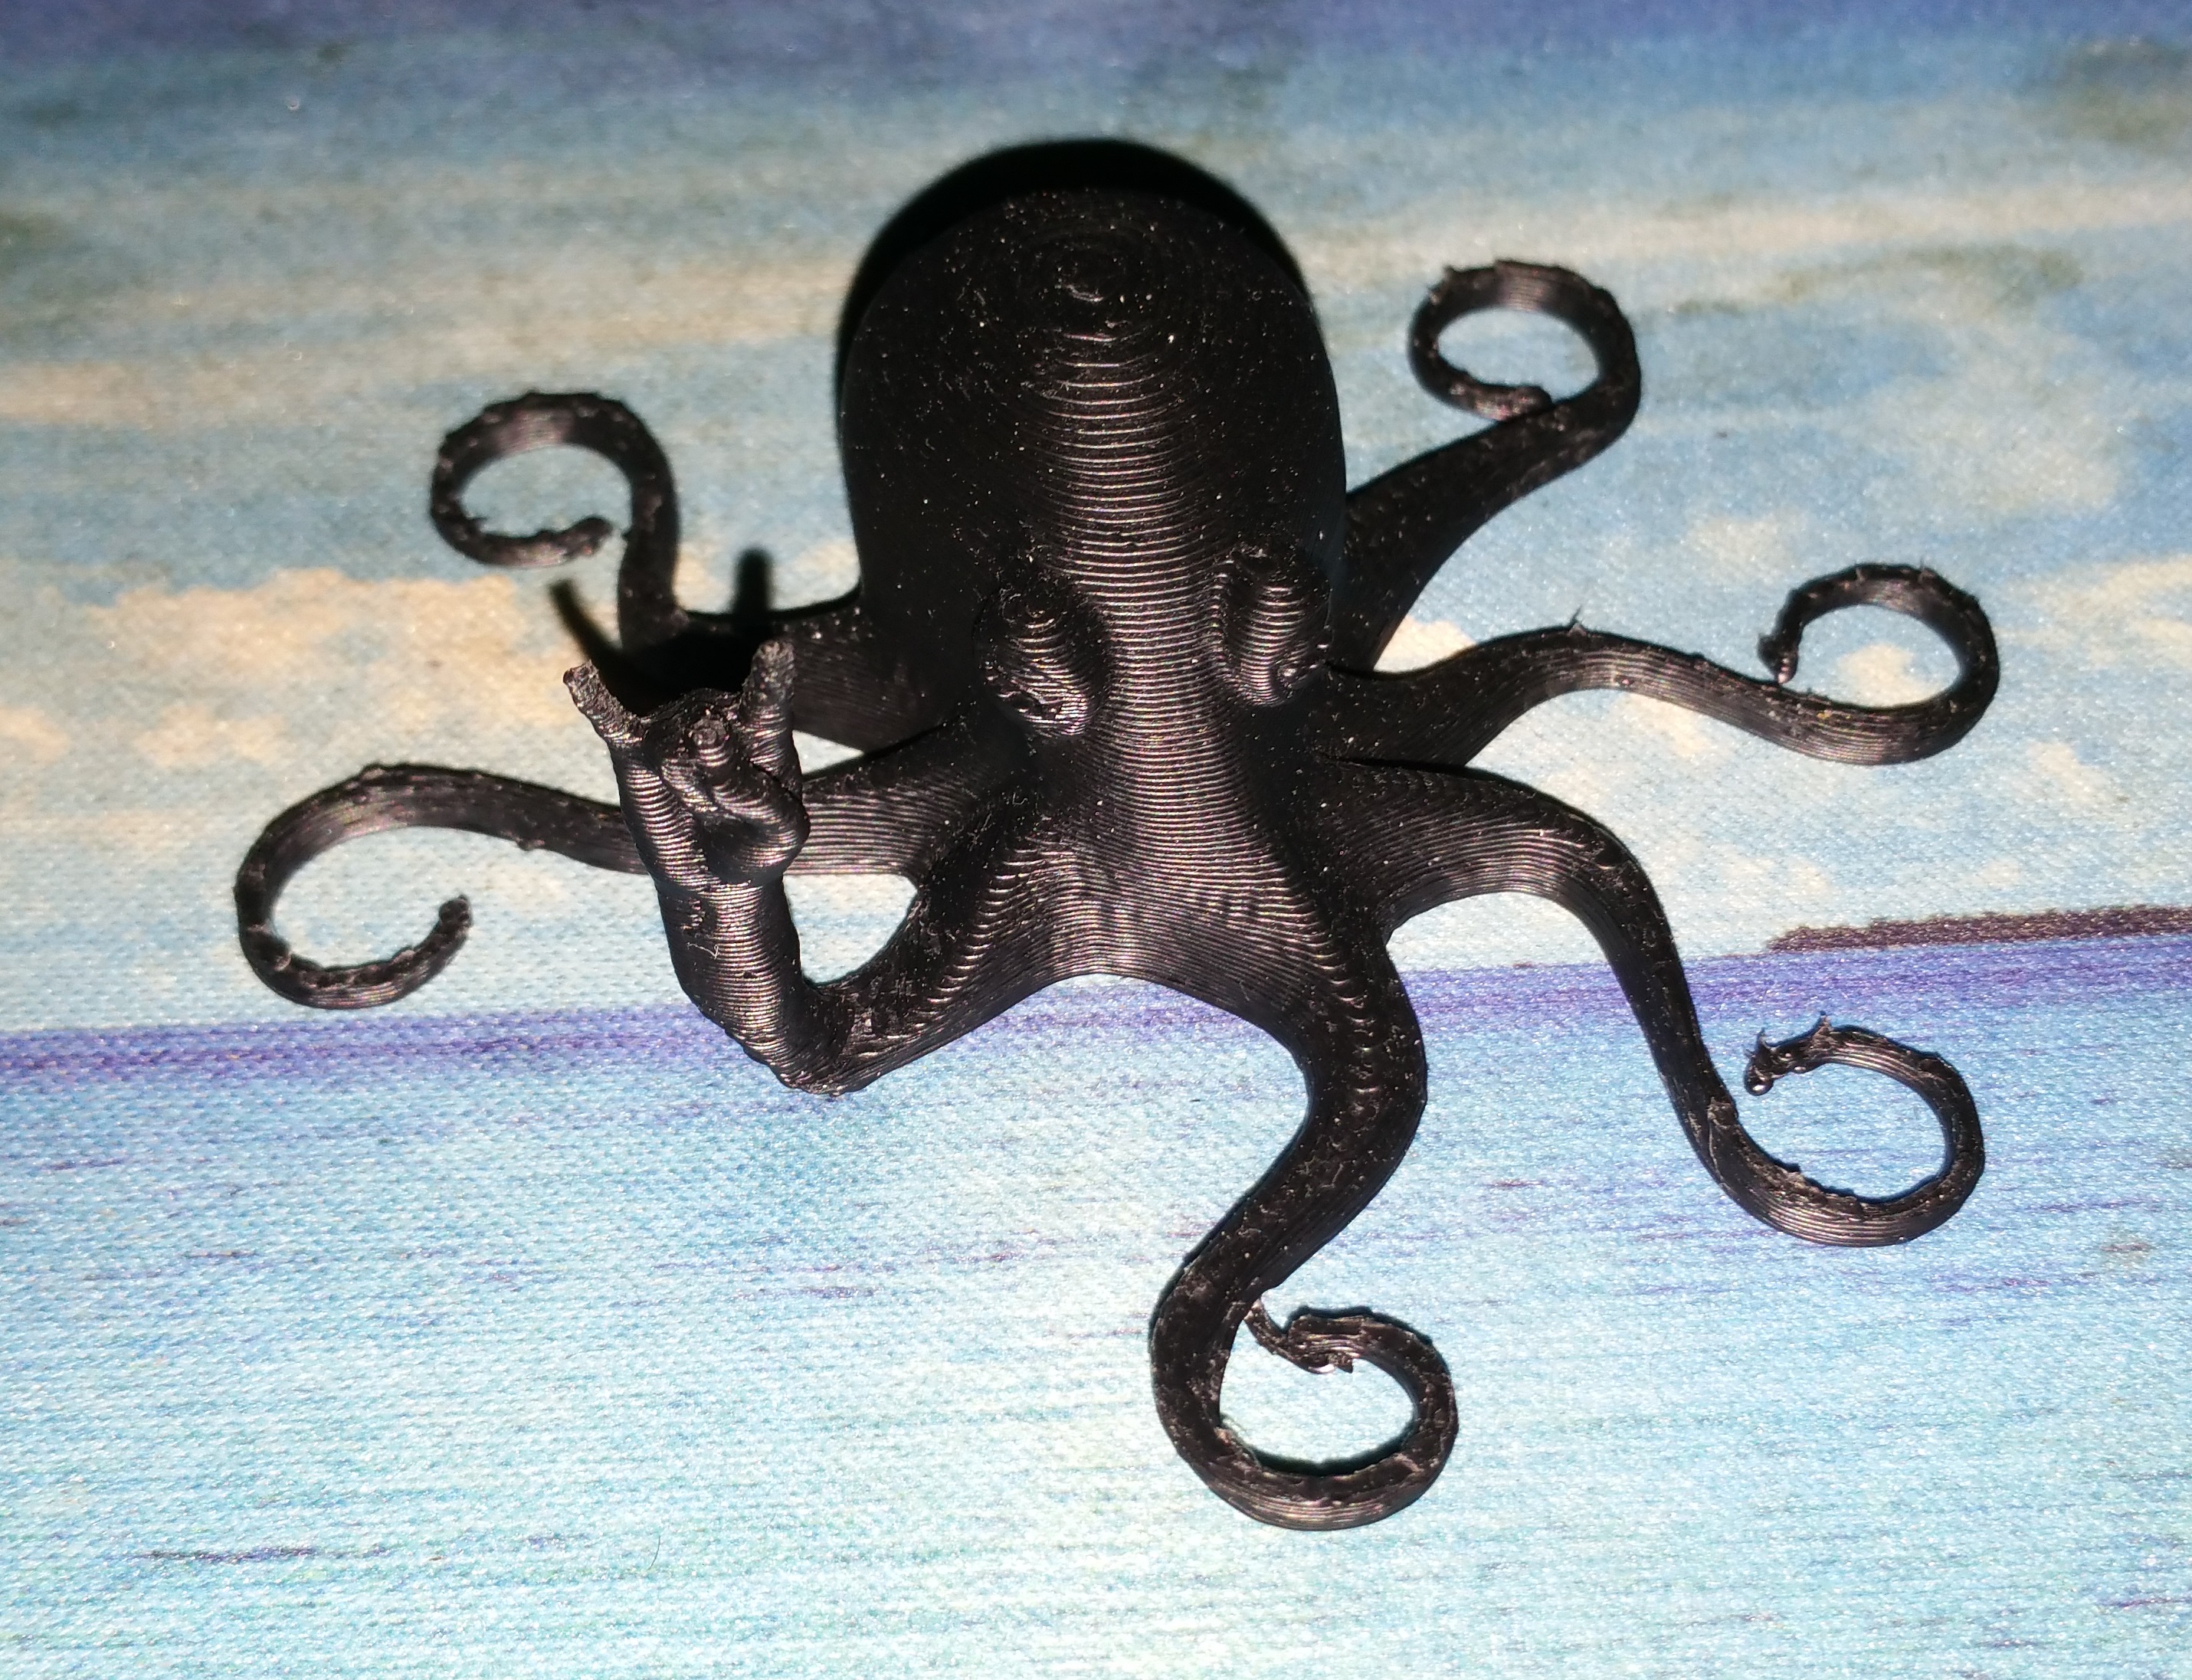
Well…To get the obvious out of the way… The rocktopus that comes with the Taz is not a 100% scale piece from the site nor is it 25%.
Despite my surprise upon returning to the printer to see the lil guy and i do mean lil guy. I was actually very impressed with the print quality given the layer height and speeds.
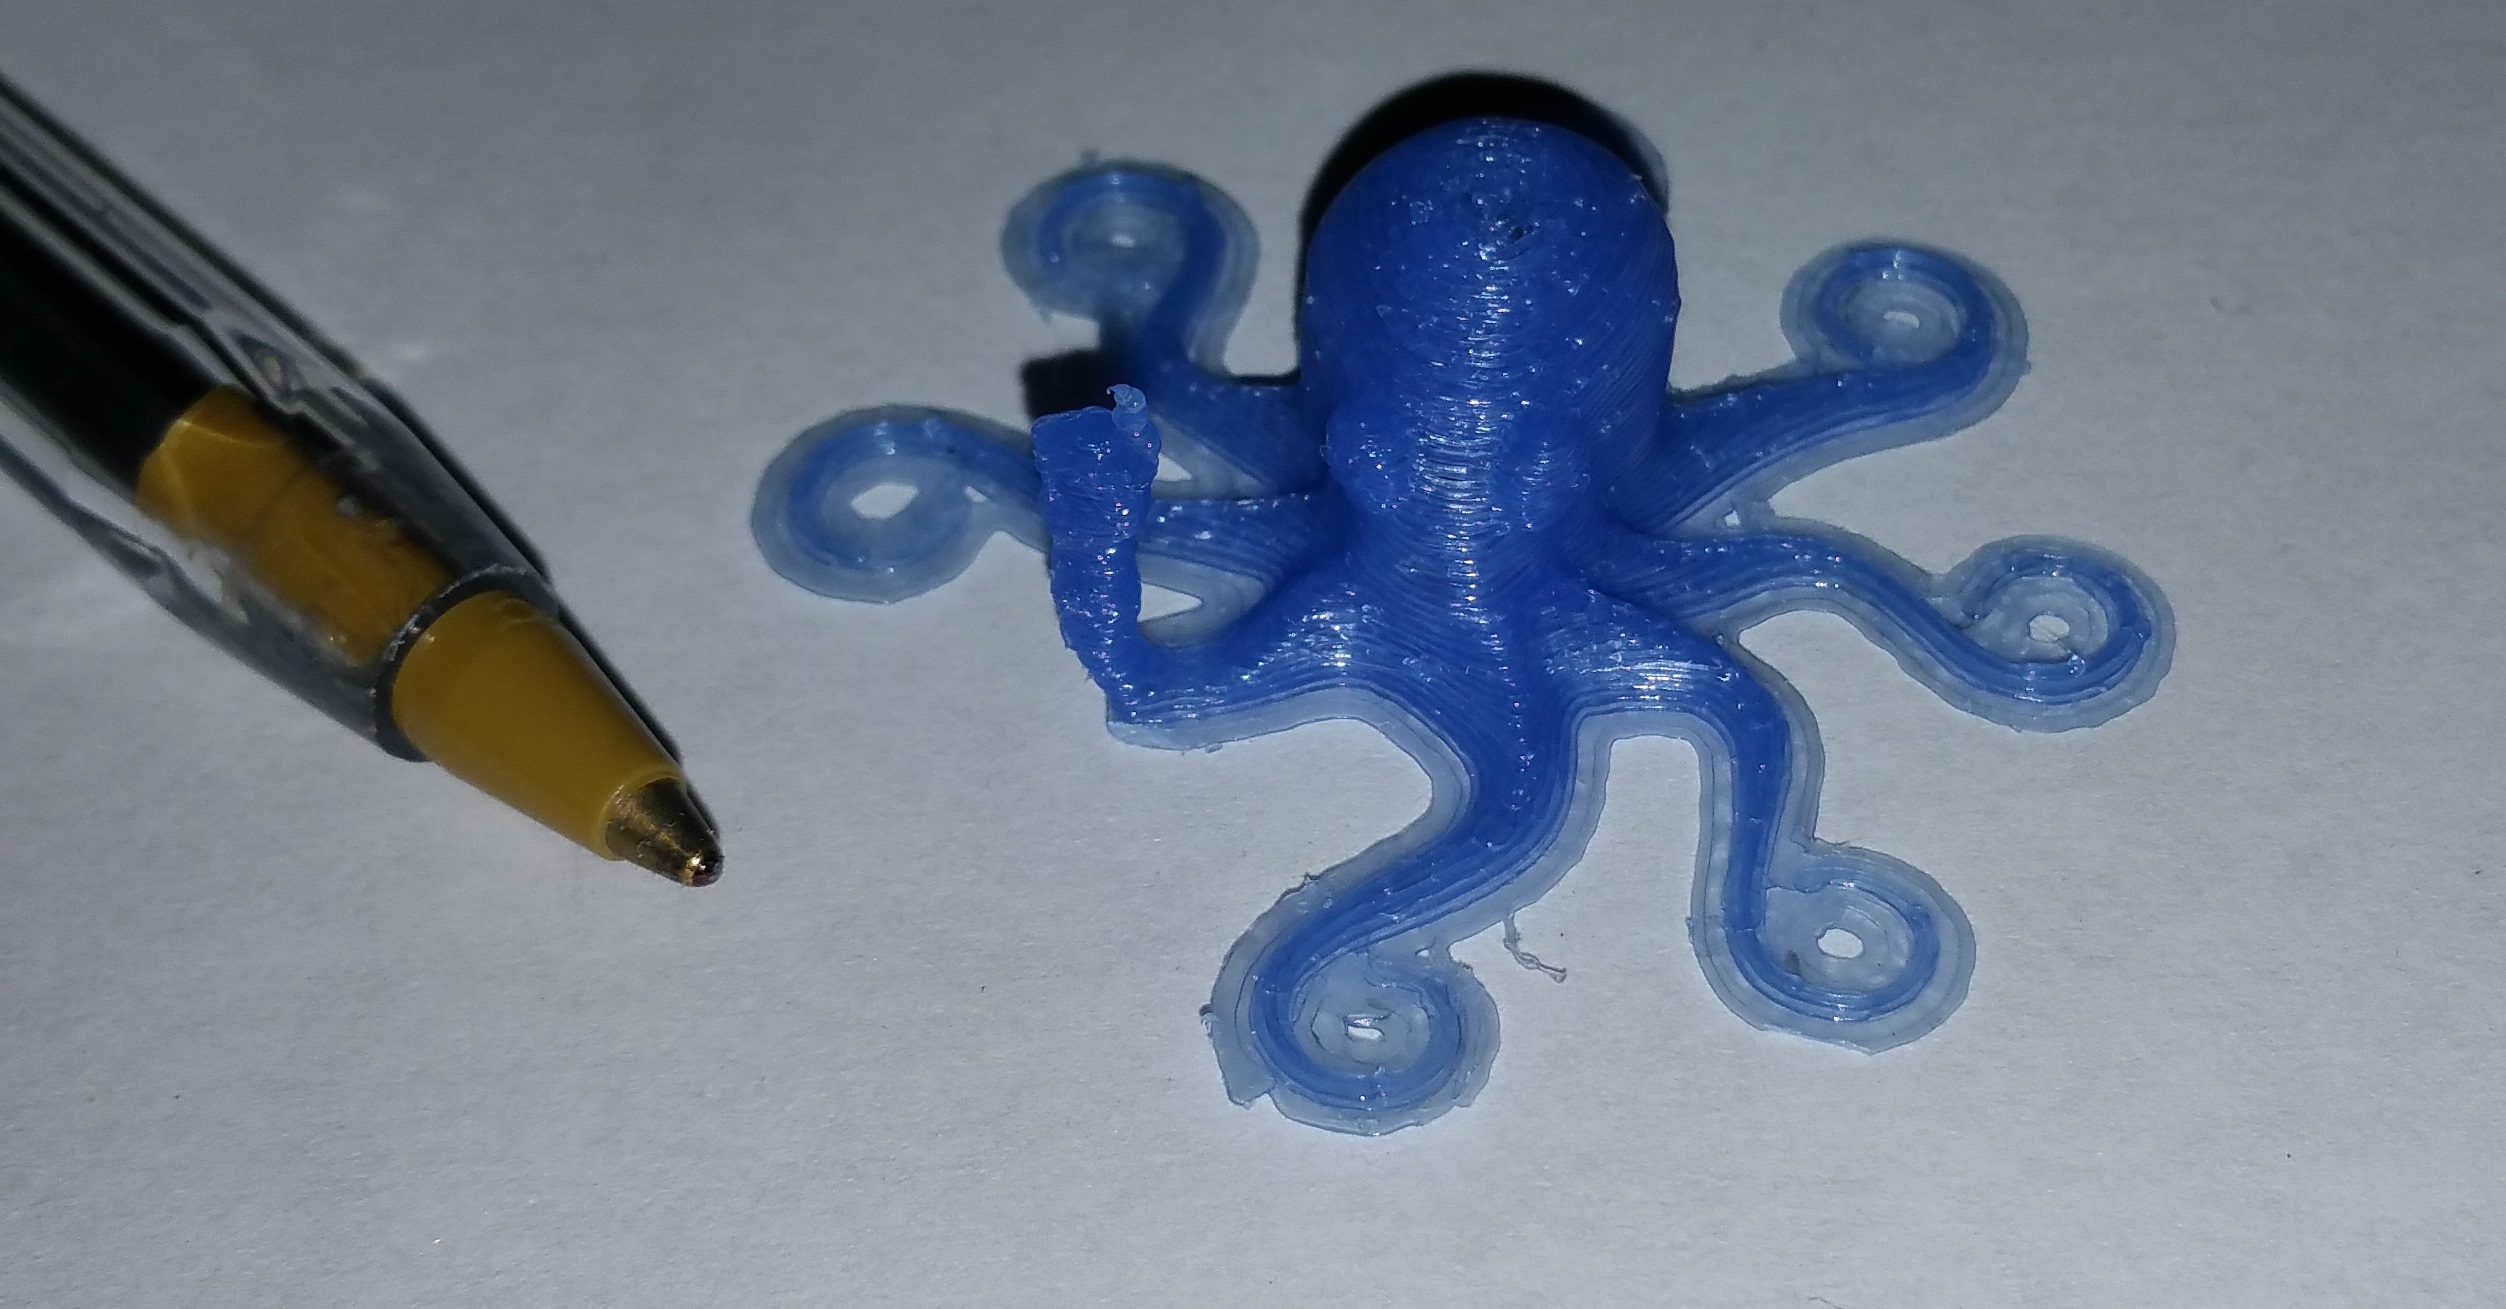
The PET + Print is in blue and another print in ABS is in black for reference.
Observations from rocktopus accidental mini print:
- The print appears to have brim around the first layer. about 1mm in size. No brim was selected in slicer. This could be due to the impressive small print or due to some over-extrusion on the first layer programmed into slicer. More testing will determine.
- The tiny print maintained good adhesion to the bed surface and easily came off the kapton tape when cooled. minimal pressure required.
- While not visible to my eyes, after a quick review of the HD close up photo of the PET + Version, you can see some minor some minor imperfections (Gaps in perimeter) around the eyes and on top of the head. This could probably be fixed with additional outer layers (Shells i think they are called) and upper layers. Some however would not consider this a requirement for the sake of time.
- The print quality seems good overall for even such a small item. While It is missing a finger it does maintain the details around the eyes as seen on the ABS print. The missing appendage is most likely due to a layer height issue in comparison to size.
- The increased fan speed of 50% appears to have mitigated all of the perimeter melting issues. The fan maintained a 50% speed only after the first X(3 in this case) many layers.
- At only 15% infill the small rocktopus is rather strong. Infill was rectilinear for the print.
- PET + Is very difficult to clean off the nozzle. Oozing remains problematic during Hot end warmup. If too much oozes out when the print begins the first layer may become damaged. (Failed print). While i have not worked with PLA i get the feeling that the cleanup of this filament may be similar.
-Print took 8minutes according to the printer interface.
-Print was executed from the computer not SD Card.
Assumptions:
- Print could probably be executed faster on the Taz 4.1. With 30mm/s perimeter and 60mm/s infill, the inter layer bonding remained solid.
-While the manufacturer recommends not printing with the fan on. 50% fan speed seemed to work best for me. <50% as shown in the above pictures resulted in the filament melting. This is possibly due to a combination of Hot end temperatures and print speed further backing up my assumption that the print needs to happen faster or turn the fan on. Based on this assumption these settings probably correspond to a mid range print setting. Faster with less detail is possible, or slower with a greater fan speed.
-The manufacturer indicates that PET+ has a strong desire to curl along the edges. With the small parts i have created and or due to the kapton tape. I have not observed this potential effect. Based on the ability of Kapton tape to hold ABS equally as well. I will assume that the tape is sufficient and no glue / other methods of hold down are required (Maybe brim as needed).
Moving Forward:
- I’m going to go ahead and say that this will be my Medium PET+ Profile for now. Continued research for quality vs speed will determine a fine vice fast setting.
- Hopefully somebody finds this information useful. I’ve uploaded my config file from slic3r to this post for anybody else who’d like to give it a try. Comments on how to make it better for everybody are welcome!!
Medium_Pet_plus_no_support.ini (3.32 KB)
Update: on larger prints (2+ hours) it does seem that the PET + clogs the nozzle with current settings. The clog strangely enough comes from the hot end pickup up “drooled” plastic as it moves back and forth. not sure how to fix that one short of increasing Z Retract height as this filament loves to drool everywhere even at lower temperatures.
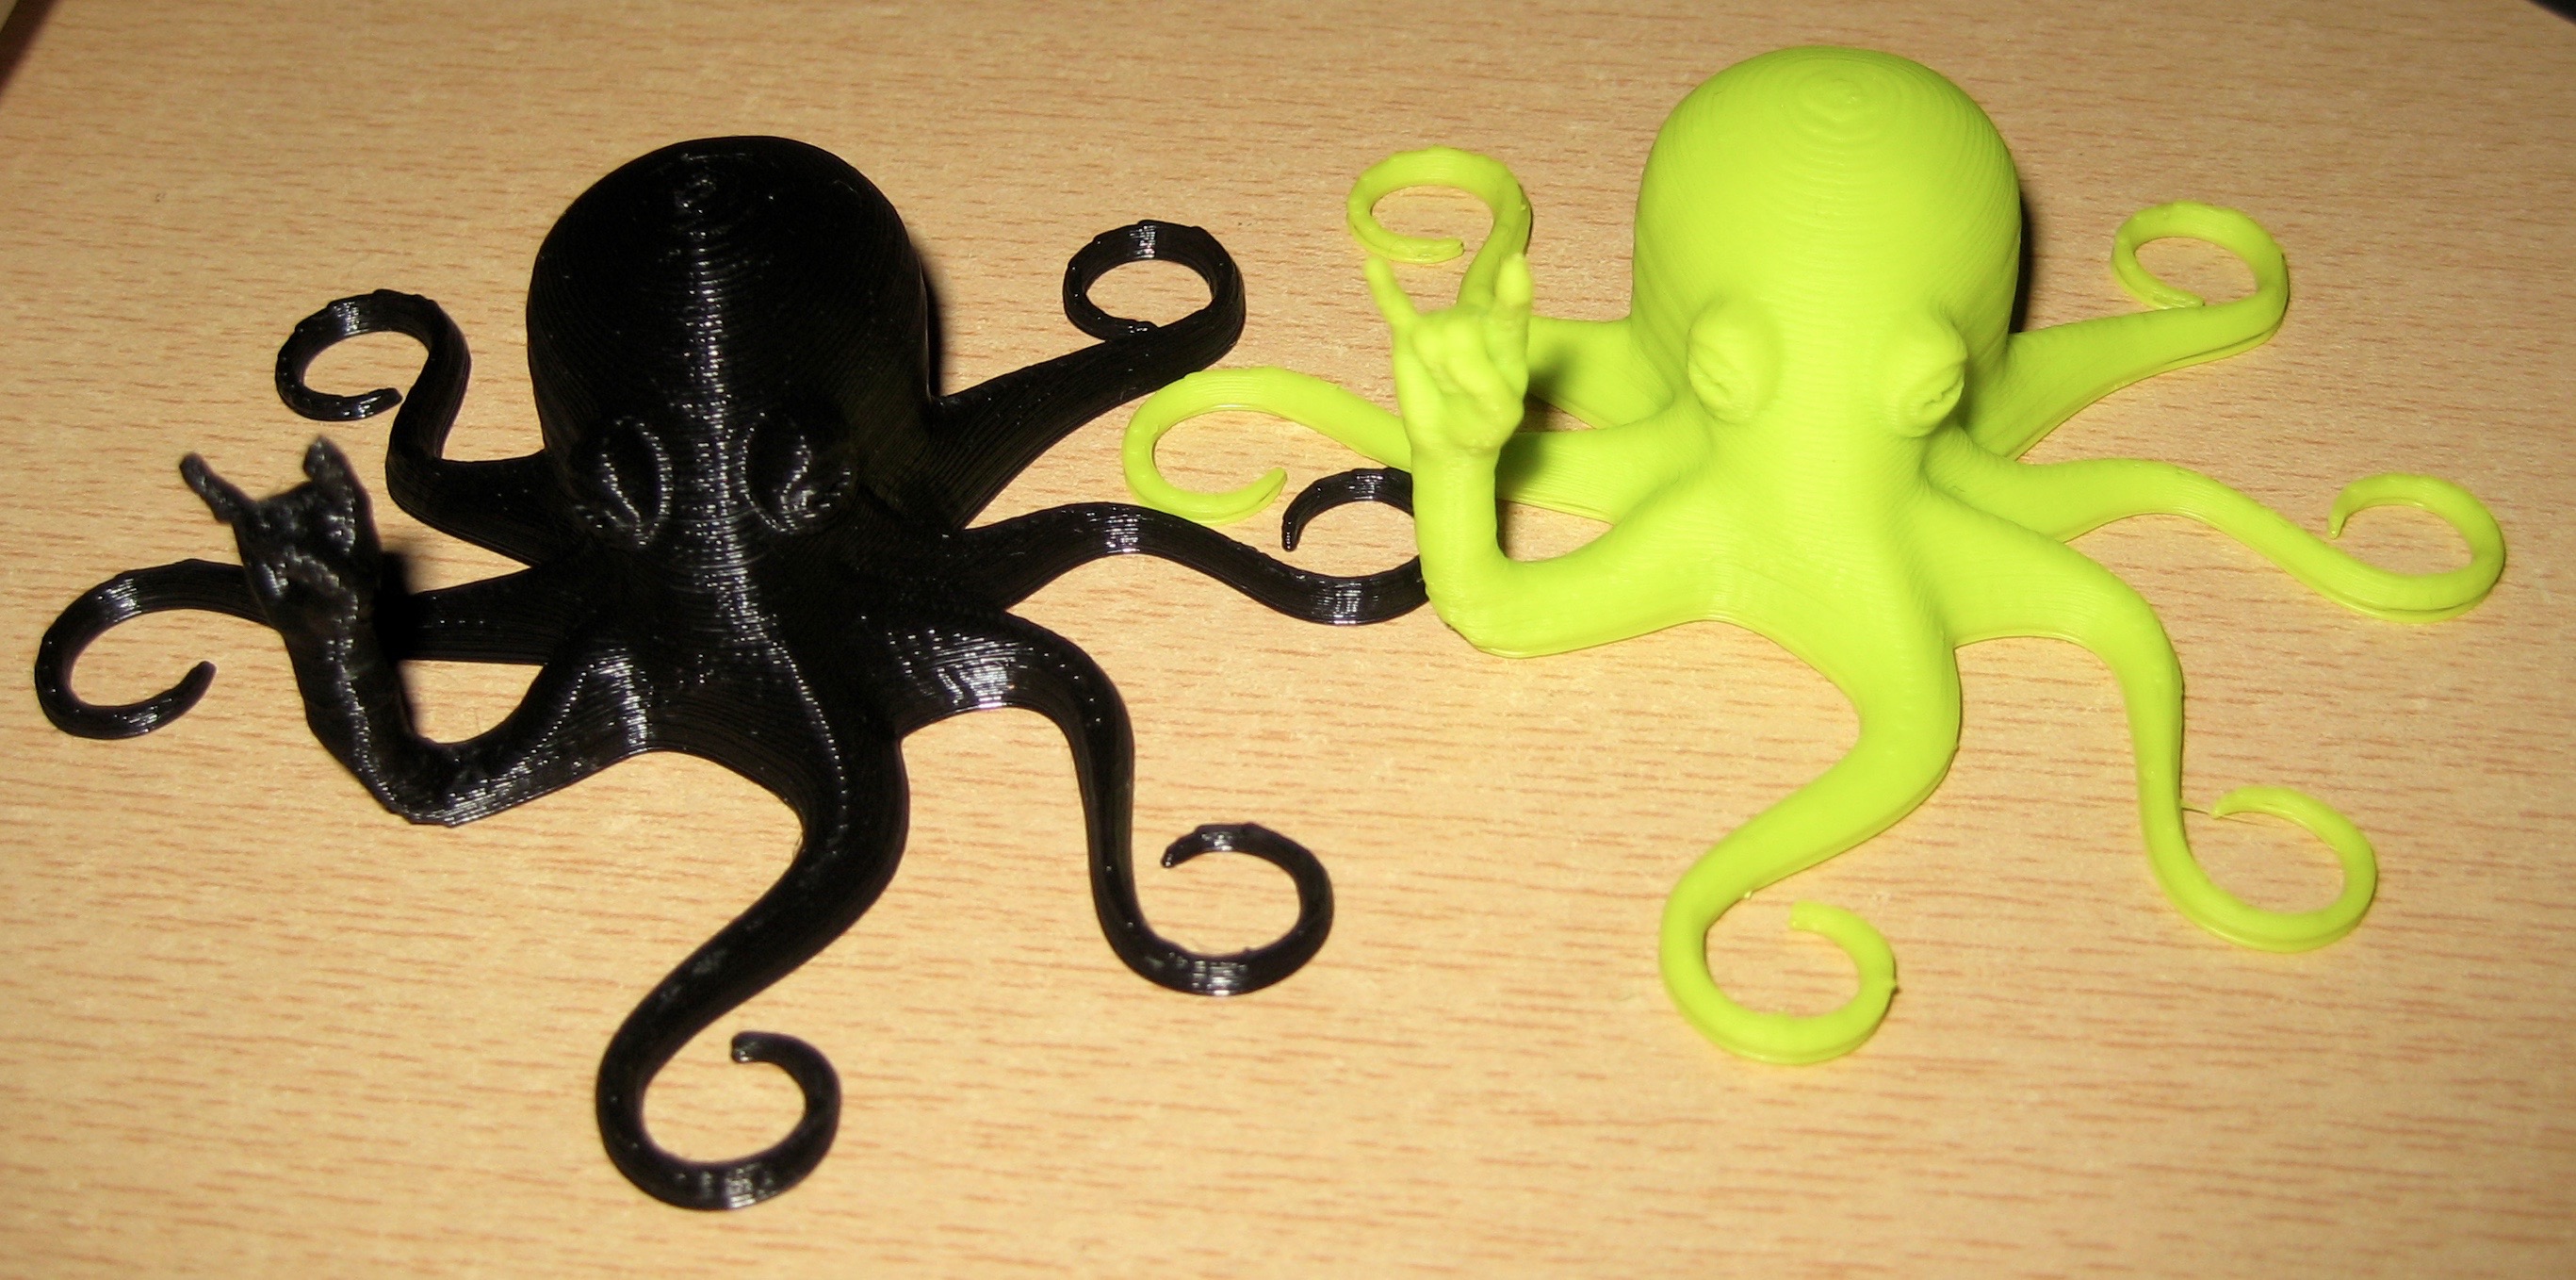
I spat out a quick Roctopus (50% scale) as a baseline when I loaded up my first PET+ filament.
I have a TAZ 5 and used Cura’s quick print “high quality, ABS” setting. Set the temp to 230 and the bed to 65. It’s not perfect, but considering I was expecting a gooey blob…
For those with more experience than I, would you think I just happened to luck upon a better starting place to tweak the profile. Or may it be more due to the difference of TAZ 5 compared to earlier models?
Picture notes:
Black: Madesolid PET+ (cura quickprint high quality ABS settings, 230, 65 bed)
Green: Lulzbot ABS (cura quickprint high quality ABS settings, 240, 110 bed)
Red: IC3D ABS (cura quickprint high quality ABS settings, 225, 110 bed)
These Roctopi were NOT all identical (e.g. not the same STL, much less the same gcode.) Unfortunately that means detailed comparisons can’t be made (e.g. the shape of the forearm differs in the PET+ (black) model because of a difference in the STL).
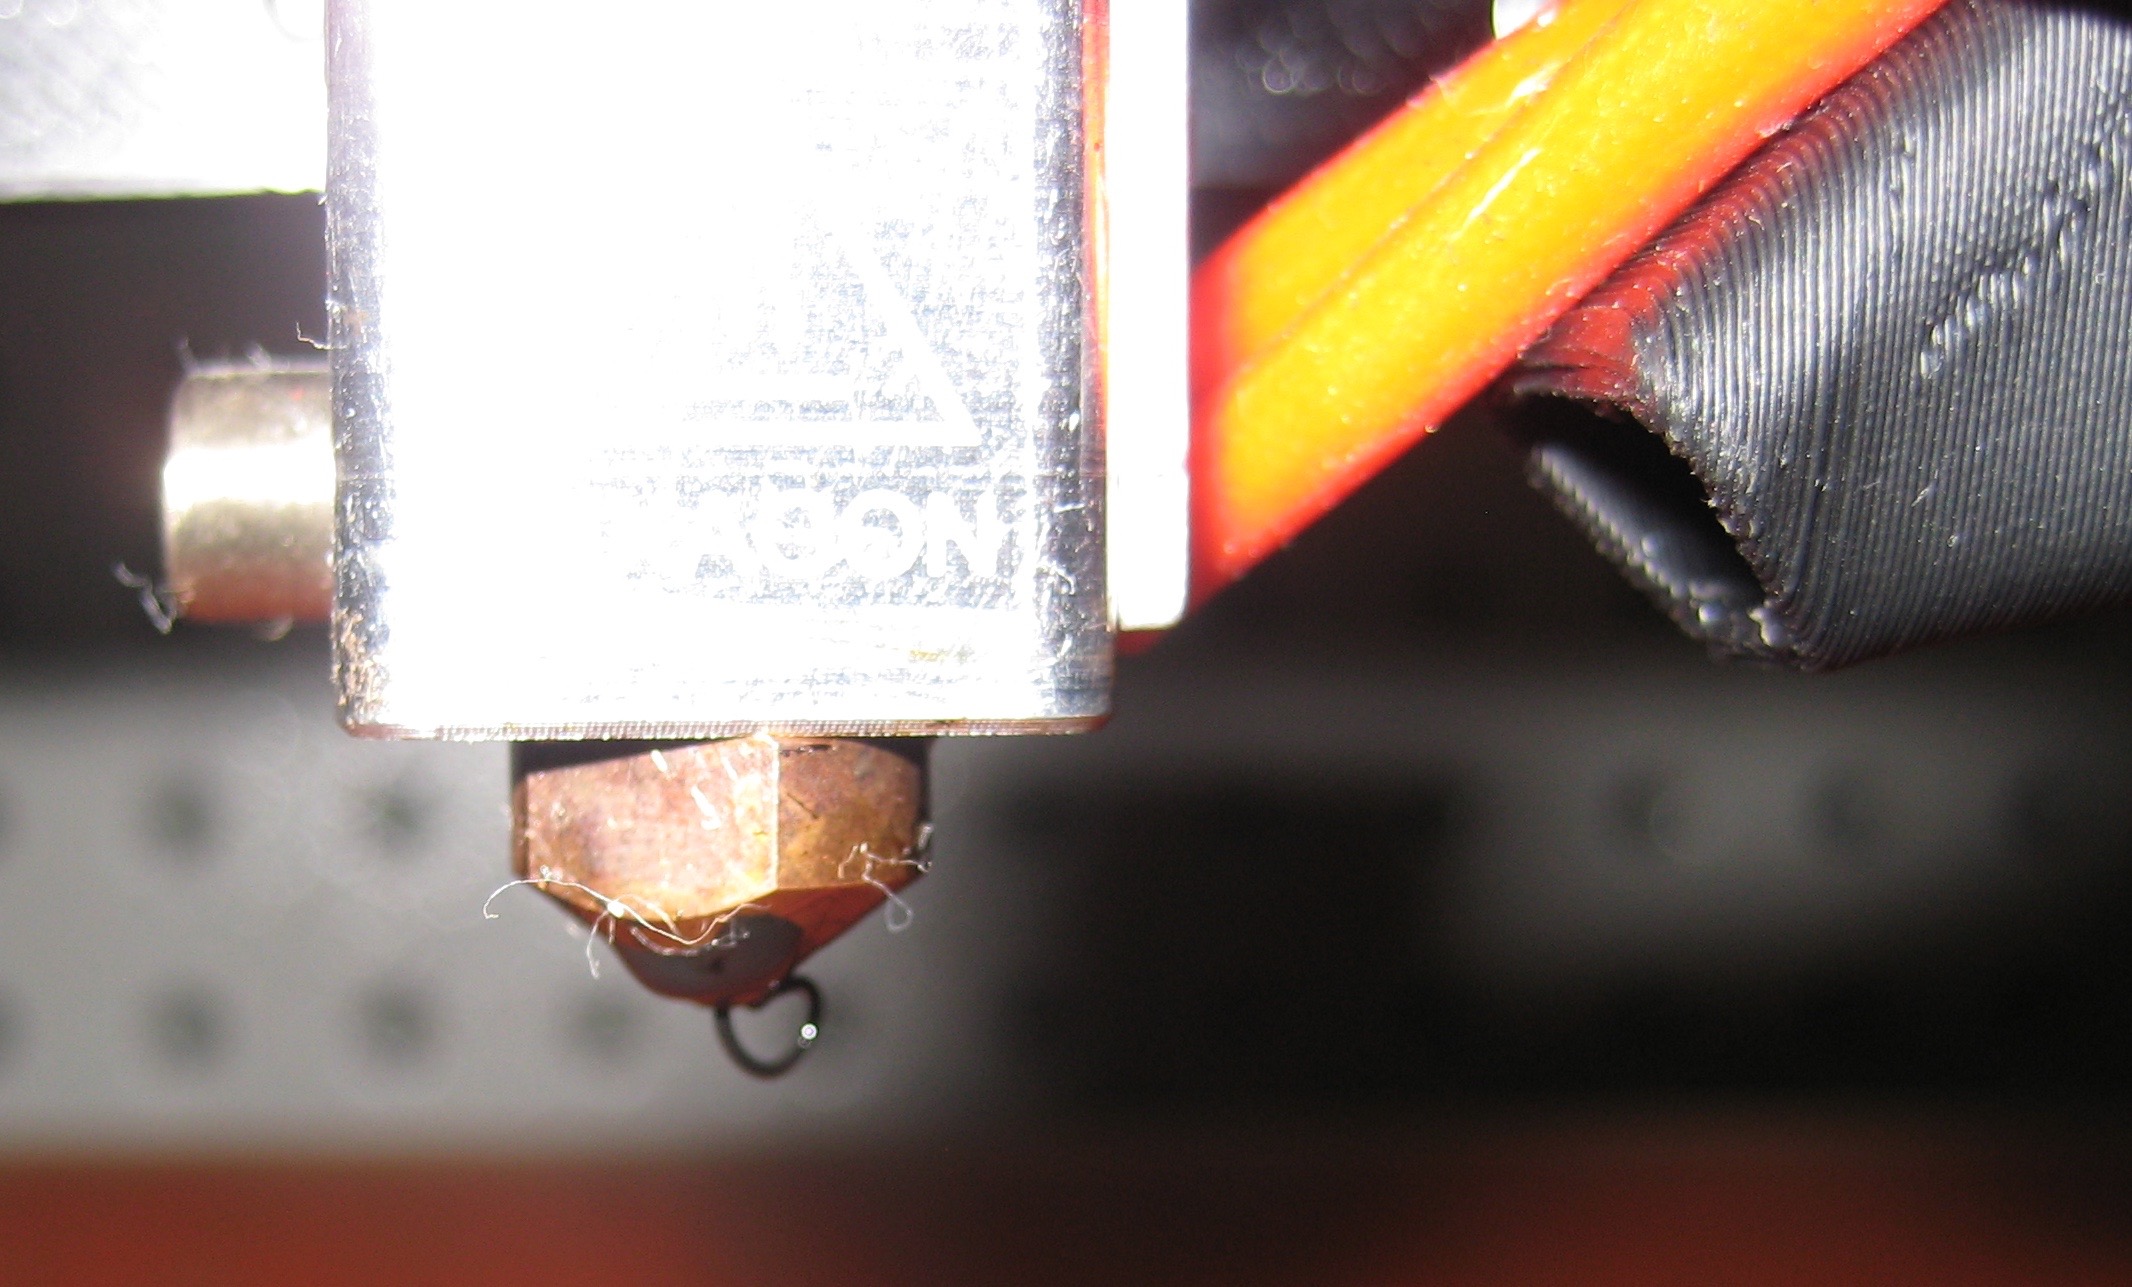
The pic of the nozzle is the extent of the build up AFTER the 1 hour long print.


That is decent quality starting print with Cura. PET+ and ABS print in a fairly similar manner, Temperature and speed wise so i’m not too surprised of your results with that setting.
I have a Taz 4 and the differences aren’t terribly significant from a Taz 4 and 5. (All Metal Hot End, and Print Surface).
The original Nozzle on my Taz 4 looked similar / often worse than your nozzle picture after short prints, and sometimes completely covered for anything longer than 30 minutes when printing with PET +. I have since upgraded my nozzle to the E3D V6 all metal hot end and the problem has gone away completely. The problem will only return when one of the following situations occur:
Partial clog in the hot end:
-
Diagnosed via slight to extreme filament curling as it exits the nozzle. (May be a potential situation for you based on your nozzle picture.) -
Solution: clean the nozzle by either taking it apart or performing multiple cold pulls.
Retraction not set correctly:
-
Diagnosed via: As your part is printing if you have excessive stringy - ness , spiderwebs, ect forming between non print moves your retraction is not set properly. -
Diagnosed via: Following a non print move, a small amount of filament has appeared just outside of the nozzle tip. As the print head begins to print again this small filament deposit usually rubs itself on the printed part and finds its way onto the nozzle tip. -
Solution: Adjust retractions - Because PET+ Loves to ooze out of the nozzle, I use a retraction speed of 30mm/s and anywhere from 1-2mm retraction depending on the color and temperature i'm printing at. -
Solution: Have the printer lift Z ~.2mm whenever a retraction occurs. This prevents the nozzle from accidentally rubbing a small amount of ooze on the part and back onto itself.
Uneven print surface:
Problem: Build up / nozzle drag on the print:
Solution: Check bed level
On a different note the finger on your prints can be improved in a few ways depending on the filament you are printing with.
For ABS:
- Use an enclosure.
- Invoke a minimal layer print time
- Adjust print temperature (Only if above 2 didn’t work)
- Turn on the cooling fan (Only do this as a last resort. Air movement may improve small print surfaces with ABS but is usually just going to cause problems with delamination, and warping. I would rather print 2 of the same objects to increase layer time before turning on the cooling fan.
For PET+:
- Turn on the cooling fan (An Auto setting based on layer time will suffice.)
- Invoke a minimal layer print time
- Adjust print temperature (Only if above 2 didn’t work)
- Print multiple objects (Causes nozzle to move away and allow layer to cool sufficiently (Not completely) for proper bonding to subsequent layer) Can be a tricky solution sometimes, but hey your friends need a rocktopus too!
Happy Printing!