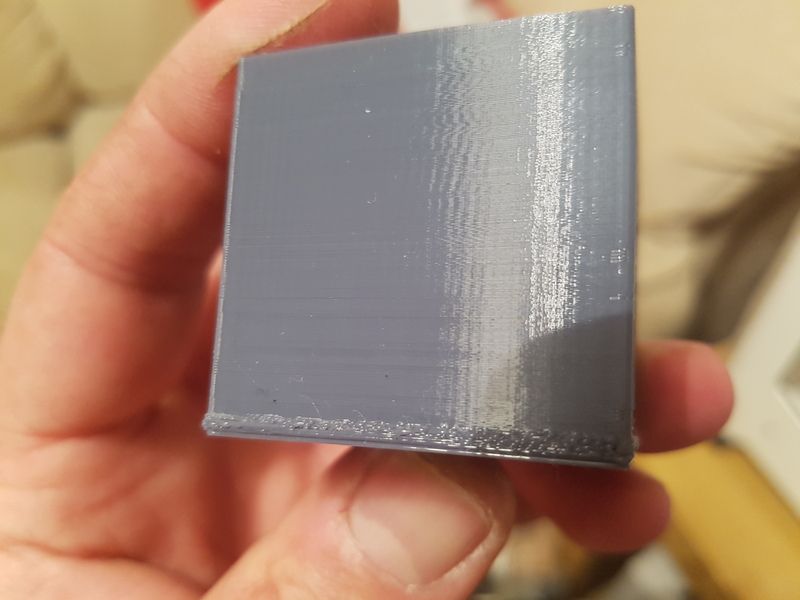
I have been getting a line around my prints. It’s about 1mm thick.
I have done the anti wobble mod and the openrail x modification and the problem has remained the same.
The printer is a Taz 4 with the Hexagon hot end fitted.
I have used cura and s3d and get the same results.
I have checked everything is level.
That is classic Z height problems and overextrusion.
Two things you have to do.
Use your calipers and measure the diameter of the filament in 4-5 spots and average the 5 diameters. Put this diameter into Filament diameter box. If you haven’t measured your filament correctly, it will cause overextrusion and give you that print defect. Most 2.85mm filament isn’t actually 2.85mm. 2.83, 2.87, 3mm isn’t uncommon.
After you’re sure you have EXACTLY the correct diameter:
Print a new test part with a skirt. Get out your digital calipers and measure the thickness of the skirt. This is the initial layer thickness. Does your measured initial layer thickness match what your initial layer thickness is set for in cura? I’m guessing no.
You can modify your Z height of your nozzle under expert mode: machine: machine settings: Z-offset. Ex: If you measure your skirt thickness to be 0.3mm, and cura initial layer height is set to 0.425mm, add about half the difference into Z-offset (~0.06mm). Print the part again and measure the skirt. Maybe it measures 0.36mm this time. Add half the difference between 0.36mm and 0.425mm (~0.03mm) and add that to the previous Z offset (New Z offset would be 0.06 + 0.03 = 0.09mm). Print again and measure your skirt thickness and compare against initial layer thickness setting. Repeat until measured skirt thickness matches initial layer thickness in cura.
If you can’t find your Zoffset settings, contact Lulzbot support and they can point it out to you.
3. If you’ve done steps 1 and 2 correctly, you should see improvement. If you haven’t ever calibrated your printhead, then it’s possible you’ll need to reduce your flow % a few % to really dial it in.
If you complete steps 1 and 2, print a test cube and post a picture of the bottom side of the print and it will be easy to diagnose whether we need to mess with your flow %.
Classic problem, easily fixed. You just need to dial in your printer a bit.
I’ve seen that crud at the bottom when my heated bed is too hot. For ABS I set it at 110 for 1 layer then 95 for the rest. I would assume the same for PLA but lower temps.
I checked all the points you suggested and all seemed ok. The first layer was a tiny amount out which i corrected.
After playing around with it all day it looked like the Z axis wasn’t raising properly for the first few layers.
When i fitted the anti wobble i had to substitute the nylon pins for a different model.
I changed back to the standard method and the prints were ok again (apart from the banding)
Im just doing another test print with the anti wobble fitted again but with some different pins and it seems to be going ok.
Im not sure what was causing the bad prints before the anti wobble was fitted, although one part had a crack in it when i removed it.
I got two good prints before it returned.
It turns out it was the end bracket on the right hand x rail. It was about 1-2mm out too far.
After moving it back in the problem disappeared, move the bracket back out and it re-appears.
I think it must have been pushing on the rods at the bottom of the z travel preventing it from raising correctly on the lower layers.
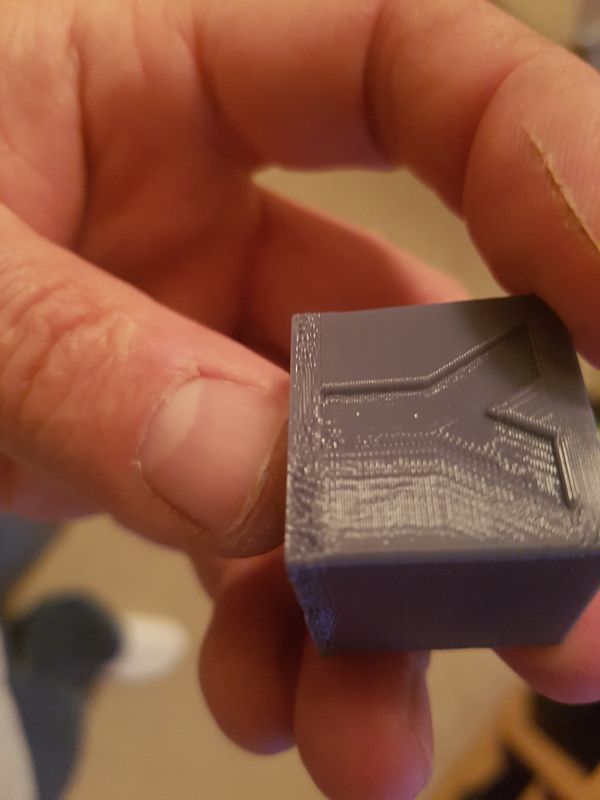
I now have a problem with bad banding so something is still not right.