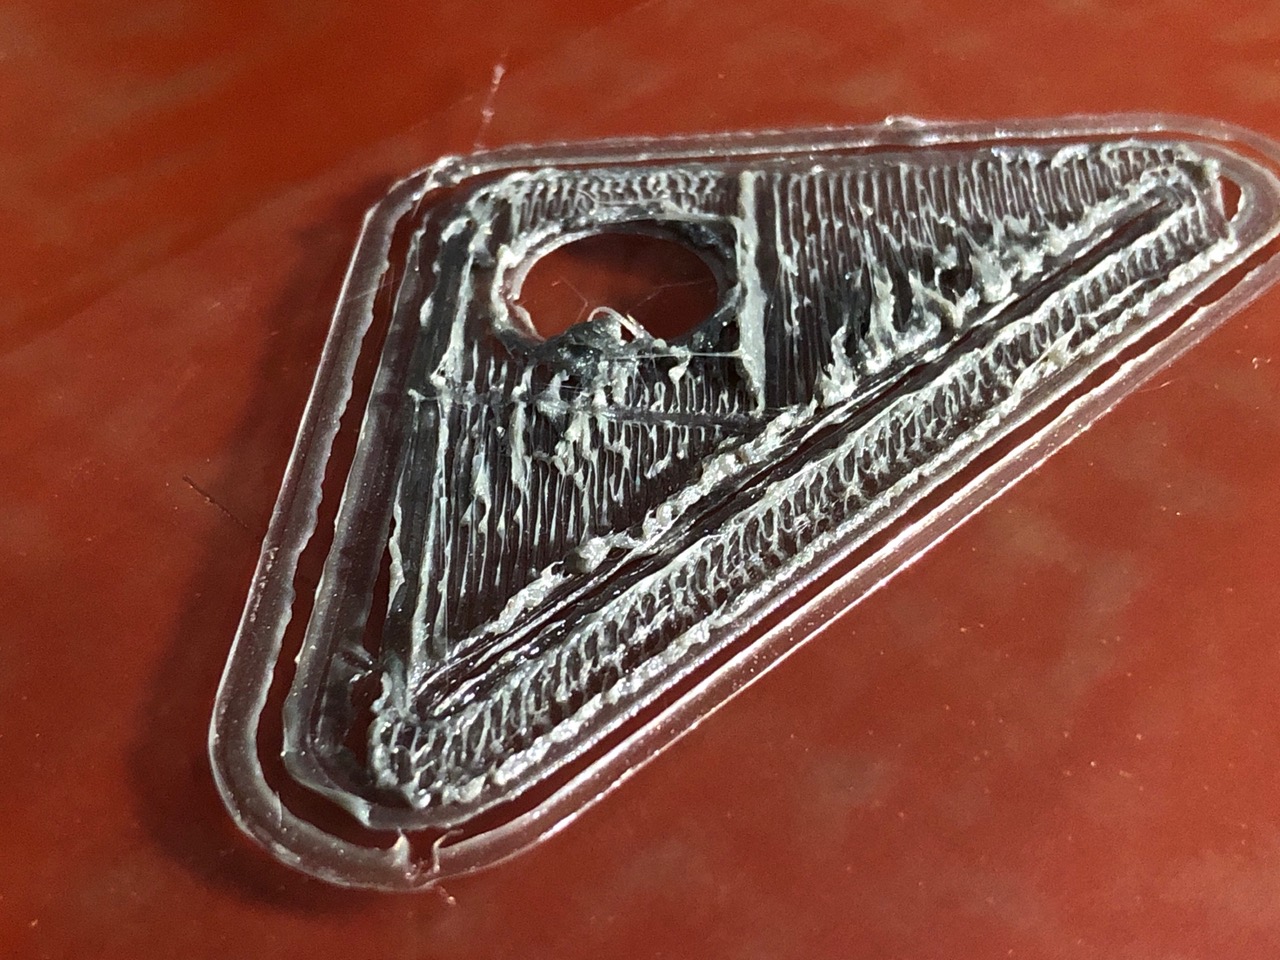
Hi, just started 3D printing, i was able to print the rocktopus fine with the stock filament, then i printed a couple of pieces with Inland PLA+. I then started with some ColorFABB NGen to print the typical toothpaste squeezer, using Cura, but the extruder seemed to then drag across previous layers, and would build up around the extruder. Tried some different defaults and the went back to what printed the rocktopus with and ended up with same issue. hopefully picture attaches.
What’s your Z level at?
Four other things come to mind. 1.). It’s not hot enough, what’s the printing temperatures set at? 2.) Your filament has absorbed water or is old. Do you live in a humid climate? How old is your filament? 3.). Your e-steps are off and needs resynched. What printhead are you using? 4,). Your layer height is too large for your nozzle size. What size nozzle are you using? What is your initial layer height set to? What is your printing layer height set to? The skirt around your print, does that look good? It looks good in the picture but It’s a little difficult to tell for sure.
Also, since you’ve been printing with different filaments have you purged out the older filaments? Especially when going from a hotter melting point to a lower one. Run the new filament through the extruder at the temperature of the hotter filament. 20 to 30mm should be good.
That skirt looks awfully smooshed to me… I’m wondering if your auto-level probe sequence isn’t completing successfully? When your nozzle touches the corner washers, can you see the print bed deflecting? If so, you need to clean your nozzle (the built-in wipe isn’t always enough).
If the bed corners are deflecting during the probing sequence, the printer will think the bed is lower than it actually is, and the nozzle will be pushed lower than it should be.
Sorry was distracted this weekend, here are some answers and I will need to look into others.
Z Depth, assume same as probe Z offset, -1.00
- print temp was 205 extruder, 60 bed for the Polylite PLA, defaults in Cura, and used for Inland PLA+. For the nGen used Cura defaults of 230 extruder, 85 bed with glue stick.
- In Colorado, house humidity is 30%, nGen was brand new out of the box from MatterHackers.
- Esteps 830, printing with the single extruder 0.5mm, standard layer height is 0.25 in standard, 0.425 initial layer
Was using all Cura Defaults.
Think i was doing a good job on cleaning, it might have had some when it depressed the disc, then it would wipe and then do the 4 corners. I was watching the display when going through the leveling procedure, after the disc, z10, then z6.71 FL, z5.62 FR, z6.32 BR, and 5.95 BL if that makes sense.
Z offset of -1.00 is awfully high. A toolhead swapout reflash firmware will set it to -1.2 which is usually still to high. Try setting it to -1.35 and adjust from there. Better yet, start the print and adjust the Z offset in real time. Tune > Z offset. Different filaments sometimes will require different offsets. Generally pretty close though. The largest offset I’ve needed was for Ninjaflex.
Finally got a moment to get back to it. I went into the printer menu, and selected “failsafe print” and think that reset defaults, so the Z offset was then -1.2. I did a print, left at -1.2, and then on the right at -1.3, and not seeing much difference. this was with the standard Cura settings for fine detail using the poly pla that came with the printer. Was able to print the rocktopus fine with this before. I did use the glue stick for the NGen and it was still on the bed.

I agree with @cg49me. That filament really looks squished.
Are you using the original bed-leveling washers?
Yes, all original, less than 2 weeks out of the box. I am in the process of making sure my filament is dry. I watched the leveling sequence and did not notice the bed deflecting, or if it did, was small enough to that i did not notice.
As noted by others on this thread, your z-offset is clearly wrong.
Check your toolhead mounting – when cool, gently grasp the nozzle with forefinger and thumb, and wiggle it in all directions (including the Z axis). There will be movement, but that movement should be limited to the flex in the rods, i.e. the nozzle should not shift in the tool head mounting, and the tool head should not shift in its mounting bracket (although there will some small play vertically in the linear bearings, so the entire assembly on the rods will move very slightly vertically - but only slightly, and you should feel the full weight of the tool head and mount should it move at all).
Assuming the tool head and nozzle don’t shift in their various mountings, the best thing to do at this point, given that you’ve made NO modifications whatsoever (including adding tape or a PEI sheet onto the bed, etc), is to follow the Lulzbot directions to adjust your z-offset. That first layer is simply too squished, if your nozzle isn’t touching the bed, it’s so close that it doesn’t make a difference! Also note that shipping is a brutal experience for any bit of equipment, so please don’t be under the assumption that a perfectly-adjusted printer at the factory arrived at your doorstep still perfectly aligned!)
(By the way, you haven’t changed your first layer height setting in Cura, have you? It should be equal to or greater than the normal layer height…)
Checked the head, no play. I bumped up to -1.35, and looks like scratched the bed. so i went the other way, was at -0.85, and tuned to -0.75. All negative values. There might be a difference with this machine, it was refurbished. I will try too tune in the values.
I still need some tuning, was able to print, tried different model, first layer looks like pic below, 2nd layer evens it out a little bit. 210 print temp, bottom layer thickness 1mm, 5 layers, print speed 60 mm/s, wall 30 mm/s initial layer speed 15 mm/s, polylight PLA

Can you mic the washers and see how thick they are?
Still too close. Look at that outer ring – that’s the skirt, which is one layer high and encircles the entire part, so it’s a great place to check how that first layer is working out. It should be a bead on the bed, not a flat strip with plastic squeezed out on either edge!
mic’d at around 1.5mm. they did factory acceptance test at -1.0, and now printing at -0.70. layer height is 0.25mm, initial layer height 0.425mm.
edit, skirt was about 0.19 to 0.20 mm depending on where measured.
I agree that this sounds all wrong - but the pictures of the plastic and the micrometer on that skirt do not lie – you’re STILL too close! Ideally, if that initial layer is set to .425mm in Cura, then that skirt should be .425 mm high. In actuality, it’ll vary a bit due to variations in the thickness and levelness of your glass and PEI layer on your bed. (Less so on the Mini than the Taz, though). You should start seeing things looking right as you get that height up to .36 mm – but since it’s a mini, and a reasonably-sized part, there’s no reason you can’t get the skirt height adjusted so that it never gets thinner anywhere than .4mm and never gets taller than .425mm.
If you observe that when you have it set that way that the first layer doesn’t seem to “fill in” or doesn’t adhere well, that’s what the first layer overextrusion is all about – set that to 110% so that a little extra plastic is extruded, but the height remains the correct height for that first layer.
yes, and the weirdest part is that I was able to print the rocktopus and a brake duct without issues and no changes to any of the settings. It is a TAZ 6. Don’t know if something on the actual printer got bumped, etc.
I will run some more tests tomorrow. Thanks for everyone’s help, has been very frustrating, but starting to see things go in the right direction, so I am hopeful.
Can you share the STL to see how that was exported. I don’t know if it would help, but if you look at the layer view I’m Cura, what’s the first layer look like?
I can, original was toothpaste squeezer, and the last was a Mandalorian Coaster, both from thingiverse. I can get a link to them.
when look in Cura, looks smoother, but distinct lines if that makes sense.
Did you print the rocktopus gcode file? Or sliced the stl? Typically the recommended first print is the gcode sample file. In which case, it was “sliced” from the factory.
Typically if you’re specifying a Z-offset in the slicer software (Cura), don’t exceed 1mm… if the level process is working properly, you shouldn’t have to specify an offset at all. If you want more adhesion or a flat bottom, try .1-.2mm offset. Anymore and you should double check that the nozzle and discs are clean to register the proper initial nozzle height.
If you want a smooth bottom, try increasing the flow for the first layer.
If better adhesion is the goal, try a quick sanding of the PEI with 1500grit sandpaper.