Hi all,
I thought I would share the source of an under recognized filament, machinable wax. It is sold by http://www.machinablewax.com.
I did a lot of trial and error to work with the filament, but once you crack the secrets to working with this filament, the ability to print castable objects becomes a reality. The filament is a true machinable wax, and as such, it should be a lot easier to have foundries work with it than other “moldable” filaments. It has a print temp of just 140 and a bed temp of 55 degrees.
It’s been a while since I last printed with the wax, but I’ll try and give you the settings I use.
Firstly, I built an enclosure for my Taz. It started out as a kittaz, but I upgraded the hotend to the Hexagon with a .25mm nozzle and I also added PEI to the bed and added the led controller. For slicing, I use Simplify3D.
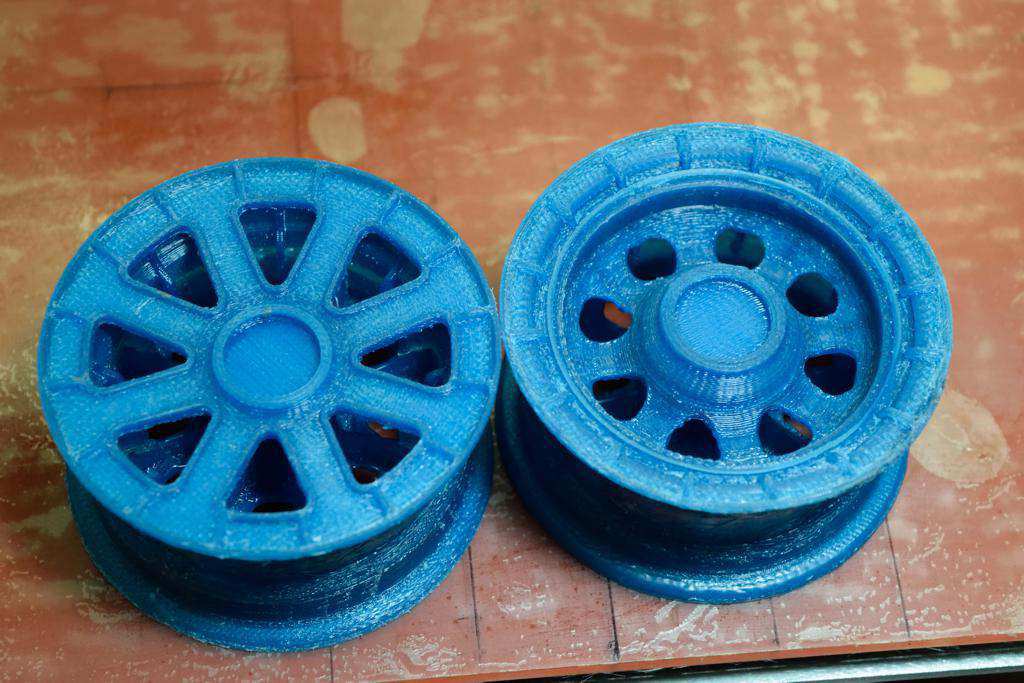
The wheel I was printing is 3" in diameter and 1 9/16" wide. I print it in two pieces in order to get good detail on both the front and back. I also printed them with a .25mm nozzle to improve detail. I have the print setup so that it prints with two different settings (one of the very nice features of S3D). Since the wheel will have a tire on it, it’s only the faces that need the really fine detail. I start off printing each half at a setting of .2 mm layer height, then switch to a .08mm layer height for the faces. After printing, the two halves are joined using traditional wax working tools.
Note, the flash from the camera makes the print look more coarse than it really is.


The two print profiles are mostly the same with the exception of the layer and advanced settings.
Coarse settings:
Extruder
extruder nozzle dia. .25
extrusion multiplier 1
extrusion width .25
retraction enables
retraction distance 1.2
retraction speed 1500
Layers
Primary Layer height .2
top solid layers 3
bottom solid layers 1
Outline/perimeter shells 4
outline direction inside-out
first layer height 100%
first layer width 100%
first layer speed 50%
Optimize start points for fastest printing speed
Additions
Use skirt/brim
skirt layers 2
skirt offset from part 0
skirt outlines 8
no raft
no prime pillar
no ooze shield
Infill
internal fill pattern rectilinear
external fill pattern rectilinear
interior fill percentage 35%
outline overlap 15%
Infill extrusion width 150%
minimum infill length 0
print sparse infill every 1 layer
include solid diaphram every 20 layers
Infill angle offset 45, -45
Support ( I build custom supports using the custom support tool.)
generate support material checked
support infill percentage 30%
extra inflation distance .4
dense support layers 0
dense infill percentage 70
print support every 1 layers
horizontal offset from part .3
upper vertical separation layers 1
lower vertical separation layers 0
support infill angles 0
Temperature
Primary Extruder
Layer 1, 140
Heated Bed
Layer 1, 95
Layer 3, 55
Cooling
layer 1 fan speed 0
G-code - default setttings
Scripts - default settings
Other
Default speed 3200 mm/min
outline underspeed 75%
solid infill underspeed 90%
support strucure underspeed 90%
x/y axis movement speed 4800
z axis movement speed 1000
horizontal size comensation 0
filament diameter 2.75
bridging
unsupported area theshold 50 sq mm
extra inflation distance 0
bridging extrusion multiplier 100%
bridging speed multiplier 100%
Advanced
Layer Modification (this is where you can set the start and stop heights for each print profile)
stop printing at height 11.6
Thin wall behavior
Allow gap fill when necessary
allowed perimeter overlap 10%
Ooze Control Behavior (I think these are default)
only retract when crossing open spaces
force retract between layers
minimum travel for retraction 3 mm
only wipe extruder outer-most perimeters
Fine Settings:
Extruder
same as coarse settings
Layer
primary layer height .08
top solid layers 3
bottom solid layers 3
outline/perimeter shells 4
outline direction inside out
first layer height 90%
first layer width 100%
fist layer speed 75%
optimize start points for fastest printing
Additions
same as coarse settings
Infill
same as coarse settings
support
same as coarse settings
Temerature
primary extruder layer 1 140 deg
heated bed layer 1 55 deg
Cooling
same as coarse settings
Gcode
same
Scripts
same
Other
same
Advanced
Layer modification
start printing at height 11.6 (note that this is the same value as the last layer of the coarse settings)
the rest of the setting are unchanged.
I hope this can give you a jump start in getting dialed in with the wax filament.
Be sure to let me know how it goes. I really think this is a very under recognized filament option.
Cheers,
Scott