New Mini 2, various adhesion problems (PLA)

I received my new Mini 2 about a week ago. Out of the box the rocktopus printed perfectly. Using the same green filament, I then printed two small parts (the lid for a Raspberry Pi case, so about 4" x 2", and the faceplate for a Raspberry Pi camera, maybe 1" x 1"). These also came out perfectly, and that mostly used up the green filament.

Before I go on, I’ll explain that experience-wise, many years ago (10? more?) I had a little Cube3D but got tired of the vendor-lock-in filament. We upgraded to a factory-built printrBot that never really worked right so I sold it – probably 5 years ago. But I’m reasonably familiar with casual-hobbyist basics, although it has been awhile.

I switched to the included white sample filament, same make (Polymaker Polylite PLA). I extruded until it ran white and extrusion looked smooth so I tried to print. So far I haven’t had a single successful print. The first three tries, it didn’t stick to the bed at all and just made a tangled mess on the hot end. It wouldn’t even complete part of that outline it starts with (which I assume primes the extruder).

I cleaned up the bed really well (just a damp cloth, had no alcohol on hand at the time) and it seemed to work. I was trying to print the bottom part of that Raspberry Pi case, so most of the print was another flat 4" x 2" rectangle with some walls at the end. It laid out the perimeter ok and started the infill, and about a quarter of the way through it started pulling up the infill and was soon dragging the whole mess around the bed again.

More cleanup, and this time I used the glue stick. I know it isn’t supposed to be needed with PLA but I had no other ideas. The next try seemed to be going well. I got two completely filled layers down. I still have that piece, for just two layers it looks pretty good. But the third layer didn’t stick at all and soon I had another mess dragging around.

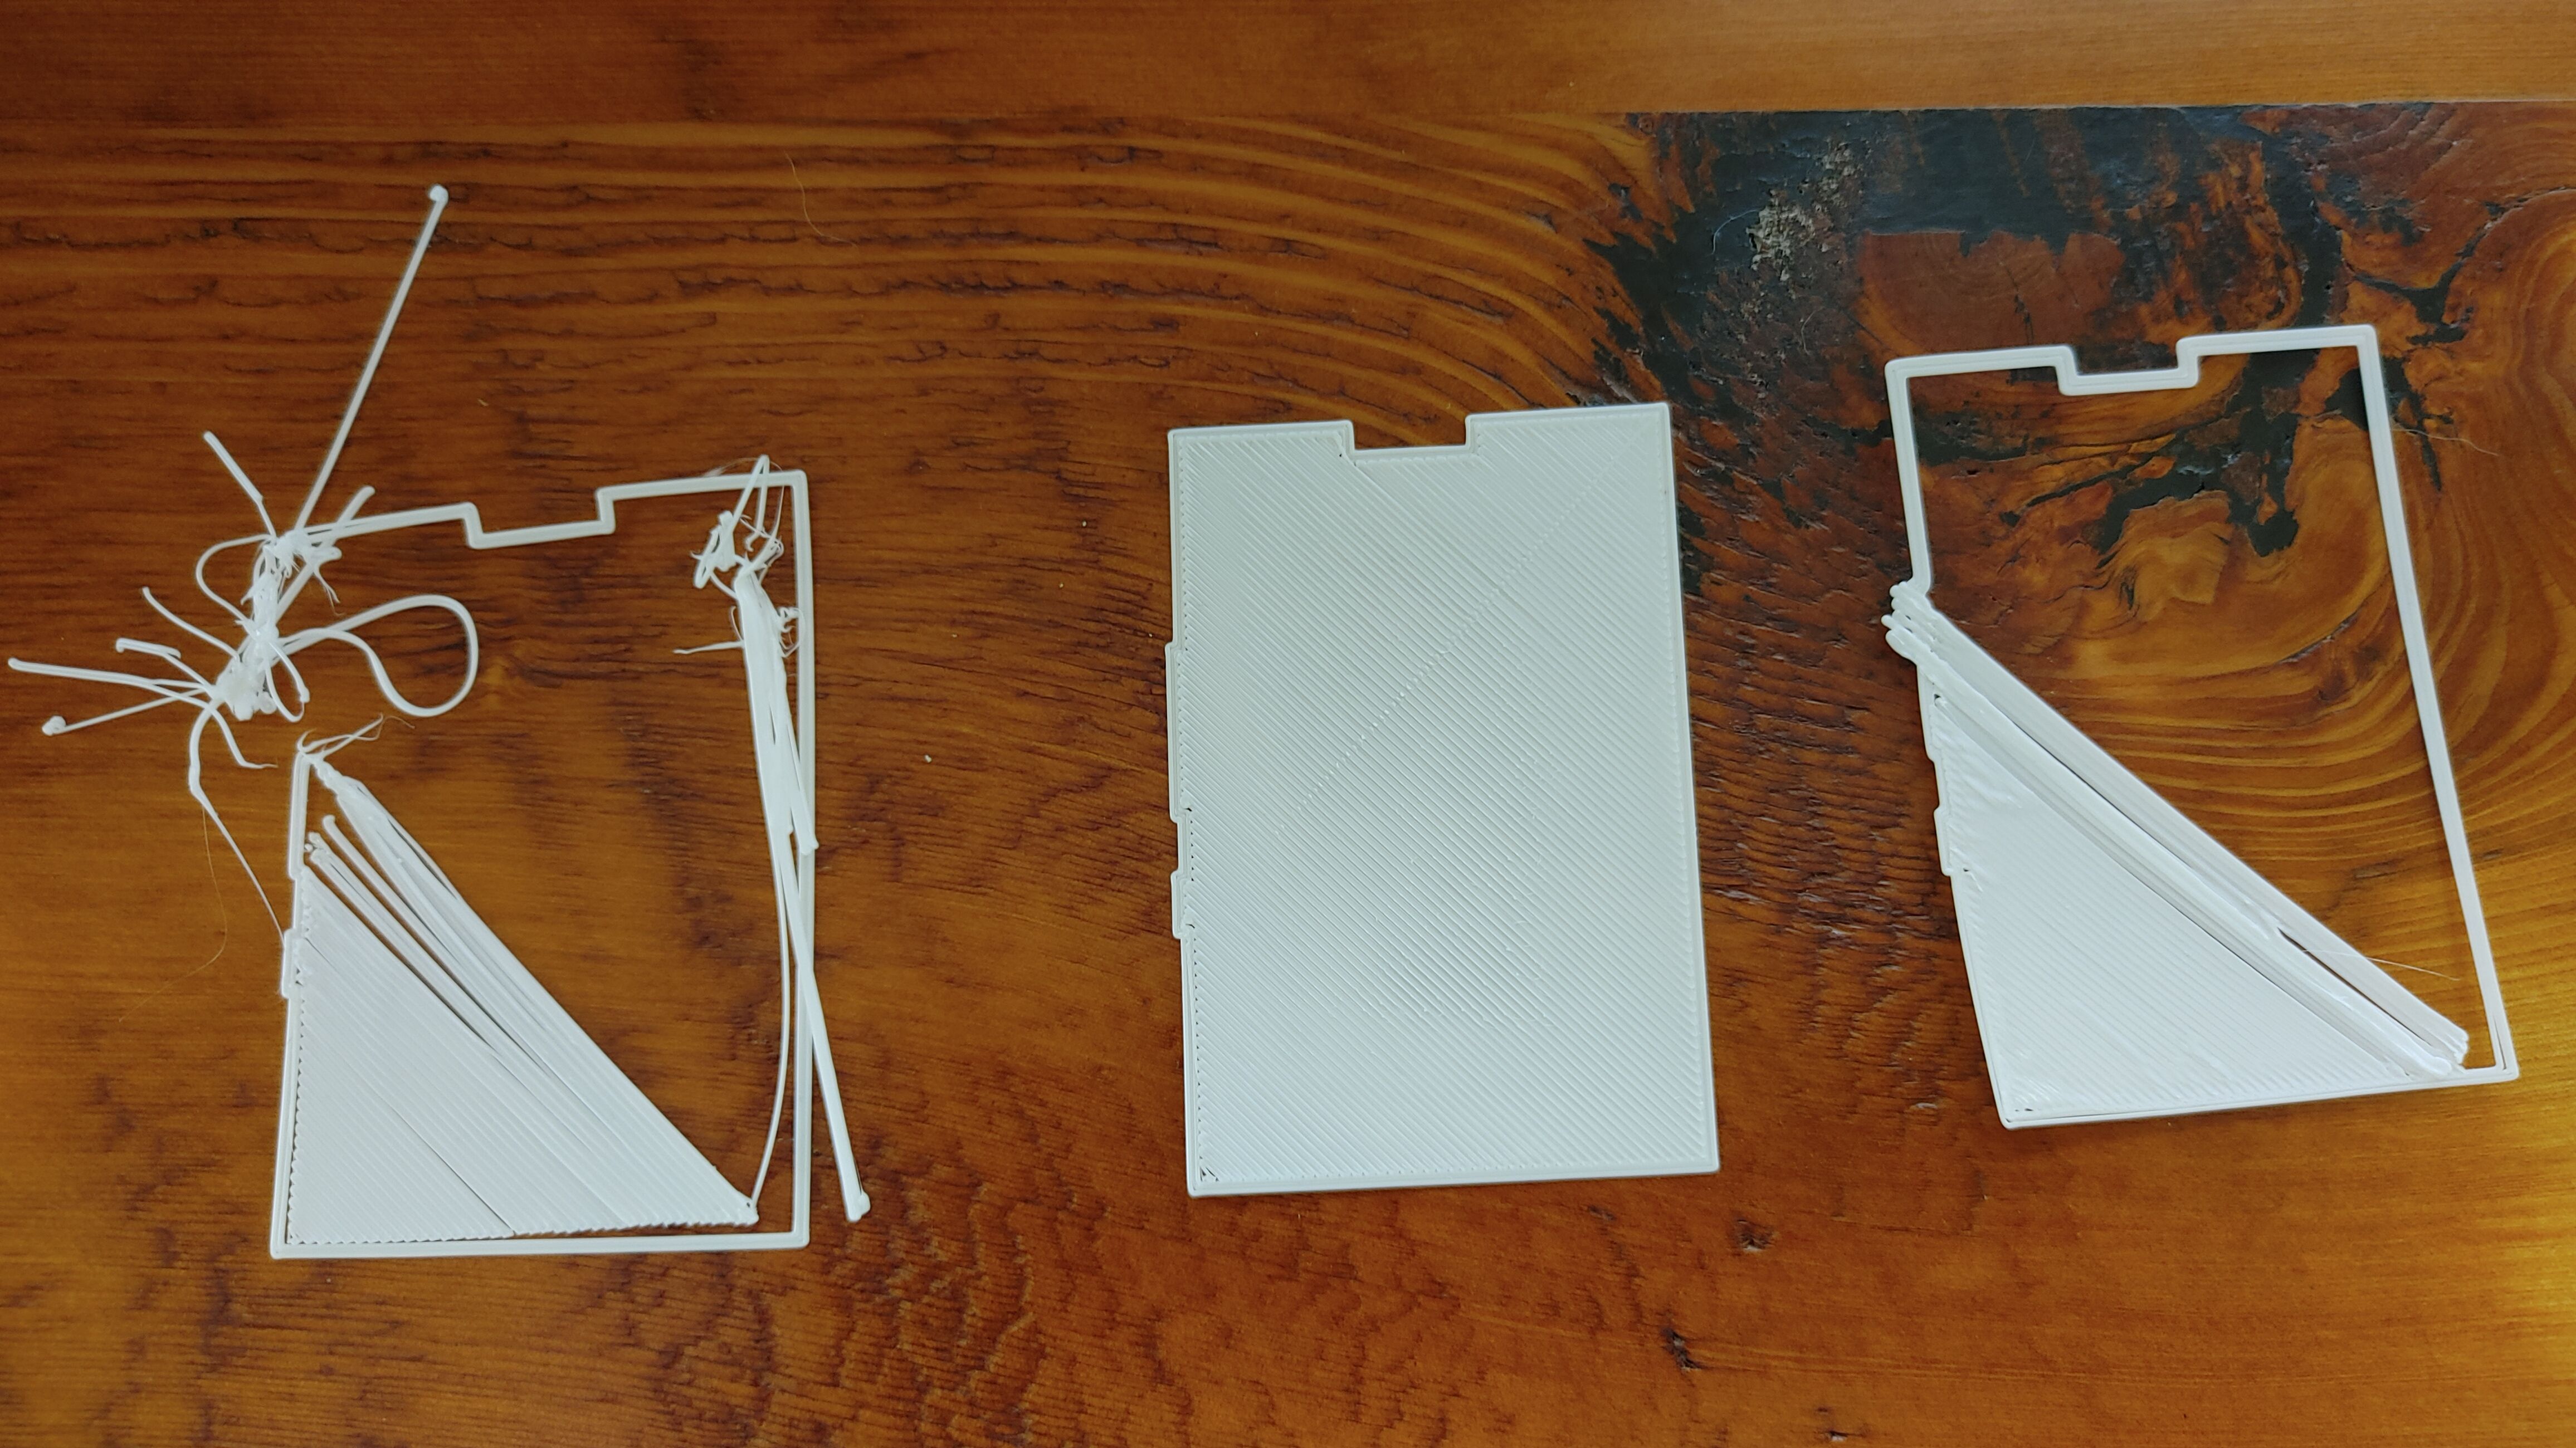
Cleanup again, this time with water for the glue, then alcohol pads. No glue this time. It laid down the perimeter fine, but the infill was looking sort of blobby and lumpy. About a third of the way through the first infill layer, the infilled corner started curling upwards, and the extruded plastic started partially tearing previous passes away, so I aborted it. Here are pictures of all three that made it to various stages.

Since it’s new, Support suggested I check belt tension, screws, etc. so I’ll be fiddling with that this afternoon. Also some settings changes they offered because the wipe process isn’t aligned correctly with the pad.

For the adhesion problems they suggested I adjust my z offset down a little bit. I’m not sure what constitutes “a little bit” and I’d like some advice on that. I still need to dig around in Cura and figure out exactly how to do that, too.

Initially they suggested maybe I needed to bump the heat up, although I didn’t get answers to a follow-up question for clarification. The Cura presets for this material show a hot end temp of 205 but I’ve noticed when printing Cura always sets the temp to 210. The quick start guide says PLA shouldn’t exceed 220 so I’m not sure about that suggestion – or why Cura doesn’t use the preset. I’m also not sure if Support perhaps meant I should increase the bed temp. Cura sets that to 60 which I think matches the preset.

Very frustrating to have three picture-perfect prints in a row, then nothing but trouble. That old Cube3D was small, slow, and expensive to operate, but that little bugger just ran flawlessly year after year. I kind of miss it.

Suggestions and advice are greatly appreciated. I have 14 Raspberry Pi camera setups that need a home!

So I’ve got my wiping process sorted – center of the pad is Y182 whereas the off-the-shelf start code is 176-178 – kind of wondering if that variance is normal. My pad was also sticking way up out of the bracket thing. Had to actually remove it and trim the end to get it to sit flush. Seems sloppy to ship it that way.

Found the Z-offset commands (M501 / M851 / M500) and I know that’s in mm … setting was -0.98 but I have no clue what a normal “tweak range” might be. I played it safe and tried -0.99 with no luck. A fresh wipe-down with isopropyl and the material just skated off the plate without sticking at all.

It really seems like the problem is with your Z-offset. If it is in fact -.99 that is too far away from the bed. The closer you are to 0 the further you are from the bed. 0 is the top of the washer on the 4 corners of the bed. The lowest you can go is to the bed itself, which of course is too low. The point is your range is the thickness of the washers. The washers are 1.5 to 1.6mm thick. Mine measures to be approx. 1.6mm and I use a Z-offset of 1.45 to 1.35. I suggest you set your z-offset to a value around those and fine tune from there.

60C bed temp is normal for PLA. 60C seems to stick too well for me, I print PLA at 55C on my bed. I prefer printing my filament at a hotter temperature than a cooler one. If your filament can handle it crank it up! I print PLA at 230C.

Once you work out the nuances you’ll see it’s a good reliable machine!

Thanks. So you’re using a positive Z-offset? It makes sense that is added to Z 0, now that you say it. Default print height is 0.2mm, I think, correct?

Is it normal for Cura to print at a different temperature than the filament profile specifies? (210 vs 205, in my case.)

I anticipate printing with ABS due to UV resistance (surveillance camera cases), so I figured on some fine tuning, I was just surprised to have so much trouble out-of-the-box.

No, those numbers should’ve been negative, sorry. I think the default height goes to -1.2mm.
The values in Cura are values they found to work good and is generally safe. PLA is very forgiving and will work for a wide range.

Thanks. I meant what is the default layer height, but I’ve found it in the custom print settings (0.25mm).

Looks like that 210 temp is the first-layer temp. I bumped that up to 220 and regular layer temp to 215, slowed printing to 50, and set the Z-offset to -1.40 and still no luck. I read somewhere that 70% alcohol isn’t great for cleaning so I have some 99% coming in a couple days and I’ll try again.

I feel like not much filament is coming out right at the start, like it takes longer to get started than it should, it moves maybe 10 mm along that priming perimeter line before anything flows, and the start of the flow looks thin at first. Once it gets going the flow looks normal. Maybe I should look into tuning the priming?

This is a brand new mini 2? Not used? Not refurbished?
You shouldn’t have to mess with the speed, besides the first layer speed is normally slower to allow better adhesion to the bed. Maybe around 15mm/s is what it defaults to I think, so your speed adjustment probably did nothing. What’s your initial layer height? Should be larger than .25mm. What’s your initial flow % ? Should be at least 100%. These settings should all be set in the profile though. Can you measure the thickness of the washer? Perhaps try a Z offset of -1.45.

During the start sequence filament gets sucked up, nozzle wiped, filament forwarded back from what it sucked up. It’s not perfect though, there will be a lag of flow before it starts coming out. Always print with a skirt to prime your extruder. I use 1 line perimeter or 25mm whichever is longer. That seems to work well for me.

Is the filament curling up and sticking to your nozzle? That’s common and troublesome. Ensure your nozzle is clean. Don’t clean it with a wire brush with power on else you’ll blow a micro fuse that’s used in the auto-leveling tests.

On my TAZ 6, I use 70% alcohol and its fine. I (carefully) use Scotch Brite pads on a hot nozzle if the auto-leveling sequence has problems. I have a brass brush but I have insulated the thermistor and heater wires with hi-temp silicone to avoid blowing the fuse (or worse).

I use a skirt on most of my prints and I have increased the number of lines and the minimum length. It is not uncommon for the first line to be incomplete but if the last line isn’t perfect, then something isn’t right and I abort the print and adjust settings until it is. I also don’t run the part cooling fan on the first layer but it is usually going 100% by layer 3 for PLA. I also use maybe 5 degrees more nozzle temp on the first layer.

Careful examination of the lines in the skirt can tell you if the Z-offset is correct. You can find pictures and explanations on the internet that would be better than my attempt, so I’ll let you look that up.

By default, I think Cura uses a thicker first layer height than the rest of the print.

Yessir, brand new, not used, ordered new straight from LulzBot’s site. Manufacture date on the QC paperwork was about 3 weeks ago.

So let’s say hypothetically (cough, cough) somebody, not knowing any better, used the included metal tweezers to yank filament off the nozzle and “may have” made contact with the nozzle itself. Is that micro-fuse you mention probably dead, or is it a resettable variety? Is it replaceable? How much did that cost me? Isn’t auto-leveling where it touches the washers? That still seems to work (it taps them, then does it again very slowly).

Yes at the initial extrusion the filament is very thin and tends to curl and stick to the nozzle (often, not always).

I’ll do some searching for examples of how to examine the skirt lines relative to Z-offset. Although I haven’t gotten a good-enough print (without using glue) lately to even have anything to examine yet. Good to know about 70% alcohol though.

Initial layer height is 0.425 and both flow values are 100% (all defaults). I only changed the couple of settings I mentioned. Skirt is on (that’s what I referred to as the priming perimeter line, didn’t know the right term). All defaults (skirt line count 1, distance 3mm, minimum length 250mm). I guess it stacks extra layers if it doesn’t reach the minimum length?

It sounds like you did not blow the fuse and the auto leveling is still working. In my experience the blown fuse knocked out the LCD display (TAZ 6), the mini 1 doesn’t have a display but you have a mini 2 so you do have a display. I don’t know what we’re to happen on the mini 2 if you were to blow the fuse. It’s just a hassle to do and the mini fuses aren’t easy to come by at your local store. Cost of new fuses are approx $10 or so for 3. Search Amazon or e-bay. Seems everything on Lulzbot site is always out of stock.

Yes auto leveling is where it touches the washers, the electrical path continues up through the nozzle.

I don’t think the skirt would stack, instead I think it will lay down another perimeter line until it pushes out 250mm of filament.

Run tests manually. Move the nozzle up, heat up the filament, extrude it in the air. How’s the flow? Does it flow freely? Or does it seem like there’s a clog impeding the flow? Printing in the air it will probably curl up on the nozzle, pull it off, let the weight of the filament pull it down.

Where’d you get this filament? Is it quality? 2.85 mm width?
Did you print with a different filament with a higher melting temperature prior?
It may be worth trying to do a purge. Remove the PLA filament, heat up your extruder to 260c. Some filament may come out. Insert the PLA manually, push it down and push through the residual filament. Read up on doing a cold pull to clean your nozzle. Can even try cleaning filament as that has a large working range and is designed to clean your nozzle between filament types.

When I changed the filament I did extrude in the air, and it does curl and stick, but eventually flows freely. This is how I purged the old filament color after changing to another. All I’ve used are the sample filaments shipped with the printer (mentioned in OP), both are same brand/type/size, just different colors

Interesting, hadn’t heard of cleaning filament. I’d noticed the “cold pull” button in Cura and have been meaning to look it up.

.

@JoeBowler300 is correct, the skirt just keeps going around until 250mm is laid down. I use line count 3 and 500mm min length (probably don’t need to increase the min length).

I highly recommend the eSun cleaning filament. A cold pull (lowering the temperature below the melting point and then pulling the filament out) should give a nice imprint of the inside of the nozzle. On my TAZ 6 Single Extruder, I can shine a flashlight through the filament path when I’m done.

You can cold pull PLA at around 110C. The eSun cleaning filament down to about 90C. I can’t remember if I approached the best temperature from above or below. Too high and the filament stretches out and can break before pulling the inside of the nozzle. Too low and it just won’t pull.

With PLA the PEI sheet on the bed should work very well. I clean mine with 70% isopropyl alcohol regularly and hit it with a 3200 grit Micro-Mesh pad (or 2 of each) occasionally.

I would make sure that the nozzle is tight. Mine wasn’t when I got it and was unwinding (lowering) itself till I figured out what was going on. Tighten it when hot. Make sure that your printer is selected properly in Cura. Make sure the bed is clean. I wet sand it using alcohol and 1600 grit wet or dry paper once in a while is adhesion is an issue.

Finally circling back to this after a couple weeks of obsessing over another hobby, thanks for all the advice. I set skirt length to 500mm which is probably overkill.

Cold pull didn’t seem to do anything, it looked clean. I did order cleaning filament but haven’t tried it yet. Considering I only printed two things before changing filament, and haven’t had any successful prints yet with this other filament, I’d be surprised if it was very dirty in there (again, all filament so far are samples shipped with the printer from Lulzbot, same type/brand as the successful prints).

Calipers say my washers are 1.53 or 1.54mm thick depending on which one I check. Is my Z offset supposed to compensate for that difference? So in theory I should be using a Z offset somewhere in that range?

I get adhesion with Z offset -1.45 (which was suggested earlier) but I felt like it was squishing too much (the layers look flattened versus the rounded lines shown in the OHAI z-calibration pictures), whereas -1.40 wouldn’t adhere at all. So I’m not sure if it’s right to say I’m getting adhesion if it’s just sticking because the nozzle is squishing it. I backed off to -1.43 with the same results, it looked squished to me.

What causes roughness seen in the picture below? Those bits sometimes stick to the nozzle when it lays down the next line and it just gets worse the longer I let it run.

I also meant to ask, does anyone have a good STL for doing quick tests?

I noticed the OHAI build instructions mention something called “PLA_HS_QuickCircle.gcode” … is that maybe what is shown in the Z-offset calibration pictures? Anybody know where to get that?

Well I had a few files to upload for you to do some quick print tests but this site won’t allow .stl file uploads (ironic cause this is a 3D printing site :man_shrugging:). This site will only allow uploads of pictures. When I change the file extension to a supported picture format and attempt to upload it I get this error:
image

Therefore I cannot help you with my files. If you don’t have the ability to create your own .stl files you’ll need to download something from the Internet. I suggest going to Thingiverse to find something to print. Maybe search “Test Prints” or something of the likes. Or you might be able to find something by simply browsing the site.

Don’t download .gcode files cause those files are created based on hardware and it’s pretty unlikely that the file will match your hardware. Especially with Lulzbot printers having the ability to swap out printheads.

Cheers!

I believe this site accepts .zip files.

We have a TAZ 6. Based on your original pictures I had a similar result when using PLA and RAFT for build plate adhesion. The raft portion would start to stick and eventually look like the third pic you have posted. My issue ‘seemed’ to be high humidity in the ambient air. Stored filament with desiccant and waited a couple of days for the thunderstorms to pass and has successful print.

On a different note with your comment about using ABS. For me the village plastics ABS profile in Cura is working great for me. The print temps are higher than what is stated on the reel of filament I have (220) however when I use that setting it jams up.

Nope, won’t allow that either.
image