Here’s my new project. Still a ways to go yet with it, but this is a sneak peak


As you can see, I went with a slightly skinnier design. Mainly because the failed print of that first section used most of a 5lb roll of plastic…
Amazing and unbelievable… ![]() I wish you success!
I wish you success!
Thanks!
Main body design is done now, I just finished printing the last piece of the neck and the entire body is printed, the pegbox is up next. I still need to design the leg spacers and back position and arm position pieces, but those will not take long once i figure out what those measurements should actually be. But i should be able to put strings on it by tuesday or so.
Very cool.
Looks great!
I apparently managed to get no useable pictures before I took the thing off to get stringed. So, next time you see it in a few days it should have strings and a bridge on it.
This is awesome Piercet (as usual). Are you going to publish the plans? Would love to print this.
Thanks! I’ll apparently get the strung instrument back Tuesday or Wednesday. Once I have it back in hand I’ll have a couple more pieces to design (leg spacers, arm rest thing, etc. ) once I am happy with those parts I will be publishing this somewhere. I am considering potentially departing from my usual fully open source free hosting method and putting this somewhere on an inexpensive stl purchase site to see if I can make some money with it to fund the other projects (something like $0.50 to download the project or something along those lines) . If a few hundred people buy it, that gives me money to put towards the other 3d printer upgrade projects. Or I may just end up releasing it open source non commercial and offer purchasable commercial production licenses. Not sure yet.
The main thing I need to do before I release any of the parts will be ensuring the design can take the string tension without imploding.
Depending on how this one works out, there may be an electric string bass in the works as well.
I’m playing around right now with a Baroque flute I found on Thingaverse, still working on learning CAD software (Blender), but gotta play along the way. I think you should go for it on the pay for the design, you do great stuff and this looks like a very cool design. That would be a negligible cost for those interested, and you might get something back for your efforts besides. I’ve seem a violin out there, but no designs. Also saw a guy who is making a mini bow and selling them, very cool (not at home right now otherwise I’d put a link in.
Good luck, hope it holds together with the string tension…if it works, you’ll have to design a printable tennis racquet next 
cheers
Well, the Cello did make it back from the cello bridge shop, but you will note that it does not yet have strings. After keeping my cello for 9 days, I finally got a phone call letting me know that the angle of cello neck 1.0 was off, and that they wouldn’t be able to fit the bridge until I make a new one. Also the fingerboard I have right now is apperently warped (new one on the way). So, I went and got it, brought it home, made neck 2.0 and pegbox 7.9 (don’t ask) to fit on the new neck, and designed the arm rest and the leg resty things. Aaand, thats about the time I ran out of fillament. One of my suppliers is being a jerk, but more is on the way. So i decided to start fixing the sides (please note, all the layer issues visible on the sides were user inflicted. I upgraded my computer and it was having a power supply issue that caused it to randomly crash reboot without bluescreens at random 9 hour-ish intervals, so it kept dying in the middle of really long prints that I was sending from my usually reiable computer. (by the way, if anyone needs to know how to stop random reboots on a socket 2011-v3 Asus motherboard, I know the trick now.)
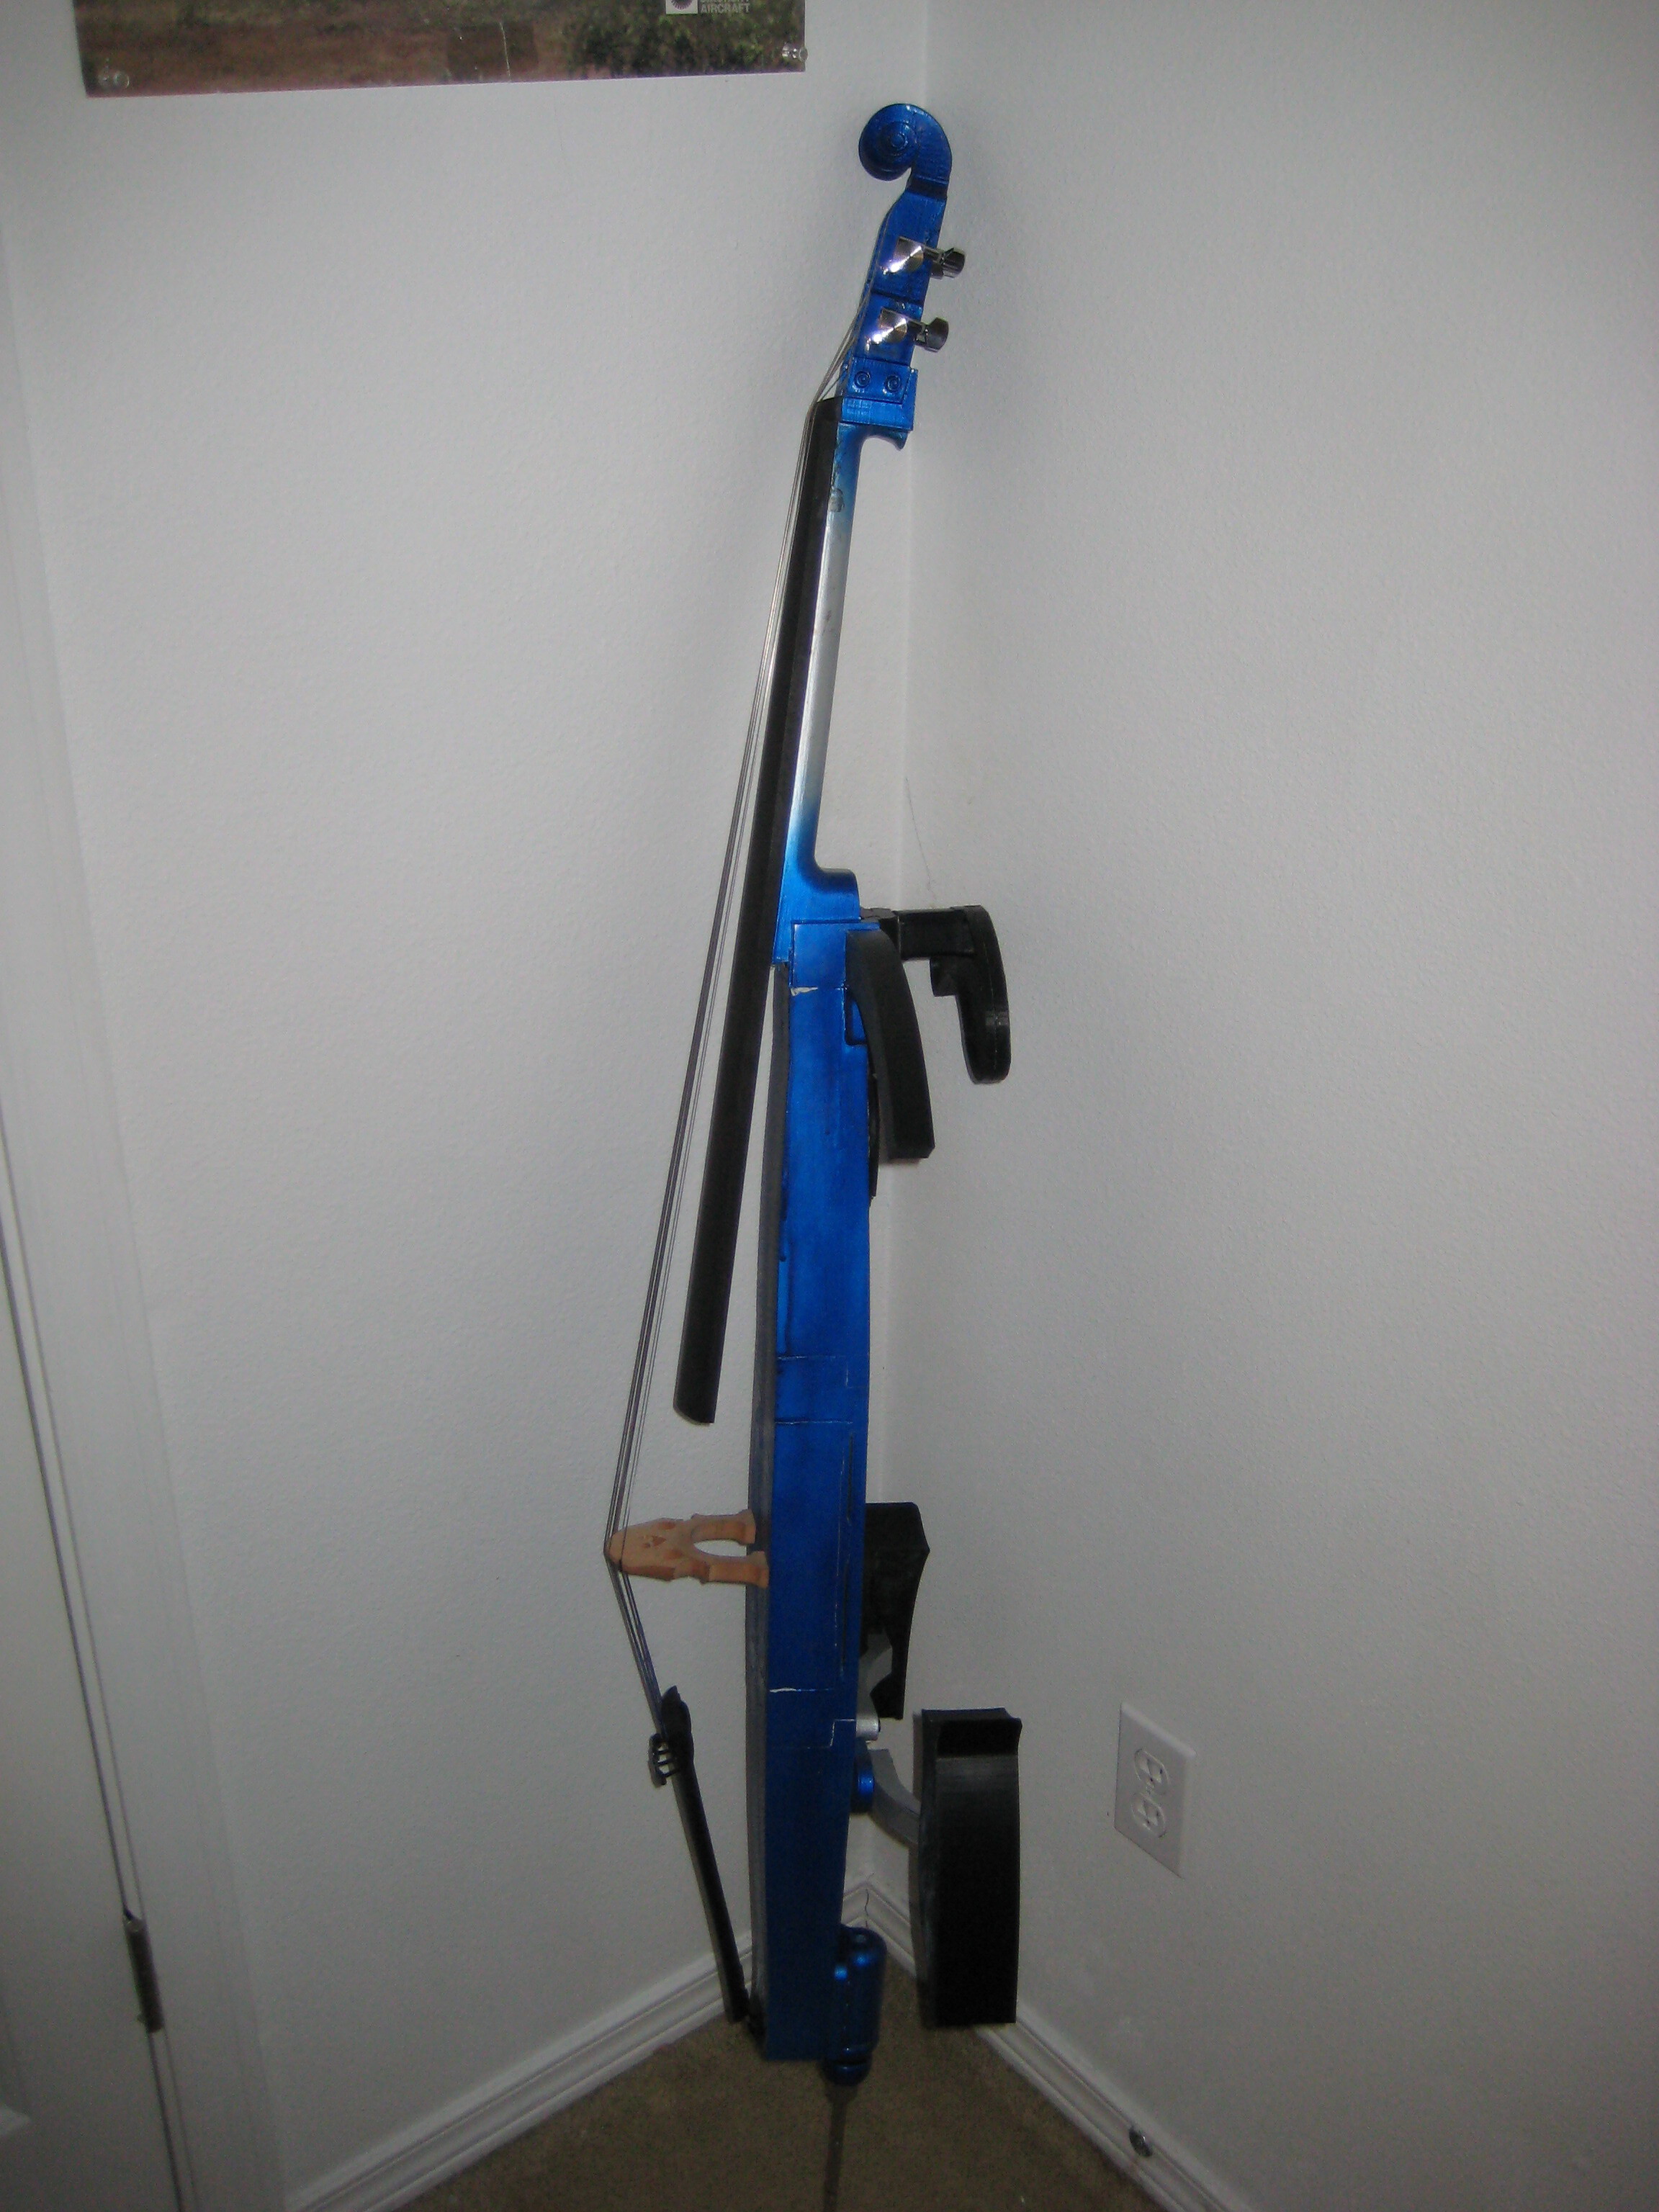
Anyways, here are the pictures of the unit as it currently stands. You can also see the powered preamp and piezo pickup. Once I get a few more things taken care of on the back in preparation for paint, the wires will be installed and an insert containing a power switch will go in the back hole there. I also still have yet to design and print the “back positiony cello rest thingy” piece. Once the new fingerboard arrives, but before I paint it, this assembly will go back to the luthier, get actual strings, and then finally be ready for painting.
Color coats of the paint are on. there will be a bit more touchup required in a couple areas, but they should be minor. The main issue was the string I was using to support it while I painted. This will get several layers of gloss clear over the next several days. The new non warped fingerboard also arrived, but is not pictured. Assuming it meets standards, the whole thing might get strings and electricals and be playable starting next week + however many days it takes to fit the stuff. The current plan is for the arm rest and leg spacer thingies to get painted gloss black, as well as the as yet to exist back spacer piece that will be partially visible next to the arm section.
Looks like it’s coming along nicely!
Thanks!
Finished up the last of the 3d files and printed pieces. It’s heading back to hopefully actually get strings this time. I really don’t want to print a 3rd neck.
In the pictures you can see the new back spacer thing, the other leg spacer, and the faceplate for the preamp. I’ll have to have the whole thing apart one last time to get the wires to the right places, but it’s basically structurally done at this point.
Strings attached! I do need to adjust the neck slightly to take the angle out of it, but it is holding it’s tune, didn’t fold in half and actually sounds halfway decent even without the electronics running. It’s definitely loud enough to practice with if nothing else. I’ll pull it apart one last time this weekend to run the pickup and fix the neck issue, but aside from that and a bit of paint touchup / black piece painting, it’s essentially done. Video will be posted when I either figure out what the hell is wrong with my web camera or get a new one on the way…
Hey piercet,
Looks great (as usual). Couple of questions, if you don’t mind? What material did you use to print with? And what did you paint with and how many coats? Did you paint the neck as well? Wondering how paint will hold up with use on a musical instrument and what you think and your experience is with painted plastic holding up and which ones hold up best?
Thanks, this is an awesome project, can’t wait to see the vid and hear it played.
Thanks!
I printed this with ABS, which for such a large section, isn’t a great idea, though the printer had no problems with it. The sections I had to glue together were all caused by computer related issues with my new motherboard (now thankfully resolved) . I think it would actually probably work better as a PLA or Ngen project, since the final cello had a bit of excess flex in the neck. The center section should theoretically sound better with a less flexible plastic like PLA, though it still seems to sound fine as it is. It still holds tune and sounds great though, and once the strings were on the flex went away, so it was not a major issue.
The paint is the Duplicolor metalcast system Metalcast Anodized Coating | Duplicolor The neck silver is the bare base metal coat, the blue metalic is that metal coat with the blue chrome top coat. You can find the paint locally in automotive supply stores usually. I know Auto Zone carries it for sure, but most of the others that stock paint should also have it. I put down 3 layers of base, and 5 more of the topcoat. It’s rated for use with engine blocks and exhausts, and seems to be binding just fine to the plastic. The minor paint flaws you see in the picture are actually joint locations that had model putty in them, and the tension force when the strings were attached caused some of the hardened putty to flake out, which resulted in a few spots I need to touch up. I need to take the entire thing apart one last time to finish the internal wiring anyways, I’ll respray those sections then. So far aside from those areas, the paint has held up quite nicely and I have no concerns about it being an issue later on. ABS plastic is basically model plastic, and acetone based paints bond really well to it. There is actually a heavy wear section on the leg spacers where the “keep from folding up notch” is that is painted, and is a bearing surface. It’s held up fine to a few hundred folds and unfolds even without the top clear coat.
One thing to be aware of with the metalcast paints, the top coat goes on extremely thin. it’s possible to go from perfect paint job to major run in about 2 nanoseconds. Lots of thin, light coats is the way to go with it. I can’t stress enough how runny this stuff is. Also, when you are done with the top coat it will look to dark and solid. Over the next several days it will cure and turn more translucent. That process takes a full 7 days. I plan on spraying a top coat of clear over the blue and silver parts when I am done.
I had the electrical pickup attached externally this weekend. It sounds great so far. I’ll take video of it as soon as the new web camera gets here since I apperently melted the microphone of the old one somehow.
Printing ABS that tall? I assume you had to do some layer split patching? If not, what’s you’re secret? I’ve gotten better results with the nozzle being up at 250C and putting it under a cardboard box, but it’s not perfect.
-Jim
If you look at the pictures, I did actually end up having to glue parts together, but not due to layer splitting. My new motherboard in my computer was mysteriously rebooting itself for no apparent reason. 1 new $300 power supply and finding the correct obscure motherboard bios power setting later, it has stopped doing that, but if it wasn’t for that issue I can and do print ABS things that tall without any layer splitting. I also don’t print inside an enclosure. There are several tricks involved though.
For starters, ABS needs a higher temperature than most people use to print. 240c is the minimum temperature for decent interlayer adhesion, yet most sources say to use 230, which will result in a poor adhesion bond. That number was mainly due to the limitations of early 3d printer nozzles that couldn’t go higher than that without melting, but it’s stuck as the “correct” temperature. Most people trying to print large things in ABS run into splitting because of that.
Next, bed adhesion is key. The stock glass bed is not capable of distributing heat evenly enough to keep large parts secured to the bed without an enclosure to relax the ABS strain. By swapping in an aluminum bed plate I can keep ABS adhered to the bed completely even with very large parts, which eliminates almost all of the warping issues.
The final “secret” though is the modifications I have made to my printer. With the openbuilds X and Y setup, I can print very large parts without any of the deflection or sway that you can get with rod based setups. With those setups, you will tend to get very good adhesion in the middle due to the apparent “hump” in the bed effect (caused by the extruder being closer to the bed due to gravity in the middle) and then too far away from the surface for the outer edges. With the boxed extrusions, I put down a single consistent layer thickness regardless of where I am on the bed if the extruder is working properly.
I find that ABS with a higher styrene content is less prone to splitting or warping because it bonds better (push plastic stuff is great for that, Villiage plastic stuff is good too, but has better definition on smaller parts)
The speed at which I print may also have a positive effect. Since I am laying down layers faster than average, they have higher residual heat when the next layer goes on.
As long as the wall thickness is at least 5mm thick, I rarely have any splitting with ABS.
That’s great info on splitting piercet, thanks for sharing from your knowledge and innovations. I’m impressed that you are able to print tall ABS stuff without an enclosure. I’ve only had my printer a couple of months and confess the idea of modifying it is daunting to me (I feel like I am just starting to get the hang of using it as is). I’ve only printed with ABS, PETG and, most recently PLA. I get why people love printing with PLA now, my prints turned out fantastic, but I don’t want that to become an excuse for not refining my printer and knowledge.
Your modified x & y rail system made a lot of sense to me when I first read about it before I even owned a printer, now that I have one and have printed, it makes sense first hand. I’d forgotten about the aluminum print bed discussion… I need to re-read that. While it seems building an enclosure would be ‘easier’ (because I wouldn’t be undoing what already seems to function pretty darn well), honestly, your innovations seem to address actual issues better.
Thanks again for all your great input, you’re a huge asset to this community, always appreciate your contributions.
Cello video Finally. Still no video of anyone who knows how to actually play it, but thats on the way. I hope.