Trying to add a BL Touch to a stock Taz 6. As far as I know everything is original about this machine, bought it 2nd hand. Has a glass bulb thermistor that I just replaced and machine is now working (sort of) but not doing a very good job of auto bed leveling, which I understand these are rather notorious for.
I have been searching online and found much on adding it but it has always been along with other upgrades to the machine so not very helpful.
I found Drunken Octopus’s firmware tool and was wondering if this is all I need other than the BL Touch unit and a mount.
Any direction or advice in this would be greatly appreciated.
Not looking to upgrade anything else at this point, just to add the BL Touch. I have yet to get this machine printing a full file after 4 months of various issues, please don’t ask.
I use a Taz 5 at work and it has been extremely reliable. I really want to get this 6 working and I am so close.
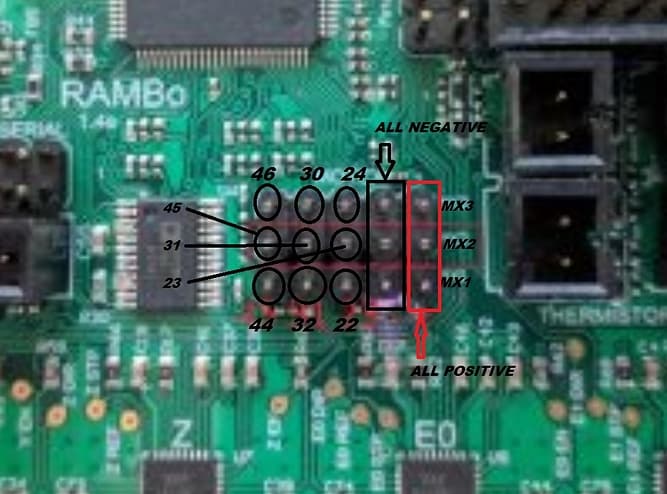
Thanks for the quick reply to this. I want to be super excited about your reply but I do not understand it well enough . I guess I need to know what “expansion headers” are, and where they are.
ZMAX pins? On the control board?
I probably should have been more detailed about my experience with configuring/building marlin. I used Visual Studio for upgrading my Ender 5 but followed a video by E3D for that and was able to do it, not that I fully understood what I was doing, but it worked.
This isn’t your issue, so I don’t want to ask a bunch from you, but is there a guide somewhere or can you point me in the right direction, or…list some steps to take.
If I remember correctly when I did this for my Ender 5, there was a source code that I downloaded, opened in visual studio and basically had to turn certain lines on or off depending on my machine. Is there a source code for what you are suggesting?
Again, I appreciate the quick response. Also, glad to know someone else has done it and is better off for it.
Then, in Marlin’s code in configuration.h, you enable the BLTouch and bilinear, set your probe points (Rambo runs out of memory if you try and go over 5x5 grid w/Catmull-Rom subdivision set to 3).
In pins_RAMBO.h, z_min_pin should be 10, z_min_probe_pin also is 10, and the servos section should be: (it may already be this by default, but just putting it here)
It’s really so simple a change that I am a bit amazed that Aleph Objects/LulzBot hasn’t done it years ago.
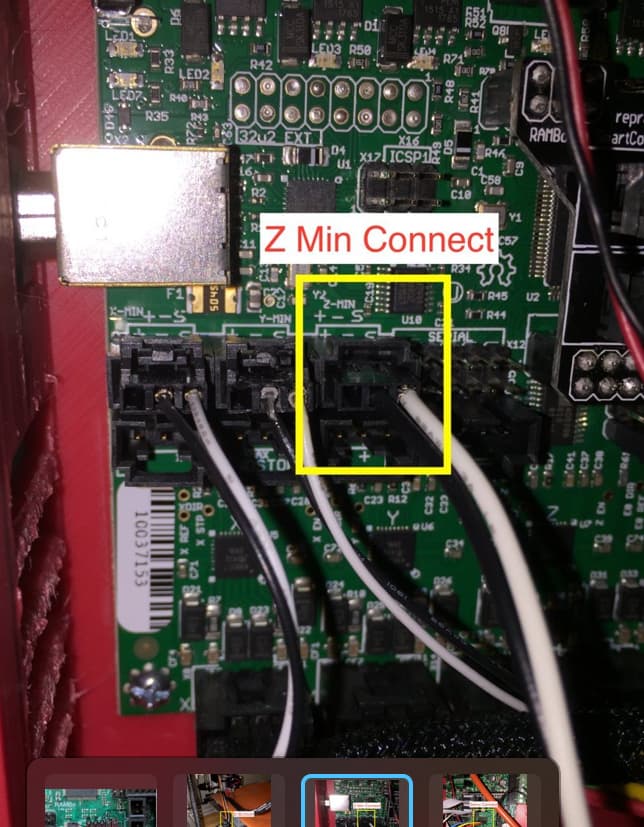
Also - BLTouch, the polarity on the ZMIN matters, that threw me off for a while when it wouldn’t trigger besides all motion being good.
Something I noticed doing this, was the ARCHIM boards only appear to have two servo connections vs 3 on the RAMBO, so if you were so inclined to reprogram the RAMBO for the Taz Pro, you could have the servo-actuated dual printhead AND BLTouch all at the same time, instead of doing a microswitch that needs both servos lifted to safely touch the bed (like I run on my Pro).
This is excellent. I will get what I can done, based on what you have posted. So appreciate this!
One question though. Where do I locate the marlin code that I need to edit? Is it a download specific for the TAZ 6 or what/where specifically? I guess that is 2 questions.
Thanks again and I may ask you more questions if they come up while I am working on this, but hopefully everything goes smoothly.
Thank you. I have been scouring the internet trying to make sense of all the different threads talking about doing this upgrade but most of them are from 4+ years ago and using older versions of the firmware, which I assume now have been updated to make adding a BL Touch easier.
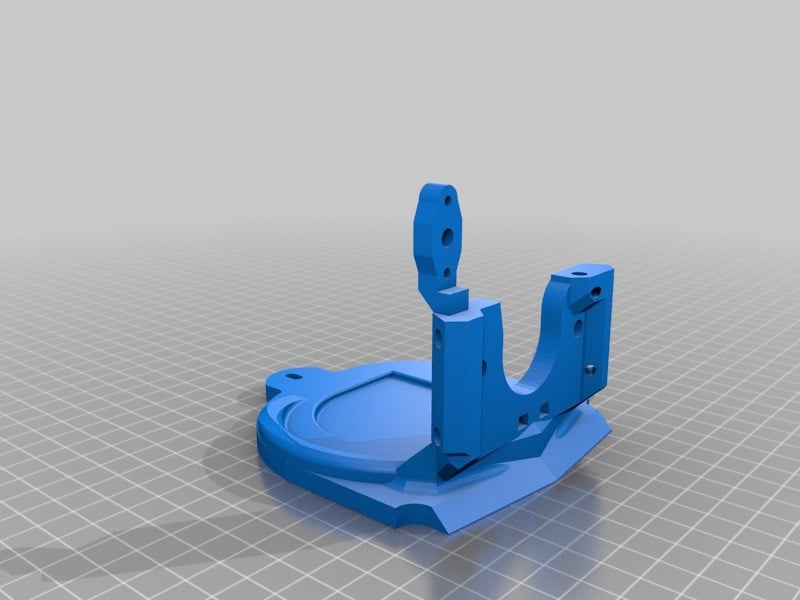
The last item I am trying to figure out is a mount. This one I have on hand as it is the closest to what the original mount looks like.
For the Single Extruder, I mounted to the fan duct, since it was the smallest part to reprint and easiest to swap. I normally used either a Titan Aero-based extruder for 2.85mm, with a Biqu H2 for 1.75mm, but since I swapped for a 2.85mm Orbiter extruder instead of the Wade Extruder on the Single Extruder, I’m not wanting to go back to the single-geared Aero. Originally it was just for use with extremely flexible materials, but that 2.85mm orbiter dual gear extruder works so well, it may replace the aero completely, even with the old hexagon hot end (with a CHT nozzle).
I think I have all the “pieces” to this install I need, just ordered the BL Touch about 10 minutes ago. Hoping the firmware build goes smoothly and straight forward. I appreciate your time and answers for this.
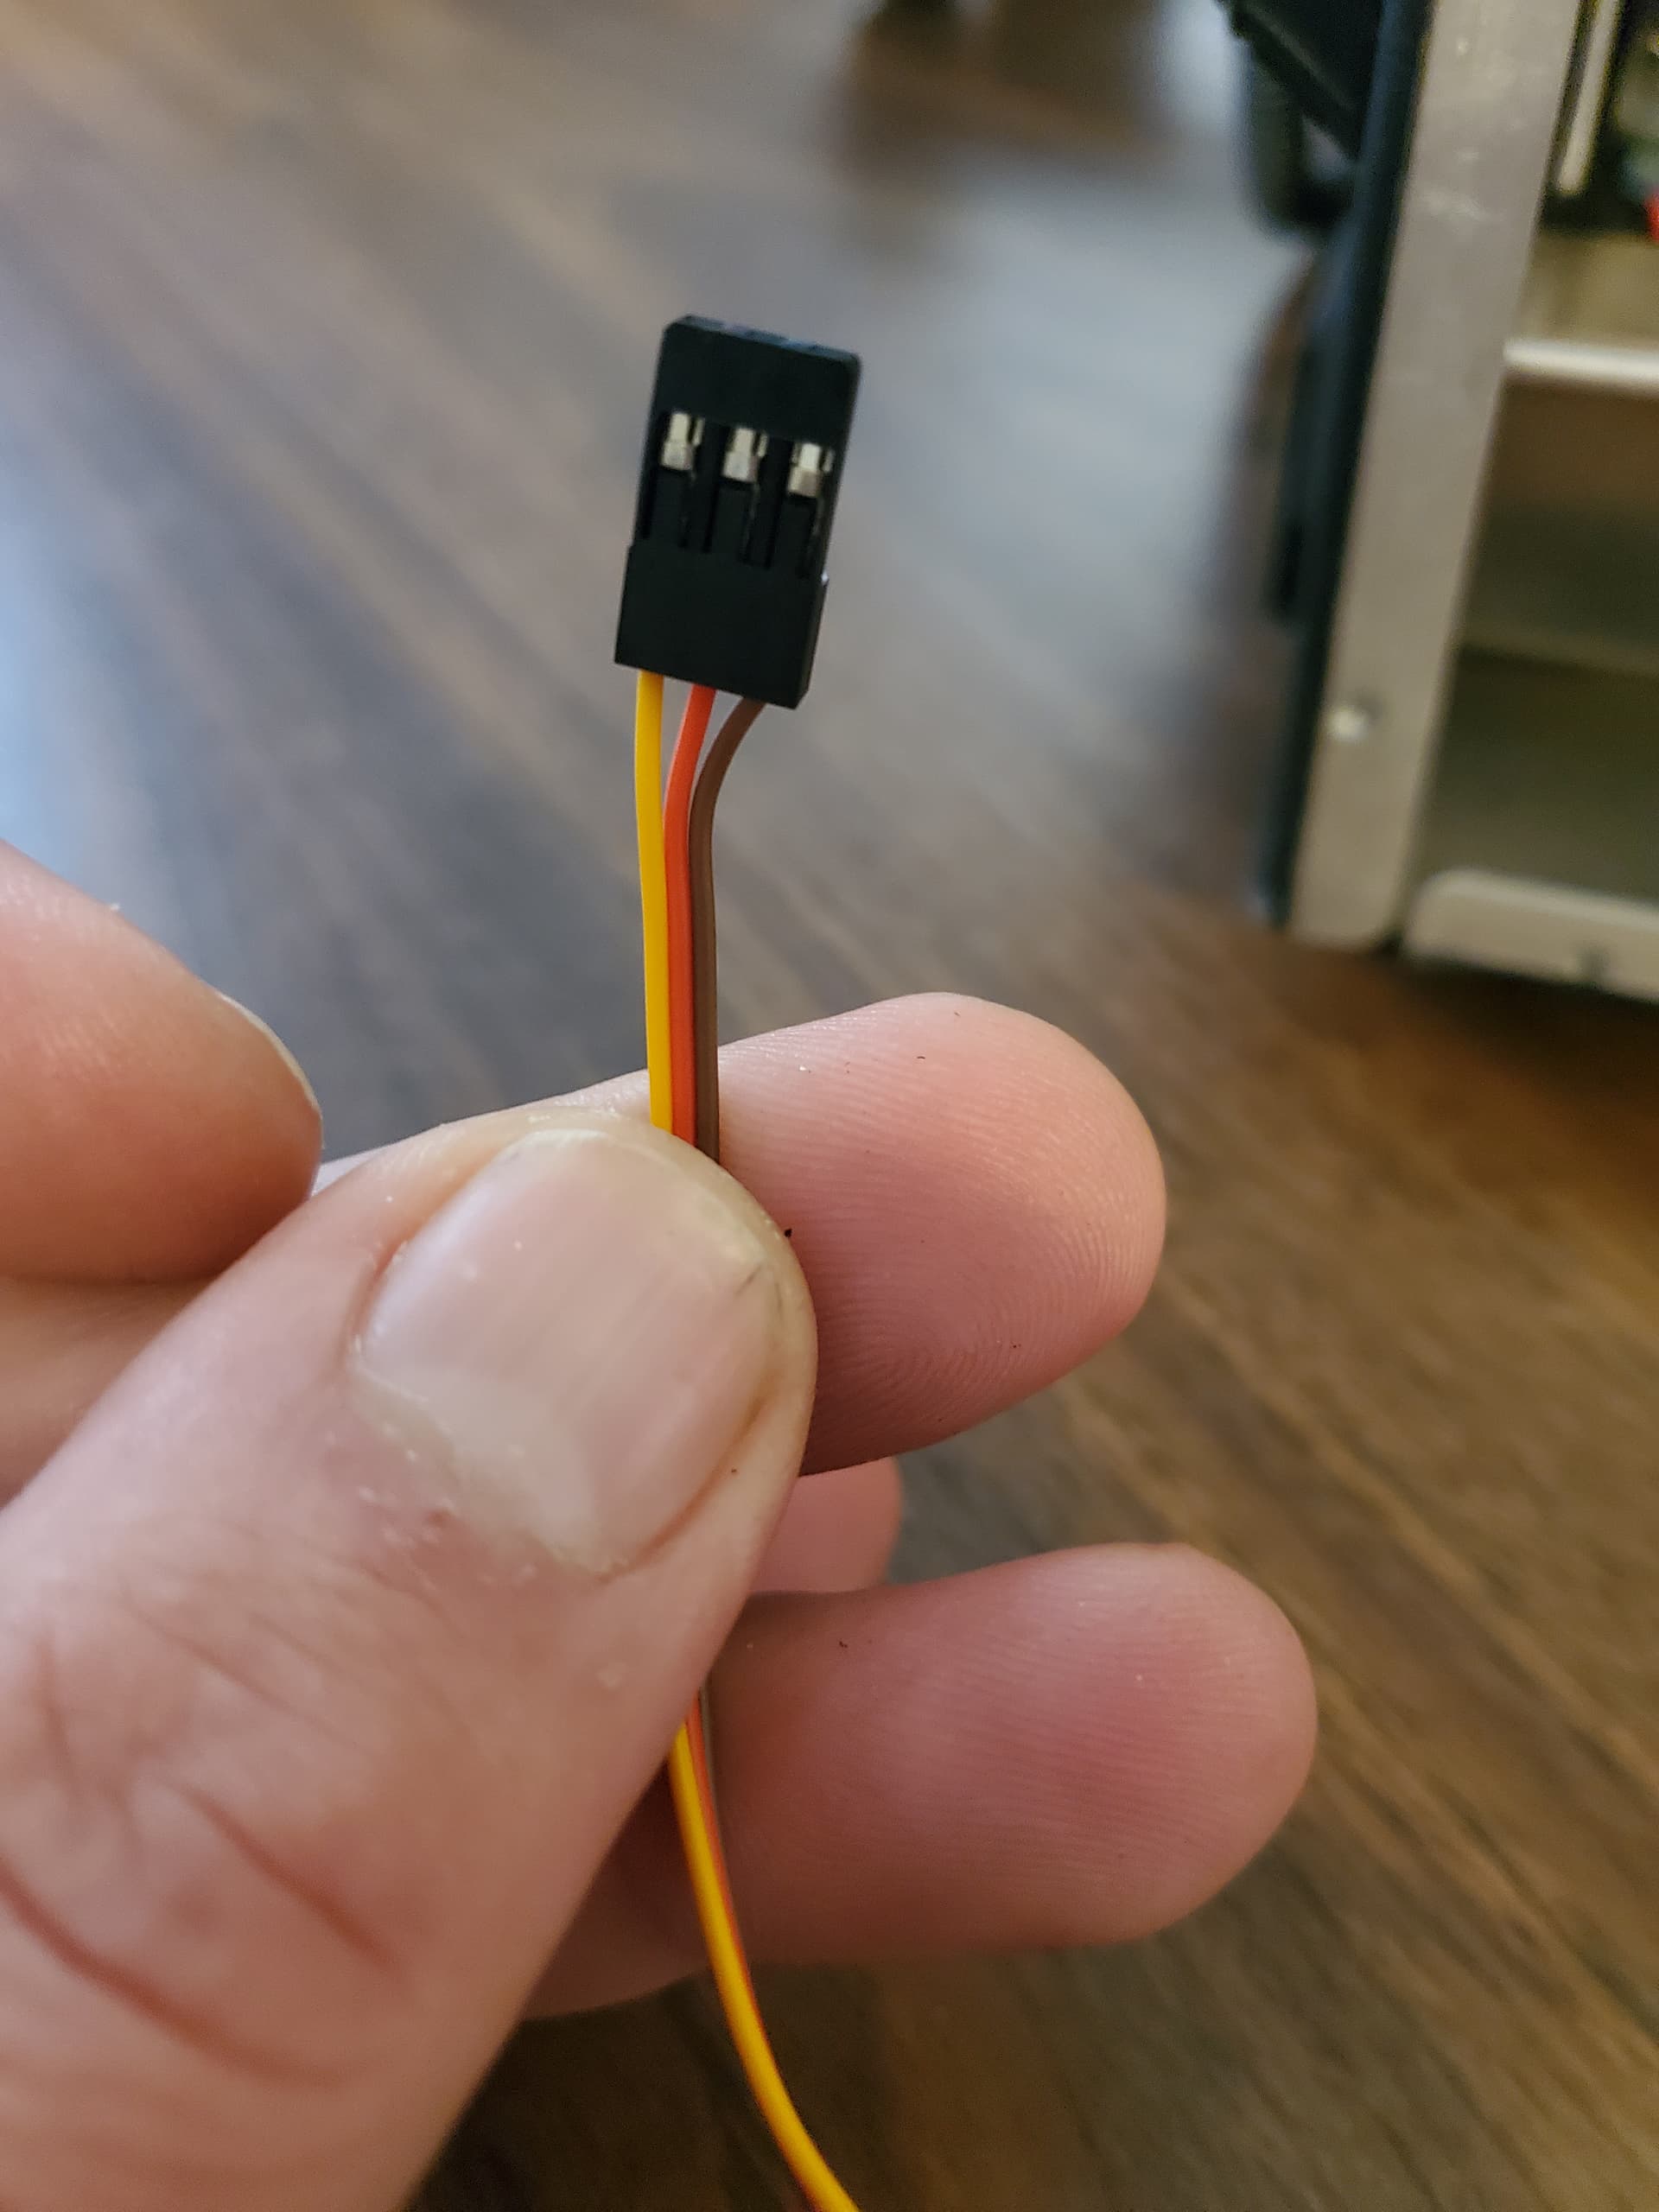
I received the BL touch and was about to start installing. The wire colors are different than in the pics you posted and i was just wondering if you coud help me deicpher which is which. If not, no worries, but you seem to be knowledgeable in this.
Brown = blue. Orange = red. Yellow = yellow. The other ones should be black and white. You’ll need some male to female extensions to plug into the motherboard.
Does this look correct for adding the BL Touch to a rambo board? The provided picture was a little hard to see but based on Weathernaut’s explanation, this is what i got.
I don’t think that’s right. Look at page 6 of this document, it’s what I used to install a BL Touch on my Taz 6. It has the colors that match the header your BL Touch has.
I ended up using the Drunken Octopus firmware without any modifications except for the number of probe points (I increased to 5x5). DO uses UBL leveling so keep that in mind when setting it up in the gcode.
For 5 bucks you can get the password needed to flash the firmware to your machine - you can even do it straight from Google Chrome. I haven’t had much luck with the other varieties of DO firmware but his Taz 6 release with BL Touch works perfectly.
Excellent! This guide is what i was looking for. I rearranged the wires per the pdf.
One question though…what is UBL? I have seen ABL and assume it means Auto Bed Leveling but its just an assumption.
I was looking at the DO download and its good to know it’s all figured for the most part.
I know everybody does things differently based on their understanding of editing the firmware but, the simpler it is, the safer i feel doing it.
UBL is a more advanced version of ABL. The gist is you create the mesh once, and then when you print you simply do a tllt check on 3-4 points on the bed rather than create the mesh again.
After I created and saved my mesh, I have this in my start gcode instead of G29. Commented out lines at the top are what Lulzbot does stock:
I think it was mentioned before, but it’s worth mentioning again. Don’t use more than 5x5 points. I learned that the hard way. If you use more than 25 (it may be between 26-35) points it will not complete the mesh and won’t say why.
Ok… I hate asking for more help, but I definitely need it. I downloaded the DO for Taz 6 with BL touch and got a .hex file. I have no idea how to edit this or more specifically how to change it to the 5x5 probe points and where to set the probe offsets. Does DO have instructions on how to edit this or is it sort of a given that I should know how?
The last firmware I edited was for my Ender 5 and I had to comment or uncomment certain lines/values to build it. Any help would be super…helpful. Thanks again for getting me this far. I’ve been 3D printing for years but definitely am a noob at firmware editing.
If you are ok with 3x3 grid and don’t want the hassle of using Arduino IDE to compile the firmware, you can upload the hex file to the printer using Cura. Select custom firmware and select the file. Try that first and see if it even works. If it works and you aren’t satisfied with the mesh it creates at 3x3 I can help you with the firmware configuration changes needed to increase it. You can get ready for that by downloading the Arduino IDE.
I started to try and just and edit the marlin firmware this morning in visual studio but could not find the spot to uncomment the bl touch.
I somewhat understand editing the configuration h but that’s still a bit confusing.
I was able to rename my printer to Sam’s Bane as that is all it has been up to this point!
So I was about to go ahead and try what you said, then realized I still don’t understand how to set the probe offset.
If I am honest, I think I have over-confused myself by all the “guides” or help I have looked up online. What you have suggested is probably very simple but for some reason I can’t seem to get it because of not understanding how to set the offset for the probe.
I just downloaded Arduino IDE and if it isn’t too much trouble, could you walk me through just a simple set up to get this BL Touch added. At this point I would like the 5x5 probing but will be ok with 3x3. I just really need to get this machine working.
I bought it on ebay 4 months ago and the delivery service was not careful and the packaging was pretty crappy so some parts broke, I fixed them and last week just got it working but have yet to actually be able to print anything because the stock leveling system isn’t cooperating.
So all that to say, the headache that I have had with this thing is also making it difficult to get through a process like editing the firmware.
Your willingness to help with this is deeply appreciated!