I’m having some problems with my PLA printing, as shown in the pictures above
I have a TAZ 5, Hexagon hot end, I have tried printing at 195, 200, and 205c, I have tried printing at these temp with the bed temp at 60, 0, with blue tape and without blue tape.
The print starts out looking good, then as it prints the filament starts lifting from the bed and the nozzle starts touching the layer next to it.
The first layer line looks good when it first starts to print, but gets worst as it prints.
I have check the extrusion rate and this looks good.
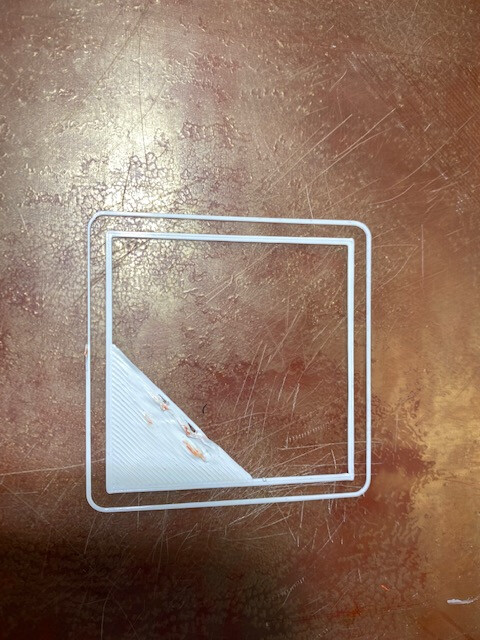
If you move the model in your slicer to a different spot does it still print like this? To me, it looks like your PEI sheet needs to be replaced. You can tell by the different colors, red where the adhesive is firmly on the glass and cloudy where its not. It would explain why you seem to have good first layer adhesion in some spots but not others. Maybe not THE fix, but would improve your initial layer.
I wouldn’t rule out the surface being the issue from using painters tape. It wouldn’t fix the PEI being uneven, it would just make the same uneven surface .1mm higher.
Even though I had been printing successfully for around 6 months I started having a VERY similar issue on a Taz 6. Ended up being that the fans on the printhead were installed backwards (label side out). I reversed them and while an improvement still had same issue. I now print PLA at 230c with a bed temp of 60c and have not had any problems.
It really looks like your first layer is pretty wide and flat but its still not sticking… I had a similar problem with my Taz6 after pulling it out of storage. I cleaned the bed really well to get all the blue tape residue off from using it with tape before i put it in storage. After getting all the tape off it stuck amazingly. I still use a bit of glue stick just to make sure i have good adhesion when printing something with a small contact surface on the bed. For example printing the “K Cup Dispenser” (for the wife) off Thingiverse. After cleaning the bed Lulzbot says you can sand the bed with a 1500 grit paper.
Here is their article on maintenance for it the pei surface…
I have moved the print item to different location on the TAZ 5 bed and the same thing happens as shown above. When the print starts out, it looks good as the lines get longer the print starts to go bad. It looks like the nozzle is not tracking true. As the lines get longer it looks like the new line is laying down filament on top of, or too close to an already laid down line. I have no idea why this is happening. The filament is sticking to the bed and it looks like the nozzle is at the right height.
I could really use some insight into what is happening, this has really got me puzzled.
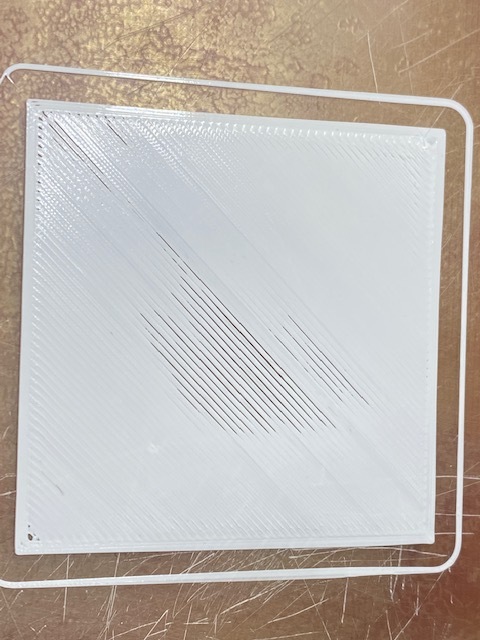
This is my latest print
The problem seems to be that the Nozzle is laying down a new layer too close to the previous layer and it starts to happen as the distance increase.
I have tried printing at different areas on the bed, but get the same results.
I can’t understand why it starts out printing great and the just get worst.
I sanded the bed with 1500 grit paper, then clean it with Alcohol and a lint free towel
My Lulzbot hexagon hotend temp is 185, I have also tried printing at 190, 195, and 200 with the same results. I have tried the bed temp at 50, 60 and no temp with the same results.
Also the filament sticks really good to the bed when I try to remove it.
For this print my bed temp is 60
My nozzle size is .35
My filament is 1.75
My filament is PLA
Just as BlueBuffalo said, make sure your slicer has the right nozzle setup.
You didn’t mention what slicer you are using but if you are using Simplify3d for example, the “factory Taz” profile automatically sets it up for a .5mm. Make sure its also set up for the correct filament diameter. Also you can check your extrusion multiplier. Mine was set to .9 and it lays down perfect amount. When i was troubleshooting my adhesion issue i messed with that number and moving it up to 1.0 put down way too much plastic. Also you can look at things like infill width, overlap, etc.
It wouldn’t hurt to double check your steps/mm for the extruder as well. Mine was actually set too high by a decent amount.
If the Taz5 and Taz6 calibrate steps/mm the same then this is what I had to do to get the correct stepper counts.
I marked my filament 120mm from the extruder where the filament enters. I then commanded 100 manual movement of the extruder. You then measure how far from the top of the extruder to the mark you made. It SHOULD be 20mm, meaning it fed 100 just like you commanded. If its more or less you take your original steps/mm, multiply by 100 then divide by how many mm it actually fed to get the correct steps/mm. This wouldnt hurt to do on ALL your axis. Mine were off my .5mm over 100mm. MAKE SURE you write down your factory numbers before you do this!!
Here is an example of that calculation just so its easier…
Marked at 120mm
Commanded 100mm
Measurement to mark is 15mm
this means it actually 5mm too much!
So that means 105mm was fed
Take your steps/mm stock number for example its 855
Multiply 860 x 100 = 85,500
Divide that by the amount that it fed 105mm
85,500/105 = 814.29 should be the new number
Mark 120mm of filament and feed 100 again. This time it should be 20mm from the extruder to your mark.
Let us know what slicer you are using though. It may help people guide you better, all slicers are a little different and can call different settings slightly different things.
Looking at the last pictures you posted your PEI is not fully adhered to the glass anymore. You will not good layers if the PEI plastic is able to move up and down as the filament is being laid down across it. Plus it will cool too fast and come right up of the plastic like that.
Hi Choban,
Here’s my 2 cents. I had a similar problem but with PETG and not PLA. Turns out the bed was not level even though the initial bed level probing the corners worked just fine. The lower right side of the bed was printing fine and the lower left was a mess. My fix was to make some adjustments so the bed was in sync with the corner washers, and, raise the Z-offset. To me, your issue looks like a Z-offset issue. I think it needs to be raised. @rhenderson mentioned this early on here. Did you adjust your Z-offset?
BTW, here’s a pic of the problem I had.
-Mike
BlueBuffalo: I am using Marlin firmware 1.1.9.3.4, I am using Cura Lulzbot Edition 3.2.6.23
OverRevved: I have calibrated my steps the same way you show in your response. Not sure what you mean by extrusion multiplier, where can I locate this paramater. If you are you talking about the flow and the initial layer flow rate, I have these set to 100% for both
Kmanley57: I understand what you are saying, so I tried to move my print to different location on the bed, with the same result. For this last print I did increase the nozzle temp from 95 to 110 and it looks a little better. I tried increasing the temp to 115, and it look worst. I will try the temp at 111 and 112, Will let you know what this looks like…
TigerMike: I have level the bed a number of times with calibraters. Also this test object is only 2” wide, there is not much remove for differences from one side to the other side. I hear a lot about adjusting the Z offset. On a TAZ 5 there is a knob on the printer that raises or lowers the height for the Z axis / and the extruder hot end. Do you know of somewhere I can change the Z level in software or somewhere else besides the knob on the printer.
I really don’t think this would be the issue but just to make sure, I mean check the .35 is in your printer settings. Settings>Printer>Manage Printers>Machine Settings
The knob is the way to do it on the 5. Other slic3rs have a z-offset option but really all you need is the knob. If it was a Z-offset issue you would turn the knob so that the nozzle is slightly closer to the bed.
Your PEI sheet definitely has outlived its useful life. They’re $20, I would look into replacing it.
If you’re just trying to get the PLA to work a couple band-aids could be using a glue stick to make sure you get good adhesion, and increasing the initial layer height.
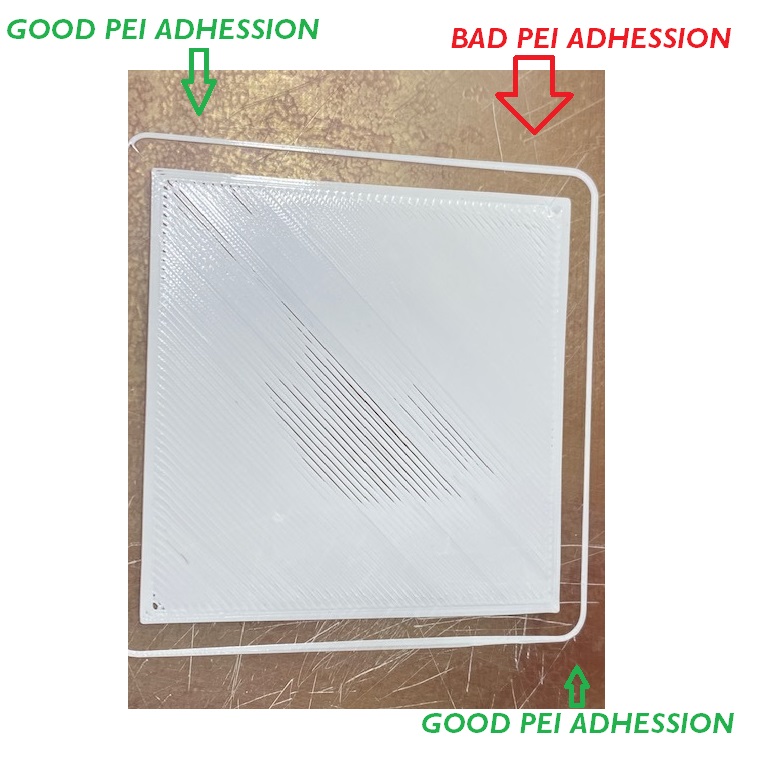
Here is why i’m pretty sure its your PEI sheet. Notice how you have good smoosh where your PEI is lifting off, and you have worse smoosh where your PEI is firmly on the glass. I might be wrong but thats the best input I can give this situation.