every time i try to print using the SD card my z axis binds. This also happens when hooked to my computer but only after 4 or 5 prints. I have been disabling the steppers and leveling it back out, but should i have to do that evertime i print? This is my first printer so I want to make sure im not doing anything wrong to cause the issue. I am using the cura software and the profiles that are on this site to print.
thanks
Are you saying the X rods start parallel to the aluminum bed mounting plate per the bed leveling guide LulzBot 3D Printers: Made in USA, Professional-Grade, Open-Source “Verify the Z axis leveling” section, but the Z steppers are getting out of sync during printing, and you have to turn the Z steppers to bring the x rods back parallel with the aluminum bed mounting plate?
This is not normal, you should rarely if ever have to re-parallel the X rods to the aluminum bed mounting plate.
If you’re still in warranty, contact Lulzbot support.
I will be contacting Lulzbot as it is still under warranty. Thanks for the advice.
They had me…
First locate the 4 Allen head screws that attach the X carriage assembly to the Z nut mounts. Once you have located them, then you will loosen all * Allen head screws, 4 on each side. After this you will need to Auto home the printer. Then move the Z axis to close to the top of the printer.Then re-home the printer again. Please do this 2 times bottom to top and back. Then please move the Z axis to the middle of the printer. Once you have the X carriage in the middle of the printer, re-tighten the 4 Allen head screws connected to the Z nut mounts on each side.
Please do not over tighten the Allen head screws.
Once this is completed, please run another print and see if the Z is acting correctly.
Haven’t had a problem since…
Please read the following if you’re also frustrated with a z-axis binding issue. Apologies for the long windedness, but if I had read this email I wouldn’t have minded the 5-10 minutes it took to read it …
The above entry from zanthor » Thu Dec 10, 2015 1:19 pm is basically the correct approach, but was cryptic enough that I missed the meaning the first time around. If you’re frustrated with this binding issue like I’ve been the last 2 days then you may be likely to either screw something up badly (strip threads, bend things, put too much pressure on wire housings, etc) or even decide you need to send your TAZ to someone to fix. Very possible that neither is necessary and, like was true in my case, the solution is likely VERY SIMPLE!
If you need clarification or just some help brainstorming I’m available to email - jahearn@sbcglobal.net
FIRST: Make absolutely certain you don’t have an incorrect z-axis SPEED setting! This was twice responsible for all my issues, and since it was impossible to guess at I wasted time working my way through all the other possibilities. IF Z-AXIS SPEED SETTINGS ARE WRONG THEN, AS WAS TRUE IN MY CASE, THE LEFT Z-AXIS MAY SEEM TO BIND. It’s almost impossible to distinguish if the motor is binding because of friction from the rods, or if it’s just stalling because speed setting is wrong. My settings to be safe? 200 mm/min. Lulzbot also suggests going into the LCD display and doing this: “configuration” > advanced settings> then set the V max Z to 3 and then back out a step and save the settings.
The other times I had z-axis issues it wasn’t related to speed…
On one occasion the set screws binding the silver coupler to the motor shaft and the threaded rod came loose. Be careful with these - the allen wrench provided with my TAZ 5 SUCKED and I think the set screws were already a bit compromised when I received my refurbed TAZ 5. In fact I think the allen wrench caused my problem so I got a new one.
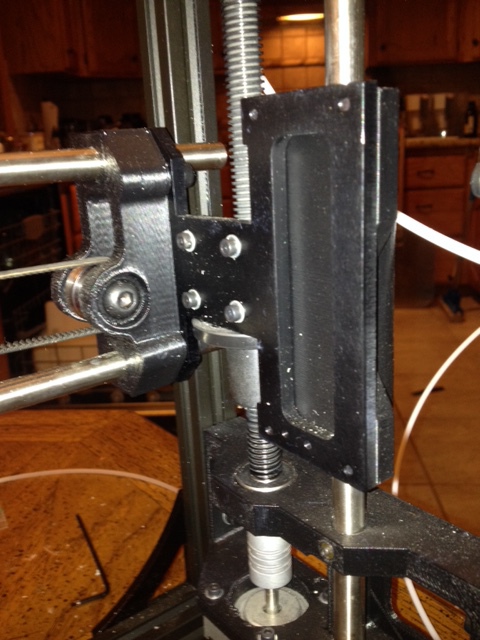
On the other occasions I had binding issues it was clearly due to mis-aligned threaded and/or guide rods. Sorry again for the wordiness but I want to be clear as to the circumstances: I’ve had my TAZ 5 for several months. Printing has been 99% flawless. Way beyond expectations wrt detailed prints etc. Couldn’t be happier. AWESOME PRODUCT. But I’ve had my moments where I crashed the print head into my model or lowered it into the bed with way too much force. Twice I’ve been successful at resolving the issue but twice it all stopped. Left z-axis binding. Loud noises. Complete fail. Just when I was ready to take the entire machine apart out of frustration, a friend noticed that one of the threaded z-axis rods wasn’t aligned correctly. I MISTAKENLY ASSUMED THIS MEANT THE THREADED ROD, THE ADJACENT GUIDE ROD, OR THE METAL COMPRISING THE FRAME ITSELF WAS BENT. I also wondered if some of the plastic covers holding it all together were cracked. Turns out none of the above was the case. Instead the intense forces I put my machine through probably changed the spacing of “things” ever so slightly. The fix? LOOSEN SCREWS! Yep - take a look around and assess where the stress points are on your machine. Don’t unscrew the motor from the coupler! (yet. unless nothing else works.) Instead, starting with the points of greatest stress on the z-axes loosen those screws first ever so slightly. The first place to start is the z-nut mount (picture of my right z-axis z nut mount attached). With power off and machine unplugged turn silver coupler by hand to see if everything is looser now. Do this for almost all points that may have stress involved (exceptions: silver couplers, LOWER frame brackets - if you loosen these your frame will drop down and then you’ll have to take a lot of time to get it back to perfect alignment again). Find out just how smooth and easy it is to turn the couplers when they’re at their smoothest and easiest. Try to get the left and right to be as easy to twist as the other. You may also want to loosen the bolts holding the z-axis motors themselves to the assembly (again don’t mess with the coupler though! unless you nothing else works!).
I want to stress that when I write “loosen” I don’t mean “unscrew almost all the way”. I mean just “loosen” to where the nuts aren’t tight. Go too far with the unscrewing thing and you’ll have screws falling out as they wiggle their way looser. Once you get it all right tighten everything back up. Not crazy tight, but tight to where vibrations won’t loosen things.
Hope this helped. Feel free to email if you still need help.
J