Taz Pro Dual Extrusion extruder 0 not working properly

Hey guys!

At the makerspace I work at, one of the 3D printers we have is a Taz Pro with a dual extrusion head. We have ran into an issue that has stumped us for a while so if you guys have any suggestions it would be greatly appreciated.

For a while, we have only been using extruder 0, since we rarely had a need for using extruder 1. We decided to try to get extruder 1 working so we hooked up the wires for it and got both of them to (kind of) work for dual extrusion. A pretty bad jam happened on extruder 1 so while I was away, it got worked on. After I came back, it appeared that extruder 1 was working perfectly so I gave the dual extrusion another shot. This is when the issue arrised.

Extruder 0’s stepper motor is not turning while printing, but there are some weird things going on with it too:
I can manually tell it to extrude some amount of filament and it will.
When it starts the print job, it does not turn at all, even for the initial purge.
While in the middle of printing a layer, if I pause the printer, manually extrude a bit of filament, and continue the print, it will print the rest of that layer correctly, but once it starts the next layer, it will stop turning again.

The people who worked on it while I was away claimed they only were working on extruder 1, and didnt touch extruder 0.

My best guess is that the computer reading the g-code might be ignoring the extruder commands, however this seems very unlikely to me.

Here is what we’ve tried so far:

Ensure all connections are wired properly
Print something that we know worked before to verify it doesnt now.
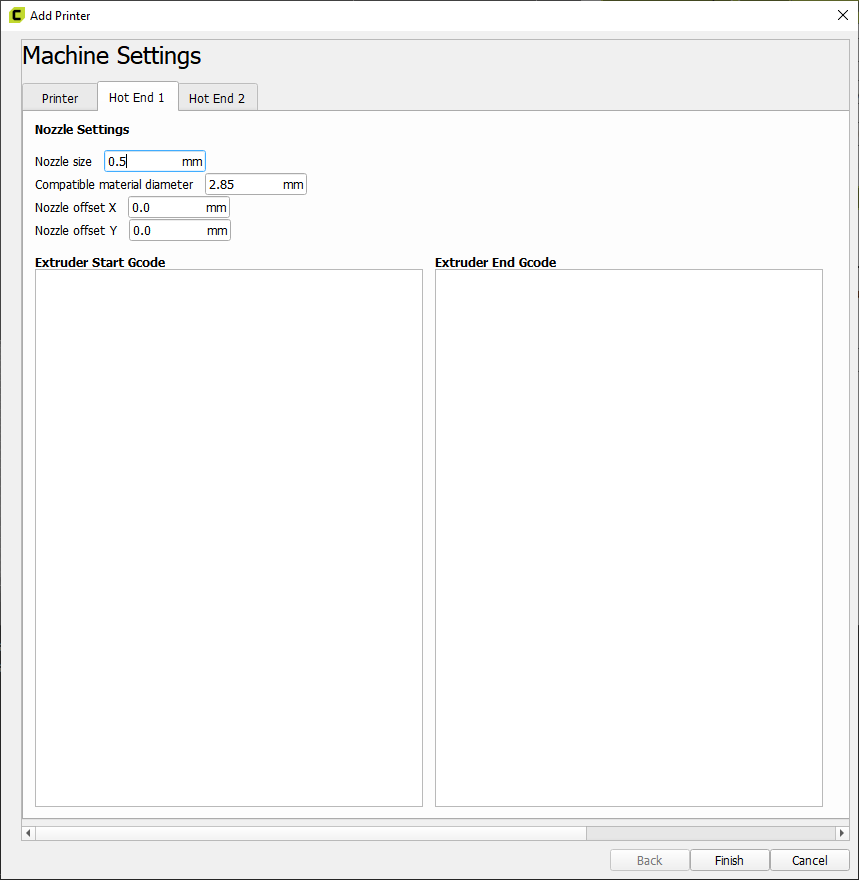
Ensured the temperature settings for our material is correct.
Reinstalled cura and sliced a new model
Selected extruder 1 only for a single color print (which worked just fine)
Factory reset the printer
Updated the printer’s firmware

So far none of this fixed extruder 0’s issue.
Any help would be greatly appreciated. We tried contacting lulzbot’s customer support a couple times, and its been a month and they never responded.

And if whoever is reading this is not able to provide help, I’d still like to thank you for spending the time of reading this rather lengthy post.

Also sorry I couldnt upload any pictures right now. If it will help in the troubleshooting process, let me know and ill see if I can.

Thank you

Updated to what firmware? What version of Cura are you using?

This sounds a lot like a version incompatibility between the slicer software and firmware, where E1 and E0 are getting misinterpreted, or that you have the wrong firmware installed for that toolhead.

The gcode produced has tool select code, and it generally inserts that code at the start of each layer, and in the startup code for purging each extruder.
T0 ; for tool 0
T1 ; for tool 1

When you’re manually telling that extruder to do something, you’re directly telling the firmware what to do. No problem there. If you interrupt a layer, then tell it to do something with extruder 0, it has sent an internal T0 command, so any future commands for extruding are sent to E0. When you resume after that, it’s going to resume reading the GCODE, where it doesn’t see a tool change back to T1 until the start of the next layer, which has a T1 code in it.

I wouldn’t be the least bit surprised to see that somebody has modified your startup GCODE to eliminate the T0 command prior to purging that extruder, or just changed all T0’s to T1’s. This change may have persisted despite reinstalling Cura.

Post your startup GCODE, and look at your GCODE file for where there are T0 or T1 commands.

Thank you so much for responding!

The firmware is Marlin 2.0.0.144.5
The cura version is Cura Lulzbot edition 3.6.36

Here is the startup GCODE

; This profile is designed specifically for the LulzBot TAZ Pro with Dual Extruder Tool Head
M73 P0 ; clear GLCD progress bar
M75 ; start GLCD timer
M107 ; disable fans
G90 ; absolute positioning
M420 S0 ; disable previous leveling matrix
M140 S{material_bed_temperature_layer_0} ; begin bed temping up
M104 S{material_soften_temperature_0} T0 ; soften filament
M104 S{material_soften_temperature_1} T1 ; soften filament
G28 ; home
M117 Heating… ; LCD status message
M109 R{material_soften_temperature_0} T0 ; wait for temp
M109 R{material_soften_temperature_1} T1 ; wait for temp
T0 ; select this extruder first
M82 ; set extruder to absolute mode
G92 E0 ; set extruder to zero
G1 E-10 F100 ; retract 10mm of filament on first extruder
G0 X50 F1000 ; move over to switch extruders
T1 ; switch extruders
M82 ; set extruder to absolute mode
G92 E0 ; set extruder to zero
G1 E-10 F100 ; retract 10mm of filament on second extruder
M104 S{material_wipe_temperature_0} T0 ; set to wipe temp
M104 S{material_wipe_temperature_1} T1 ; set to wipe temp
M106 ; turn on fans to speed cooling
T0 ; select first extruder for probing
G1 X-16.5 Y100 F2000 ; move above wiper pad
M117 Cooling… ; LCD status message
M109 R{material_wipe_temperature_0} T0 ; wait for T0 to reach temp
M109 R{material_wipe_temperature_1} T1 ; wait for T1 to reach temp
M107 ; turn off fan
G1 Z 1.0 ; push nozzle into wiper
G1 X -16.5 Y100 F1000 ; slow wipe
G1 X -16.5 Y90 F1000 ; slow wipe
G1 X -15.5 Y86 F2000 ; fast wipe
G1 X -17.5 Y80 F2000 ; fast wipe
G1 X -15.5 Y74 F2000 ; fast wipe
G1 X -17.5 Y70 F2000 ; fast wipe
G1 X -16.5 Y68 F1000 ; slow wipe
G1 X -16.5 Y60 F1000 ; slow wipe
G1 X -14.5 Y60 F1000 ; slow wipe
G1 X -14.5 Y46 F1000 ; slow wipe
G1 X -17.5 Y46 F1000 ; slow wipe
G1 X -17.5 Y60 F1000 ; slow wipe
G1 X -14.5 Y60 F1000 ; slow wipe
G1 X -14.5 Y46 F1000 ; slow wipe
G1 X -17.5 Y46 F1000 ; slow wipe
G1 X -17.5 Y60 F1000 ; slow wipe
G1 X -14.5 Y60 F1000 ; slow wipe
G1 X -14.5 Y46 F1000 ; slow wipe
G1 X -17.5 Y46 F1000 ; slow wipe
G1 X -17.5 Y60 F1000 ; slow wipe
G1 X -16.5 Y60 F1000 ; slow wipe
G1 X -16.5 Y42 F1000 ; slow wipe
G1 X -15.5 Y40 F2000 ; fast wipe
G1 X -17.5 Y38 F2000 ; fast wipe
G1 X -15.5 Y36 F2000 ; fast wipe
G1 X -17.5 Y34 F2000 ; fast wipe
G1 X -16.5 Y30 F1000 ; slow wipe
G1 X -16.5 Y19 F1000 ; slow wipe
G1 X -16.5 Y19 Z20 F1000 ; raise extruder
M106 S255 ; turn on fan to blow away fuzzies
G4 S5 ; wait 5 seconds
M107 ; turn off fan
G0 X50 F1000 ; move over to switch extruders
T1 ; switch to second extruder
G1 X296.5 Y100 F5000 ; move E2 above second wiper pad
G1 Z 1.0 ; push nozzle into wiper
G1 X 296.5 Y100 F1000 ; slow wipe
G1 X 296.5 Y90 F1000 ; slow wipe
G1 X 297.5 Y86 F2000 ; fast wipe
G1 X 295.5 Y80 F2000 ; fast wipe
G1 X 297.5 Y74 F2000 ; fast wipe
G1 X 295.5 Y70 F2000 ; fast wipe
G1 X 296.5 Y68 F1000 ; slow wipe
G1 X 296.5 Y60 F1000 ; slow wipe
G1 X 298 Y60 F1000 ; slow wipe
G1 X 298 Y46 F1000 ; slow wipe
G1 X 295 Y46 F1000 ; slow wipe
G1 X 295 Y60 F1000 ; slow wipe
G1 X 298 Y60 F1000 ; slow wipe
G1 X 298 Y46 F1000 ; slow wipe
G1 X 295 Y46 F1000 ; slow wipe
G1 X 295 Y60 F1000 ; slow wipe
G1 X 298 Y60 F1000 ; slow wipe
G1 X 298 Y46 F1000 ; slow wipe
G1 X 295 Y46 F1000 ; slow wipe
G1 X 295 Y60 F1000 ; slow wipe
G1 X 296.5 Y60 F1000 ; slow wipe
G1 X 296.5 Y42 F1000 ; slow wipe
G1 X 297.5 Y40 F2000 ; fast wipe
G1 X 295.5 Y38 F2000 ; fast wipe
G1 X 297.5 Y36 F2000 ; fast wipe
G1 X 295.5 Y34 F2000 ; fast wipe
G1 X 297.5 Y30 F1000 ; slow wipe
G1 X 296.5 Y19 F1000 ; slow wipe
G1 X 296.5 Y19 Z20 F1000 ; raise extruder
M106 S255 ; turn on fan to blow away fuzzies
G4 S5 ; wait 5 seconds
M107 ; turn off fan
G0 X247 F1000 ; move over to switch extruders
T0 ; switch to first extruder
M109 R{material_probe_temperature_0} ; heat to probe temp
M204 S100 ; set accel for probing
G29 ; probe sequence (for auto-leveling)
M420 S1 ; enable leveling matrix
M204 S500 ; set accel back to normal
M104 S{material_print_temperature_layer_0_0} T0 ; set extruder temp
M104 S{material_print_temperature_layer_0_1} T1 ; set extruder temp
G1 X100 Y-29 Z0.5 F3000 ; move to open space
M400 ; clear buffer
M117 Heating… ; LCD status message
M109 R{material_print_temperature_layer_0_0} T0 ; set extruder temp and wait
M109 R{material_print_temperature_layer_0_1} T1 ; set extruder temp and wait
M117 Purging… ; LCD status message
T0 ; select this extruder first
G1 E0 F100 ; undo retraction
G92 E-30 ; set extruder negative amount to purge
G1 E0 F100 ; purge XXmm of filament
G1 E-3 F200 ; purge retraction
G1 Z0.45 ; clear bed (barely)
G1 X100 Y10 F4000 ; move above bed to shear off filament
M106 S255 ; turn on fan
G4 S7 ; wait 7 seconds
M107 ; turn off fan
G1 X180 Y-29 Z0.45 F3000 ; move to open space
T1 ; set extruder
G1 E0 F100 ; undo retraction
G92 E-30 ; set extruder negative amount to purge
G1 E0 F100 ; purge XXmm of filament
G1 E-4 F200 ; purge retraction
G1 Z0.35 ; clear bed (barely)
G1 X180 Y10 F4000 ; move above bed to shear off filament
T0 : set extruder
M190 R{material_bed_temperature_layer_0} ; get bed temping up during first layer
G1 Z2 E0 F75 ; raise head and 0 extruder
M82 ; set to absolute mode
M400 ; clear buffer
M117 TAZ Printing… ; LCD status message

6th from the bottom line - that colon should be a semicolon.

Whoever modified that line owes you a roll of filament.

Wow I did not catch that. Ill fix that when I get a chance and I’ll let you know how things go. Thank you!

So I fixed that line and it sort of worked. Here’s what it is doing now:

If we print with only the first head (T0), it works again. It doesn’t purge the filament for some reason but it starts the print correctly.
When we print with dual extrusion, when it swaps from T1 back to T0, it doesn’t print anymore.

So I’ll look through the gcode to see if anything weird is going on.
Thank you so much for finding that! We still don’t have dual extrusion working properly but at least the single color extrusion works again.

There are probably similar typos throughout the custom gcode. I think if you add a new printer and choose the Taz pro dual extruder, and give it a different name, it should load all the default profile data.

It sounds like there may be something specific that’s been altered around the tool changes, and given how the startup gcode was altered, it’s somebody who knows enough to be dangerous, trying to make references to T0 redirect to T1.

Can you bring a laptop with a clean cura LE install in, use it to reflash the pro, and to send a test print from?

Ill go ahead and try that, thanks. Ill let you know how that goes.

I think there is a pretty good chance that there is a firmware issue too because I just tried running prints that we know worked before and they are also having the same issue.

Your old prints may not be working since you’ve changed the firmware, so previous gcode isn’t guaranteed to work.

In the machine settings, there’s places for gcode for both extruders, they should be empty. That’s a likely spot for a change that’s screwing things up to have been put.

I’m doing a quick comparison of the default 3.6.38 and what you posted, and it looks like they have hard-coded values for soften and wipe temps, probably as part of being the “testing” version instead of release. It’s hard coded for PLA temps for the nozzle wipes and probing. If you do a clean install, you’ll want to change those back to the {temperature} variables from your old code so they change with the material you’re using.

If you still have issues, you can wipe all settings and customizations:
Close cura, open the file browser, and type in %appdata% into the address bar.

There will be a cura-lulzbot folder in there, just rename to cura-lulzbot-old. If you get an error that stuff is open, restart windows and go back to the folder and rename it.

Next time you start up Cura LE, it’ll be fresh.

On the Taz Pro, just go into config and restore factory settings. You’ll need to recalibrate your z offset, and re-do your esteps, but other than that it should be fine to at least start printing again.

Okay I’ll go ahead and do that, thanks!

By the way, I just did a fresh install of cura LE on my laptop. This is the first time I’ve ever put it on my computer, and that line that had the colon in it still has it in there. I think that mightve been cura’s fault

Strange, I just did a rename of the %appdata%\cura-lulzbot folder on mine to make sure I had a clean version before installing 3.6.38

No messed up line with a colon… It might be pulling stuff from my Cura 5 installation, which would explain the lack of variables in the startup.

I just renamed the %appdata%\cura folder and started 3.6.38 clean.
Also checked the startup file at:
C:\Program Files (x86)\cura-lulzbot 3.6\resources\gcodes\lulzbot_quiver_evergreen_bagworm_start.gcode

It has the hard-coded temps and no colon like yours did.

Huh, thats weird. I installed 3.6.37 and it still had the colon. Perhaps version 38 dosen’t.

But yeah when I get the chance, I’ll go ahead and install version 38 (I’ll make sure the appdata is deleted before I do that) and I’ll flash the firmware of the printer using my cura installation. That seems to be the absolute limit of what I can do to try to fix it, because if all that doesnt work then there must be something wrong with the printer itself.

Thank you so much! Ill get back to you after all that is done

Oh actually just a quick question. When I reupload the firmware, should I also check the box that says “update EEPROM” too? Thanks!

Yes, update the EEPROM as well, it’s some of the saved settings, but resetting to default values is what you’re going for.

I just discovered something that I think has a big role in all of this. I was trying to unload the filament and the extruder was doing very weird things. I looked at the wiring and the white wire connecting from the controller to the extruder is broken

So we will have to wait for that to get fixed before I can do any other testing.

Thank you so much for all of your help! Sorry that I didnt catch that sooner. It was only today that I started moving the wires around and saw that it detached from its pin. After that gets repaired I’ll post here if the problem still persists

That’s a great thing to catch now, and we’ve at least identified the other little things that would be messing things up.

So we just got that repaired, and we have confirmed that the printer now works perfectly. So it turns out that was the major problem, and the semicolon issue also fixed the issue of the printer not starting with the correct extruder selected.

Thank you so much for all your help! I’ve certainly learned a lot about how the printer works and how to go about troubleshooting it from start to finish. And yes, they are more than happy to give me some free prints :sunglasses:

Thanks again!

Great! Now you gotta pay the toll with a picture of a multicolored Benchy.

I got you :wink:

Also just for fun