TAZ 6 Dual Extruder V3 Running 1.75mm Filament

Hello All,

I purchased a NOS Dual Extruder V3 and, after removing the original filament from factory testing, proceeded to modify it to run 1.75mm filament.

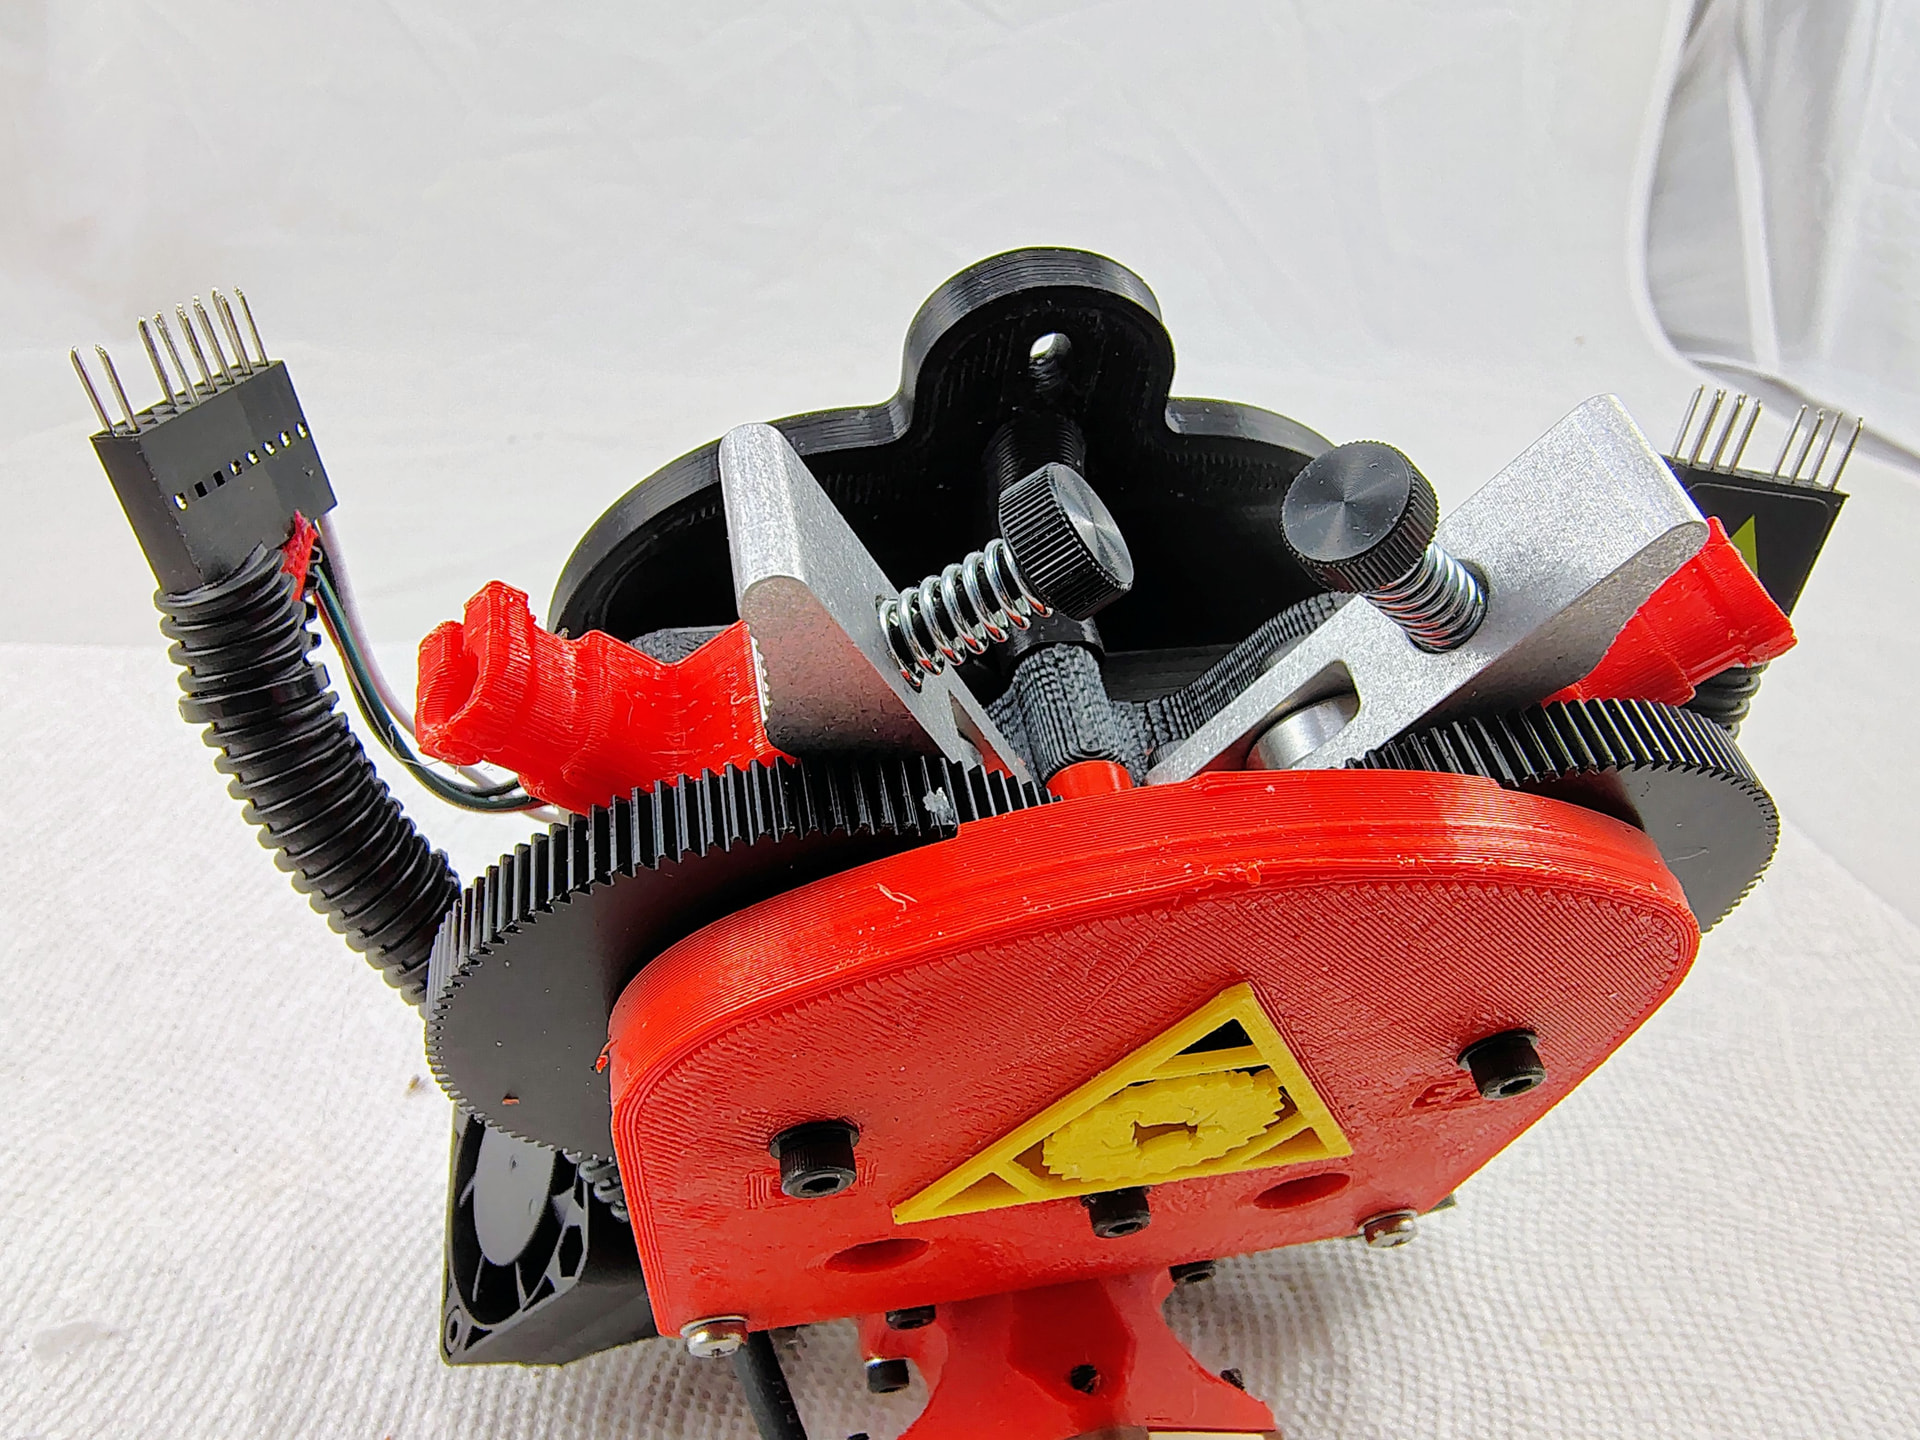
This included making 2 new stainless steel heat breaks, reducing the ID of the filament path to 2mm and reducing the heat break OD from 4mm to 3mm. (photo attached) These are the only parts that needed to be fabricated from scratch.

I converted the STEP file (from Github) for the mid-plate to TurboCAD and then reworked and resized the filament paths to accomodate the smaller diameter filament (reducing the diameter and moving the inlet closer to the hobbed gear). The filament path is now lined with a 3mm OD / 2mm ID PTFE tube from the inlet at the hobbed gear to the top of the heat break. This should work better than a 2mm teardrop-shaped pathway. I also added “ears” for 4mm OD / 2mm ID tubes at the top of the plate to facilitate filament loading and to provide a secure anchoring for a “reverse Bowden” tube if desired (This should work great with filament fed from the standard, TAZ side-hung spools or for moisture-sensitive filament (i.e. PVA) fed from a dry box). The new plate is printed in PCTG rather than the original ABS. (STL file attached)

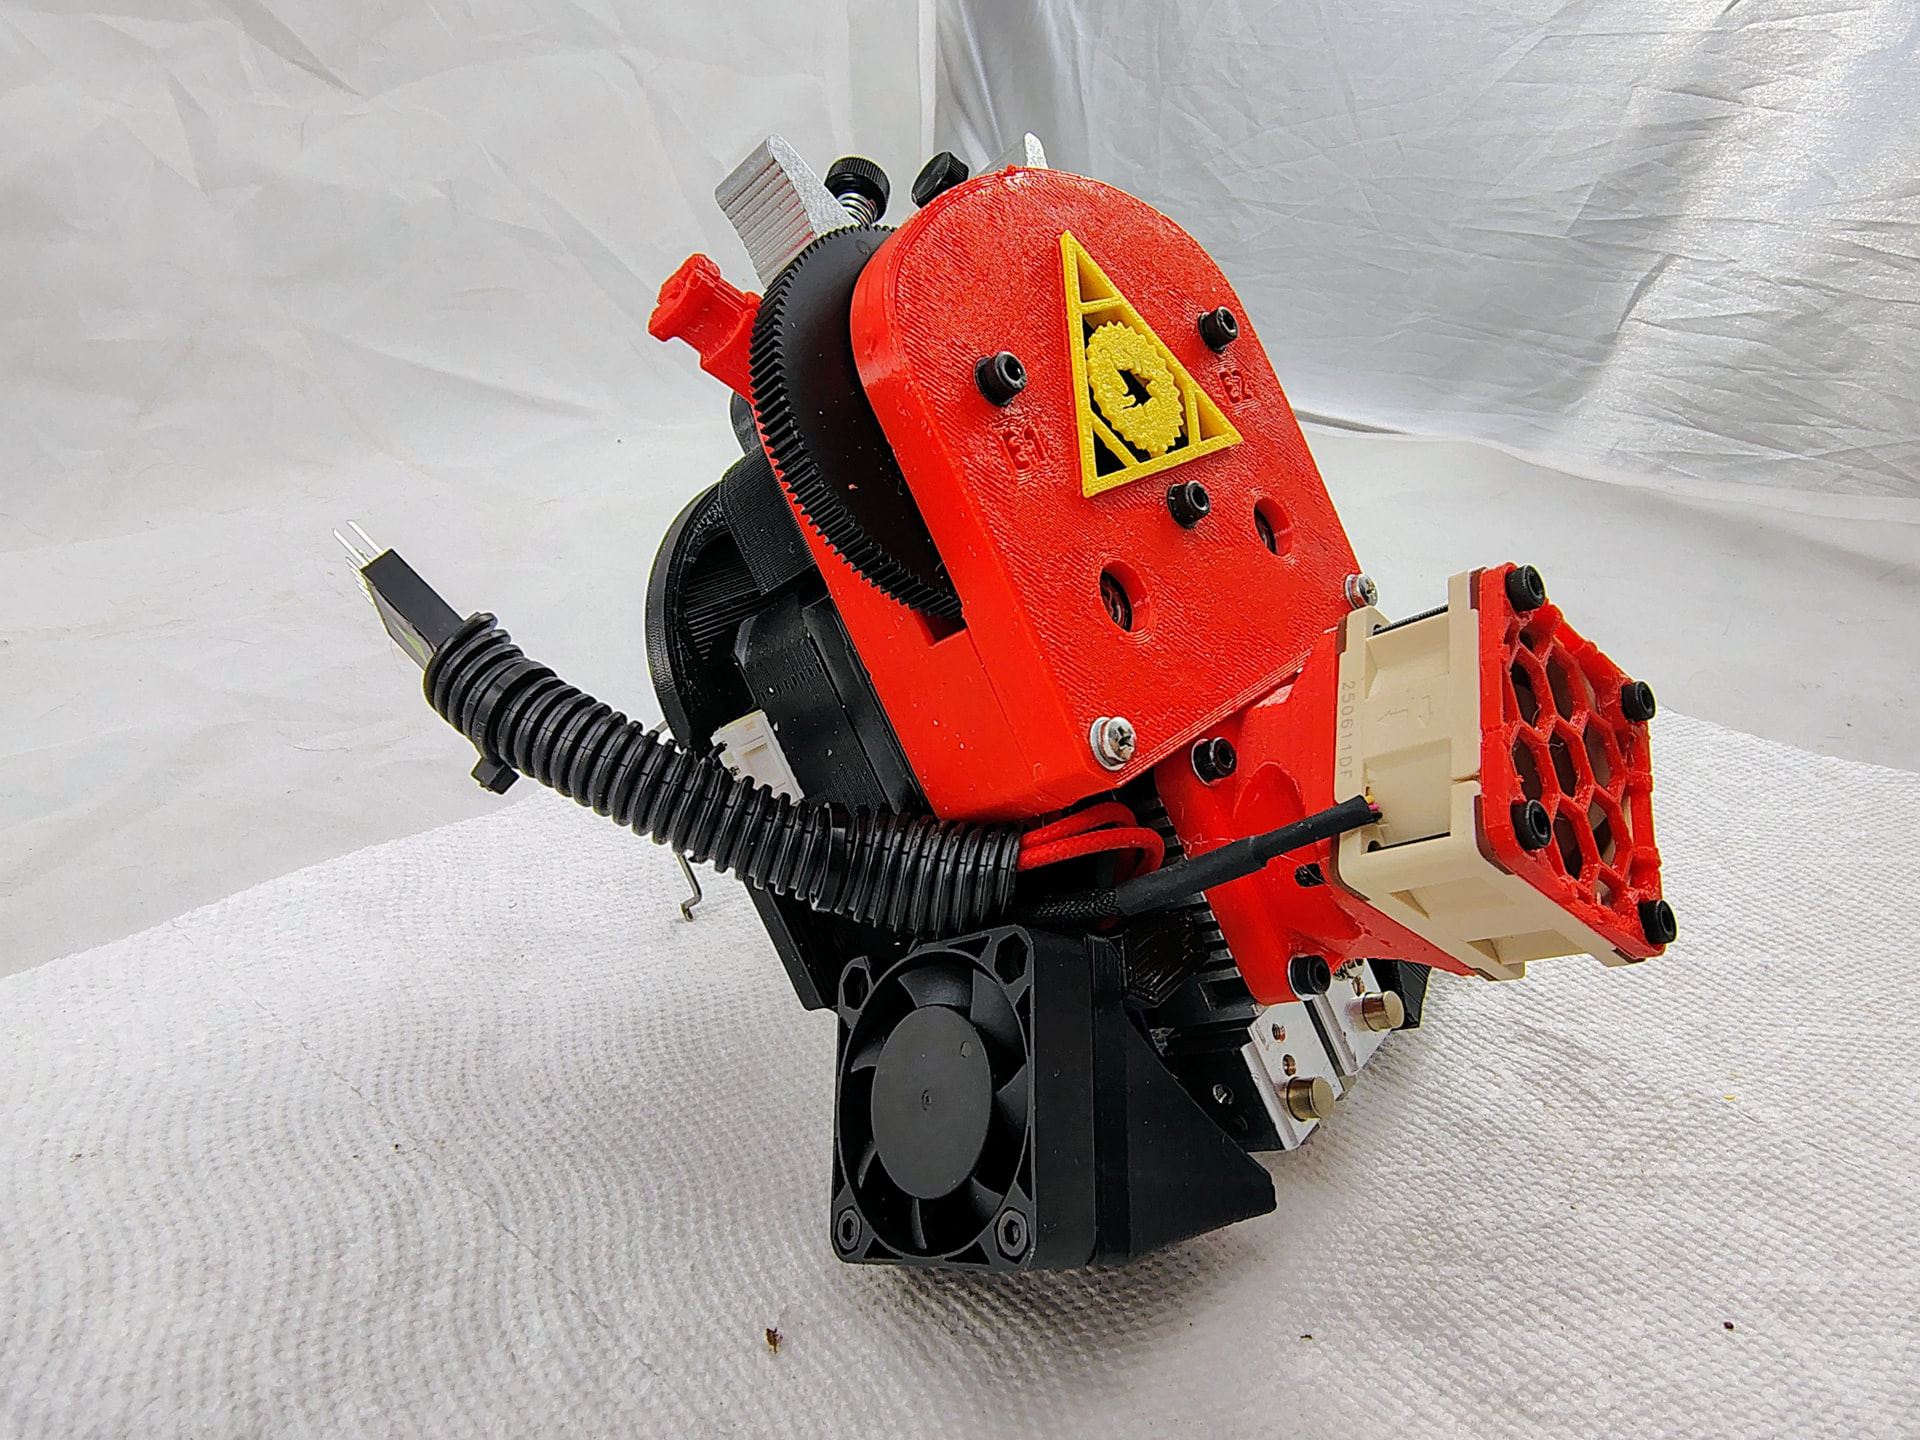
The print head had the original front bearing plate, missing two screws at the bottom corners. This was replaced with the V0.2 version available on Github. It was also printed in PCTG to match the mid plate. (STL file attached)

While I was dressing things up, I worked up a logo insert for the front bearing plate. This should be printed with a 0.25mm nozzle. Some detail was lost with a 0.4mm. (STL file attached) The insert was derived from a Lulzbot 40mm fan cover located on Github.

Cooling was improved with a Noctua 5V 40x40x20 fan and a fan housing recommended by another forum post addressing early cooling issues. ( Fan Duct for - LulzBot TAZ Dual Extruder V3 Tool Head by mordiev - Thingiverse ) Repeated Fails T6 dual extruder recently

I added a fan guard to help protect the Noctua fan and my grandkids’ curious fingers. :slight_smile: 40mm Fan Cover Honeycomb by pakkko - Thingiverse

PP-GP0291_Bearing_Housing_front__v0-2.STL (841.5 KB)

some_struder_dual_plate-1.75mm Lined Path w Ears.STL (2.7 MB)

LulzBot_Logo Insert for Dual Extruder V3.STL (1.6 MB)

The result so far is that the new head works great. I’ve printed several larger (12 hour+) prints in PLA/PLA (2 color) and PLA w/ PCTG supports with no issues. Next on the list to try is PVA disolvable supports.

This has been a fun and rewarding side project. Hopefully it can be of some benefit to others.

Enjoy!

Todd.

Todd Snouffer

Littlelocos Model Engineering

Hagerstown, MD

4 Likes

Awesome and I want it!

My dual recently clogged, again. Took it apart and didn’t have the heart to rebuild it… again.

You should offer a mod service, haha :smiley:

1 Like

Did you just drill out the heat break 2mm ID with a regular drill bit?

My milling machine could do the outside easily enough (incl thread mill). I don’t have a lot of experience cutting stainless though, and also don’t know if a drilled hole is smooth enough to prevent filament sticking.

Nice going! Thanks for sharing.

The thru-hole was drilled about 0.25mm (0.010”) undersize and then reamed with a 2mm reamer so the ID would be smooth. I used the free-machining (303) stainless steel specified on the drawing and have a new favorite stainless steel. It machines very nicely. The only changes I made to the heat breaks was changing the bore to 2mm dia and the neck to 3mm dia.

I considered sleeving the heat sink, but decided to extend the PTFE sleeve down to the top of the heat break. This insulates the incoming filament as it enters the heat sink and ensures alignment of the heat sink from the 3D printed mid-plate.

Todd.

Not good on the clogging. The additional cooling from the higher performance fan and the fan duct may help with that if it’s due to heat creep. With the fan duct, the coldest air meets the hottest part of the heat sink (between the filament paths). I thought about offering an upgrade service. :wink:

Lulzbot recently re-released this tool head, noting improved cooling, but the photos on the Web site seem to show the original front plate and fan. Not sure how the “new” version differs.

I’m currently about 8 hours shy of a 35 hour print running HTPLA in nozzle one only. The first long print last week was with regular PLA in nozzle 1 and PCTG as break-away support material in nozzle 2.

Todd.

I bought the v3.1 “upgrade kit’ and its just some printed standoffs and longer screws that spaces the fan up off the heatsink. It was an improvement, but not a big one.

Then I went with that redesigned fan duct and higher power fan… which was yet another marginal improvement. Though still not enough to make we want to regularly use the dual toolhead!

@Littlelocos solution seems to be the most comprehensive yet.

Is it the one that will finally make the lulzbot dual reliable?

:crossed_fingers::crossed_fingers:

Thanks. So far it’s worked great. The switch from 2.85 to 1.75 has a lot going for it. The 3mm OD x 2mm ID neck has a much smaller cross sectional area than the original 4mm OD x 3.2mm ID neck so it will conduct less heat from the heater block to the heat sink. The combination with less incoming heat and more / better-directed air flow seems to do the trick.

Print quality has been outstanding. This is most-likely due to tighter tolerances along the filament path along with more “clicks” per mm^3 of filament with the smaller diameter filament.

Next steps for me would be to look at controlling radiant heat exchange between the heater block and the heat sink along with an improved heat break, possibly bimetallic with a stainless neck and copper upper end.

For the above, my interest is in making the Dual V3 toolhead as bulletproof as I can, while quickly putting it to work.
Todd.