Hi all. My Taz pro is only a few months old but recently started failing to calibrate and auto-level. The cleaning process begins, but invariably, the head ends up a little too low and just barely in the cleaning pad (too far “north” if we pretend compass points while facing the machine). Then the head collides with the plastic housing of the cleaning pad. If I allow the process to proceed, the same thing happens on the other side.
I’ve tried for months to speak to tech support on the phone, to no avail, and responses have taken several days via email, so I’m hoping someone knows a fix.
I have tried the auto calibration in the advanced settings, and while it succeeded last week, this week it fails because of the collision with the cleaning pad housing, as described. It’s as though the head is very gradually moving further away from it’s correct location.
I also tried restoring factory settings, which I’d not changed, but I hoped it would help. It made no difference.
Thanks in advance.
One of the things that I would check is to make sure the machine is physically aligned. I don’t remember off the top of my head what would be out of alignment to cause this to happen, but it could possibly be the assembly is not correctly in place. If you are able to verify that the printer itself is physically aligned then I would reflash your firmware. If that doesn’t fix it make sure you are using the correct machine in Cura to slice your files. It is hard to diagnose more without pictures or more information such as your cura settings.
Thank you! I’d blame Cura, but the failures happen even when I run the advanced settings auto align tool, which happens without any file. Here’s a recent video from yesterday (it should start at 44 seconds, but if not, you may wish to skip the heating process wait time) : https://youtu.be/lJZjMHn1HoI?t=45
Are there instructions for resetting the physical alignment? Why would it lose alignment? I set it up in this location rigt after purchase, and it hasn’t moved since.
Sorry for the 200 questions.
I talked with support and watched the video, we have a couple of concerns. First is that the wiper pads are not properly seated and should be push down until flush with the plastic holder. Second may just be our eyes tricking us but in the video the y-axis looks a little angled, go ahead and make sure it is at a 90 degree angle with the rest of the machine. If you have any questions about how the machine is put together or are curious check out Lulzbot OHAI. Third question is did you change anything right before it started failing?
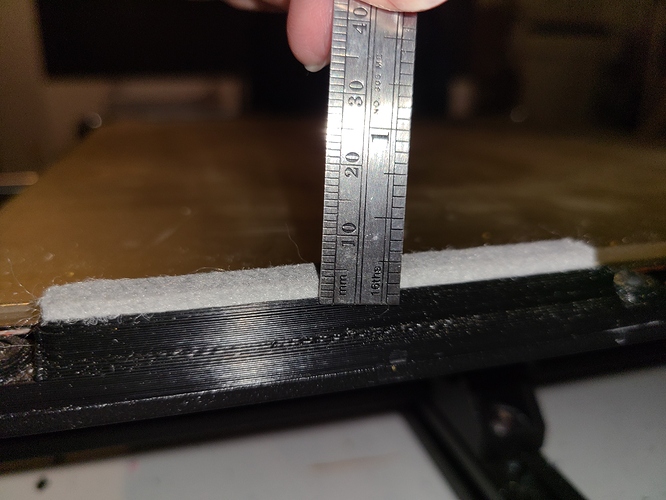
Much appreciated. The problem is that the replacement pads don’t fit length wise. The pads you just sent are 95 mm long. The cartridge that holds them in the machine is 89mm. I cut them to length, but the hole is 10mm deep and the pad is 13mm tall, making it quite impossible to seat the pad any deeper in the socket, and impractical and dangerous to shave 2-3mm from the pad.
As to your other questions, no, I’ve changed nothing on the machine.
I will find my carpenters square to check the 90 degree angle.
Pics attached. Note the shadow where I show the pad is 3mm proud of the cartridge, Meaning it’s fully seated… Otherwise it looks like 4 or 5mm.
Again, thank you for the prompt reply.
We are looking into the issue of the wiper pads being the wrong specs. For now you have two options, one is to cut one side of the wiper pad to length so that it is flush with the top of the mount. Two is to change the starting gcode to accomodate the raised wiper pads. The second option is significantly more advanced and would require testing. Both will require you to continue to see if you are having issues.
I’m happy to cut them down when the situation is a one-off and remediable long term. Because I will have students using the machine at times, we do need the pads with the appropriate fitment. I do very much appreciate that you seem to have identified the issue. I’ll update if the flush-cut pads have any issues, which I don’t anticipate.


