Thanks. I am using KISSlicer, and there terminology is a little different, but I have also gotten excellent prints from KISSlicer as well. I think my next step (as you both suggest) is to do a slice from Cura and try that from the Lulzbot TAZ Cura Profiles.
They’re sections of a colon if anyone is wondering. That’s why they look a little wobbly.
These were all sliced in KISSlicer ahead of time, so I haven’t gotten to trying Cura yet, but that’s next on the list.
Any thoughts as to what could cause this in the middle of a print like this?
I’ve had problems like that on both my printers… Slight overhangs often come out with clumps on the surface. Reducing the print speed, tweaking extrusion temps, increasing cooiing amd finalky lowering extrusion rates should help those prints.
Finding the right extrusion temps can be an “art”. Ideally you want to print at the lowest temps to help lock the extruded plastic in place as soon as it comes out of the nozzle. Of course, the temp needs to be high enough to keep up with the print. Too low a temp could cause delamination or weak bonding with the previous layer. See how it can be an “art”? . Sometimes in a quiet room, you can hear the filament become molten as the nozzle preheats… Its like a subtle crackling/bubbling sound… which signifies the lower end of the temp range (printing at this temp is probably too low). Oozing indicates a slightly high temp, which can be good for initial layer adhesion and promotes good bonding to adjacent filament… resulting in strong parts. Oozing gives your filament a mind of its own in which could lead to clumping and other weird things.
Increasing fan cooling during overhangs will also help to lock the filament in place. With ABS, I like to reduce fan cooling to 20-30%… the material seems to like cooling at its own leisure. I havent printed PLA in a while, so havent experimented as much.
Use the extrusion multiplier to lower he amount of filament being deposited. Keep in mind too low and you could starve the nozzle. Too little filament can also weaken a part. Alternative to adjusting flow, sample the diameter of your filament with calipers to get a better average diameter of the filament for your slicing software. If the nozzle scrapes the top of the print (sometimes can be heard as a rumbling sound), that’s a good indication of over extrusion.
Anyway sorry for the book… hope some of the insight helps.
OK, I’m sure that there something I’m doing wrong but I am extremely frustrated.
I have tried to print this model multiple times, ALWAYS with a failure.
The latest:
Failed with cura (with PLA settings from Lulzbot) very early, very beginning of first infill.
Back to KISSlicer, but tweaked the first layer settings for slightly wider (.4 up from .35) and much slower first layer speed (15mm/s). After that I’m printing at 20mm/s for loops and 35mm/s for solid.
First layer, perfect! Second layer FAIL, as you can plainly see.
I’m going to do a cold pull as per discojon’s recommendation, then increase the temp slightly as I believe that it’s possible that the hot end is “not keeping up” with the extrusion rate, although that seems silly as I’m printing at a snail’s pace.
Then, finally, pull the hot end off again as it seems that the filament “snags” as I insert the filament.
I feel like I’m grasping at straws, but I’m really frustrated.
Hmm… that looks like a clogged nozzle. The cold pull is Lulzbot recommended method to help dislodge clogs. It doesn’t look like it worked for you. I believe Lulzbot doesn’t recommend removing the nozzle to clean, give them a call or e-mail for suggestions.
If you raise the nozzle up to 100mm and perform a manual extrude, does the filament come out in a nice straight line? Or does it curl? This can help identify if there is a partial clog… The line of filament should come out straight.
Is it possible that the little blower has gone bad?
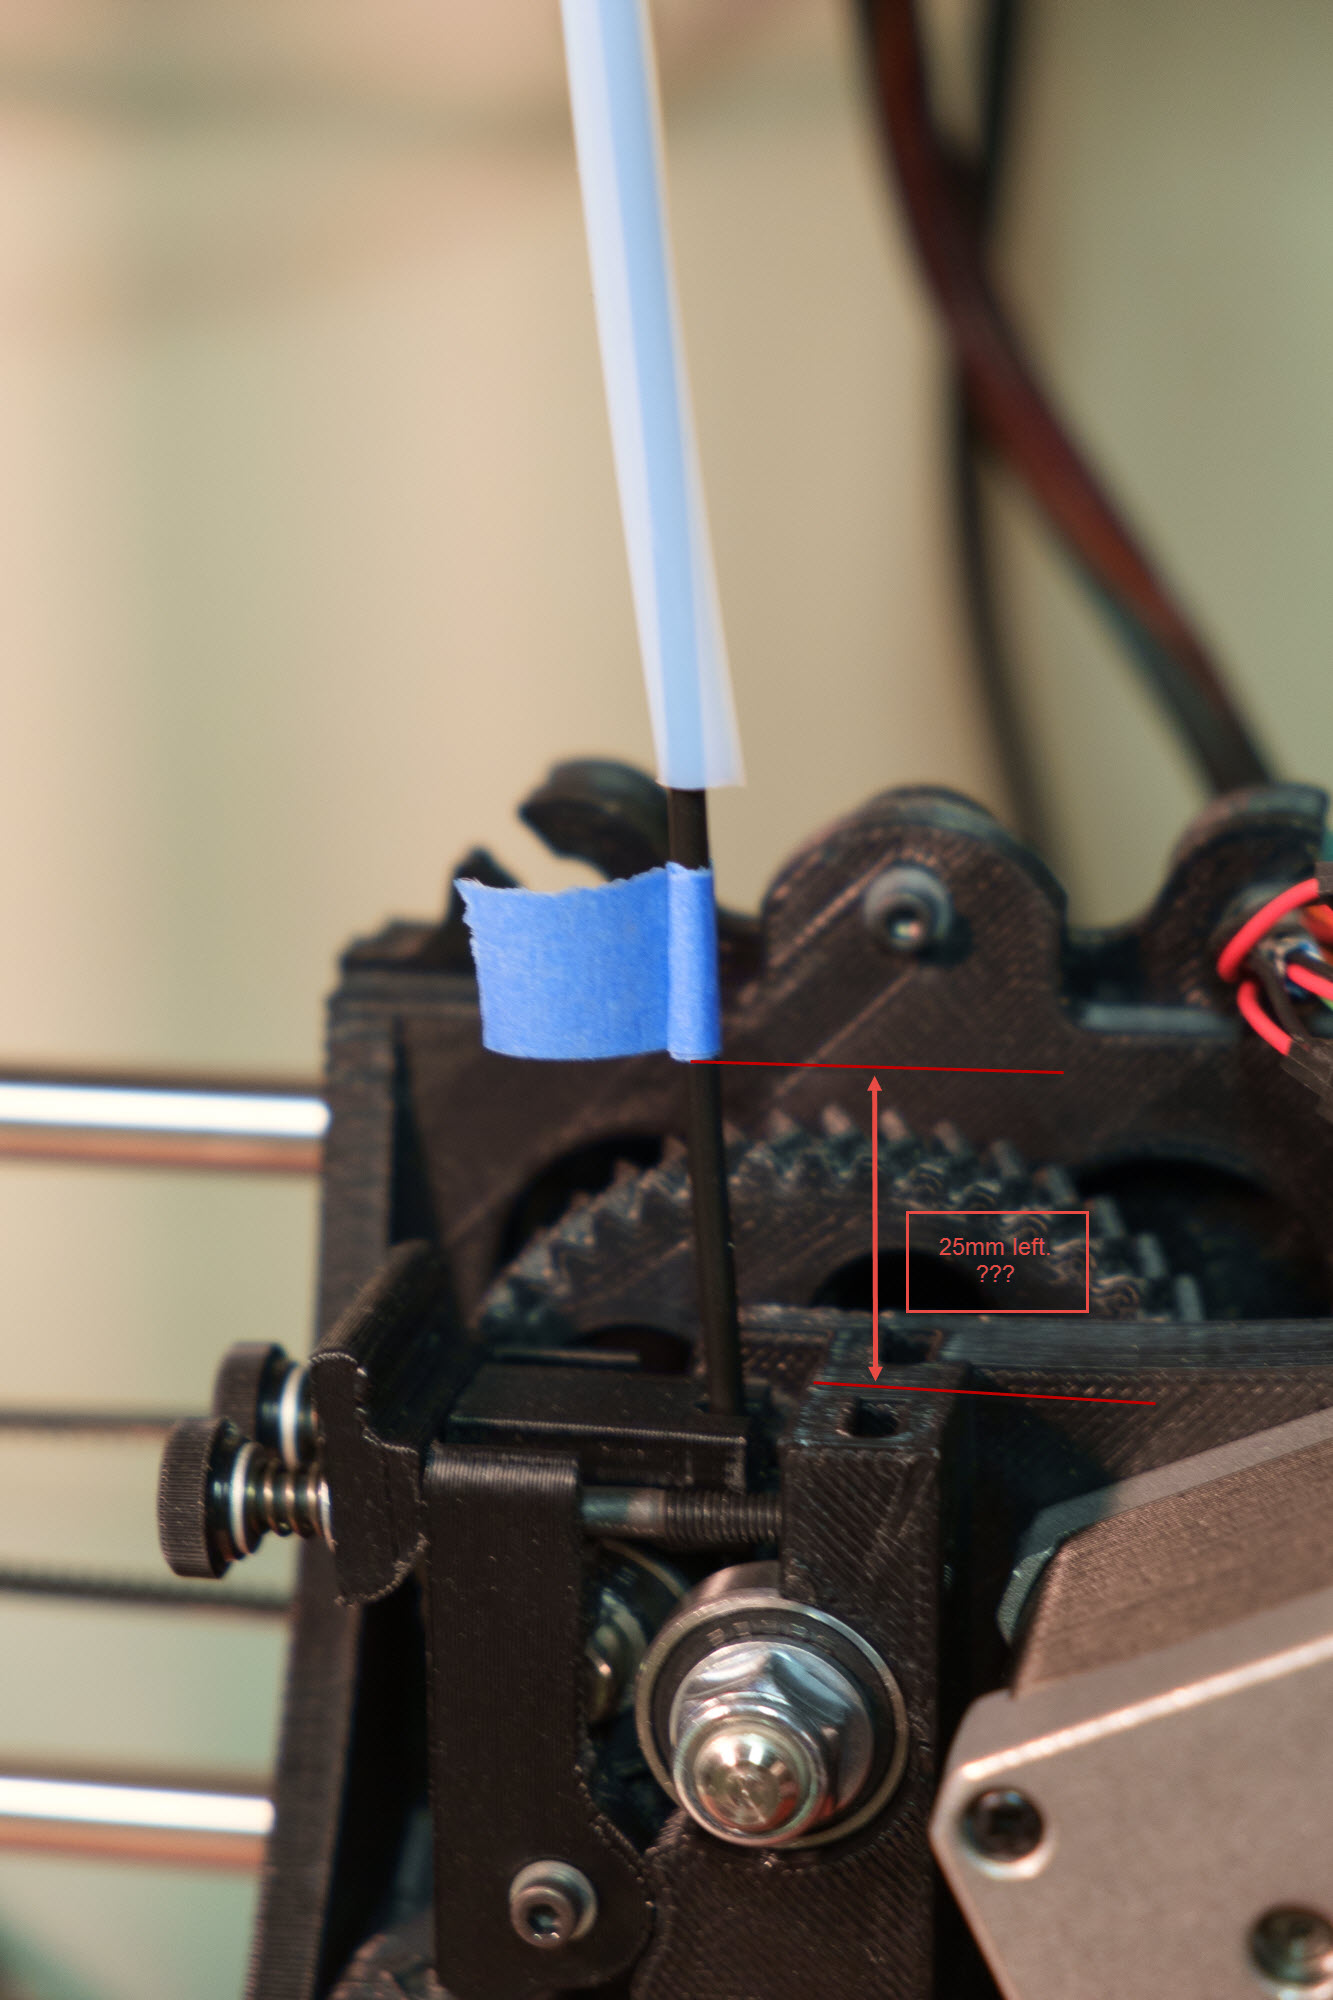
However just as a check, I put a piece of tape at 100mm above the flat part of the extruder, the stationary part, not the swinging arm, and did a 100mm extrude and ther was 25mm left! WHAT?
Is it even possible that the extruder is slipping that much or that the extrude # is off in the firmware? I’m not sure where to look to correct this.
BTW, the little fan on the fins blows constantly.
That could be compounding on your problem. Make sure to clean the teeth of the hobbed gear and check that the filament isn’t binding on the spool. Make the changes to account for the extrusion difference and report back.
Thanks, I think I’m in the process of solving my issue. I tried to calibrate the extruder using the 100mm @ 100mm/m in pronterface, and found that not only was my esteps # way off, I inadvertently overtightened the hobbed bolt when I first took it apart for cleaning.
I’ve loosed that and the extruder seems to moving a lot more freely (Yeah, DUH).
Anyway, I’ll try another part and see what happens. My next call is to Lulzbot.
Hmm… that’s one to file into the notebook. Overtightening the hob gear bolt sounds like something I would do also. Guess the test is to make sure it rotates freely when the motors are off.
Hope you figure it out… to get good prints you’ll need to get very intimate with your printer. Hang in there, these machines print great.
OK, just tried another print. On the second or third layer there was a point where there was very sparse material being extruded (spider Webs), but because it was running unattended, it pushed itself though and started to extrude again.
I hope that makes sense.
So I let it go and then this.
You can see in the upper right-hand corner that it is making little spider webs and that the previous few layers were not nice and flat like normal, but just kind of pushed out and laying there.
Man, after reading some of my posts, I sound like such a whiner, but I’m just so frustrated.
Hmm… I do see where the infill looks a bit different. Not sure whats going on there. How does the perimeter walls look there? If they look okay, then I wouldn’t worry much about infill layers… unless it starts to affect rigidity of the part. For that part infill looks to be 50-60% which should be fine as long as the top/bottom and perimeter shells are decent.
Personally that looks like under extrusion, the 2 perimeters are not bonded. Did you fully recalibrate the steps per/mm after your last round of fixes? I believe they should be in the 800 - 850 range.
kc,
The perimeters are about the same more rounded and not bonded together.
wantmys2000,
It does definitely look like under extrution and probably is at this point, but NOT at first, until it starts “acting up” everything seems fine and then wham!, It’ll start under extruding and then not extruding at all.
Yes, I did do quite a few extruder calibrations. I finally settled on 870, which seems like a lot to me, but what do I know!
Looking at the Lulzbot info that came with my TAZ 5, says they set it at 842.
As I was typing, I got this response from Lulzbot:
“This looks like a good print. You must just be at the tipping point between back-pressure and feed-pressure if it is starting to get those points where it stops feeding. Please tighten your idlers to 4mm spring compression, make sure that your hobbed bolt is nice and clean, increase your temperatures about 5 degrees at a time until you get good feeding, and give it another shot.”
This sounds like good advice. I’ll try the same print right now.
Awesome! Glad you got it sorted out. I typically like higher early layer temps with slightly lower temps for the rest of the project to aid in cooling (I run the fan at really low percentages). But your prints look perfect, don’t change unless you have problems with warping…
So at level 30 or so I start to get crap, then all of a sudden it goes back to “normal” again at about level 70. And even then the perimeters look OK, but the infill looks bad.
I’m at a loss. Everything was going fine. What would cause this behavior?
I removed my nozzle last night for a cleaning. And I think there is something binding the filament on its path past the hobbed bolt. There’s also been talk about heat creep which would affect PLA more sos than ABS. And lastly, I just read something about “seasoning” metal hot end with olive or canola oil.
Seasoning seems to reduce any sticking of the PLA to the hotend… There’s a youtube video of the process on the E3D hotend. Hard to link on my tablet. But basically it seem to be a dab of olive oil and manually feeding the filament through by hand while the hotend is at temp.


 . Sometimes in a quiet room, you can hear the filament become molten as the nozzle preheats… Its like a subtle crackling/bubbling sound… which signifies the lower end of the temp range (printing at this temp is probably too low). Oozing indicates a slightly high temp, which can be good for initial layer adhesion and promotes good bonding to adjacent filament… resulting in strong parts. Oozing gives your filament a mind of its own in which could lead to clumping and other weird things.


 WHAT?
WHAT?