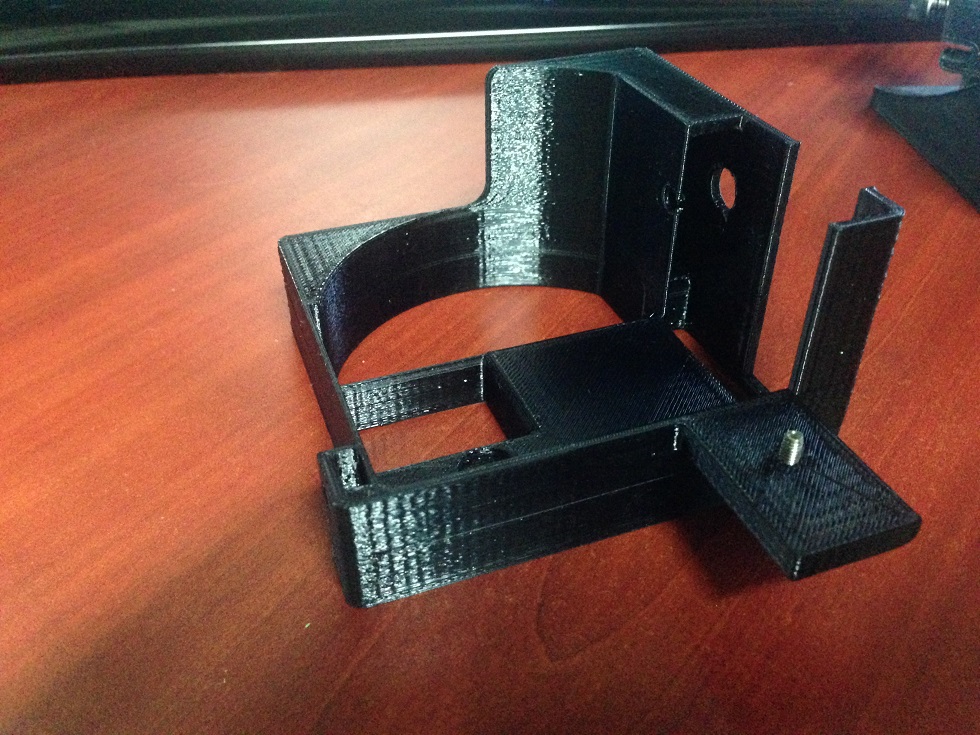
This thread goes along with my post about TAZ 5 PLA random clogging issues and a solution. I needed to create a way to provide a serious amount of cooling for my TAZ 5 / Hexagon hotend. The little “squirrel cage” fan was just… cute. No offense to the Taz designers! I LOVE my machine But seriously, that small fan was way too small, and it was actually really noisy. So, as all good do-it-yourselfers would do, I designed and printed my own along with a Filament Tube Retainer.
The intent of the shroud is to provide as much air flow across the cooling fins right above the heater block in the hotend itself, while preventing any airflow across the heater block. I also wanted to provide some additional air flow across the entire filament feed assembly, but I wanted it to look and feel as if it were a stock item. The shroud itself went great, but I realized that I wanted to keep the filament tube retainer that I had (Wolfie’s design), plus I needed a way to anchor the top of fan shroud. Slight design change = win.
As promised, here is the link to the .stl files and the Cura profile I used to print this. They’re over at Thingiverse
Here’s some pictures of the shroud itself. I printed it using PLA. I figured I’d really get to see if the clearance around the hotend was enough if the PLA didn’t melt
The mounting points of the fan shroud are 3 existing points on the extruder assembly. The stock “squirrel cage” fan will need to be removed completely, and is no longer needed.
The first one is the small unused threaded hole just above where the “squirrel cage” fan was.
I’ve been in contact with Ray from Lulzbot as well (though email) and today he steered me to your post. I can’t beleive I haven’t seen this before. THANK YOU!!!
I’m PMing my email address right now, if you could send me the files it save me from re-inventing the wheel (or in this case the fan cage).
Yessir I am. I have a power supply from a computer running the fan currently. I have a few other plans for the 12 volt supply that I’ve installed, but if you’re only looking for a fan replacement solution, muggs has a pretty good looking one in this post - TAZ 5 PLA random clogging issues and a solution.
Just made this mode for my Taz, unfortunately the fan that I’m using is too strong (I think) my nozzle extruder can not keep the temperature on the set point… there is too much air going to the lower part of the hotend.
I’m using a 24V fan, but will run with 12V to see if it fix the issue…
I think you could do a slightly improvement on the fan holder by extending the pointed part 25mm towards the hotend… this would avoid air getting into the hot end itself, constraining it to the cooling part…
Great point! I’ve had a couple others suggest that for “Rev. 2” as well
I did the design in Solidworks, and I’m using GOM Inspect to convert the .stp file to a .stl file. There’s a couple other things I’ll be changing in the next version.I want to make more clearance for the small knob that tightens the filament bearing, and I’ve been considering a change to allow for either a left side (mirrored) nozzle cooling fan assembly, and/or a special cooling manifold design I’ve had rolling around in my head.
Thank you for the suggestion on the changes! I think since that’s what it needs most, I’ll make that change first, and work on the rest after that’s been improved. I’ll make sure I update the thread when I get the new file(s) put on Thingiverse.
I recommend using a external power supply, unless you know what you are doing…
I started using the 24V internal power supply on Taz, but you need to be careful and protect taz internal circuit board using diodes. When you shutdown taz, the motor will be still spinning and it could generate enough power to o something bad.
I switched to use a wall 12v power adapter, like this and a small circuit using an opto-isolator and the original 5V fan wires.
When the Taz turn on, the current from the 5v will activate the opto-isolator turning on the 12V fan. Everything isolated and protected.
JLC_Designs: have you had the change to change the design yet? Thanks!
I haven’t had a chance to print one yet, but there were no changes to the mounting points so it should be a direct replacement. I would recommend printing it with the fan mount side on the print bed, and make sure to use support material “everywhere”. That should be included in the profile this time
Great idea for the mod!
I was having PLA heat creep problems as well… found this thread, BUT didn’t have a 80mm fan laying around and needed to finish multiple large print ASAP.
The solution I found:
Take a 2" long piece of electrical tape and put the tape on the edge of the OEM micro fan (taz5) and continue to wrap it about 50% around the heatsink. This forces the air to circulate better around the heatsink. It seems like the OEM fan is just blowing on the left side of the fins, where as adding a simple piece of tape forces the air in a semi-circle.
Just printed a few 20 hour prints, no problems - where as before I couldnt get more than a few hours in.
I have a ton of large prints coming up. I’ll report back if I run into further heat problems…
 But seriously, that small fan was way too small, and it was actually really noisy. So, as all good do-it-yourselfers would do, I designed and printed my own along with a Filament Tube Retainer.