I’m having a lot of issues with the printer I’m working with. It is a Lulzbot Mini less than 9 months old running the latest version of Cura (21.0). It appears that the layers are not adhering to one another, the printing lines are stringing together, the layers are not keeping uniform thickness, and that there are gaps between layers. There are two main issues:
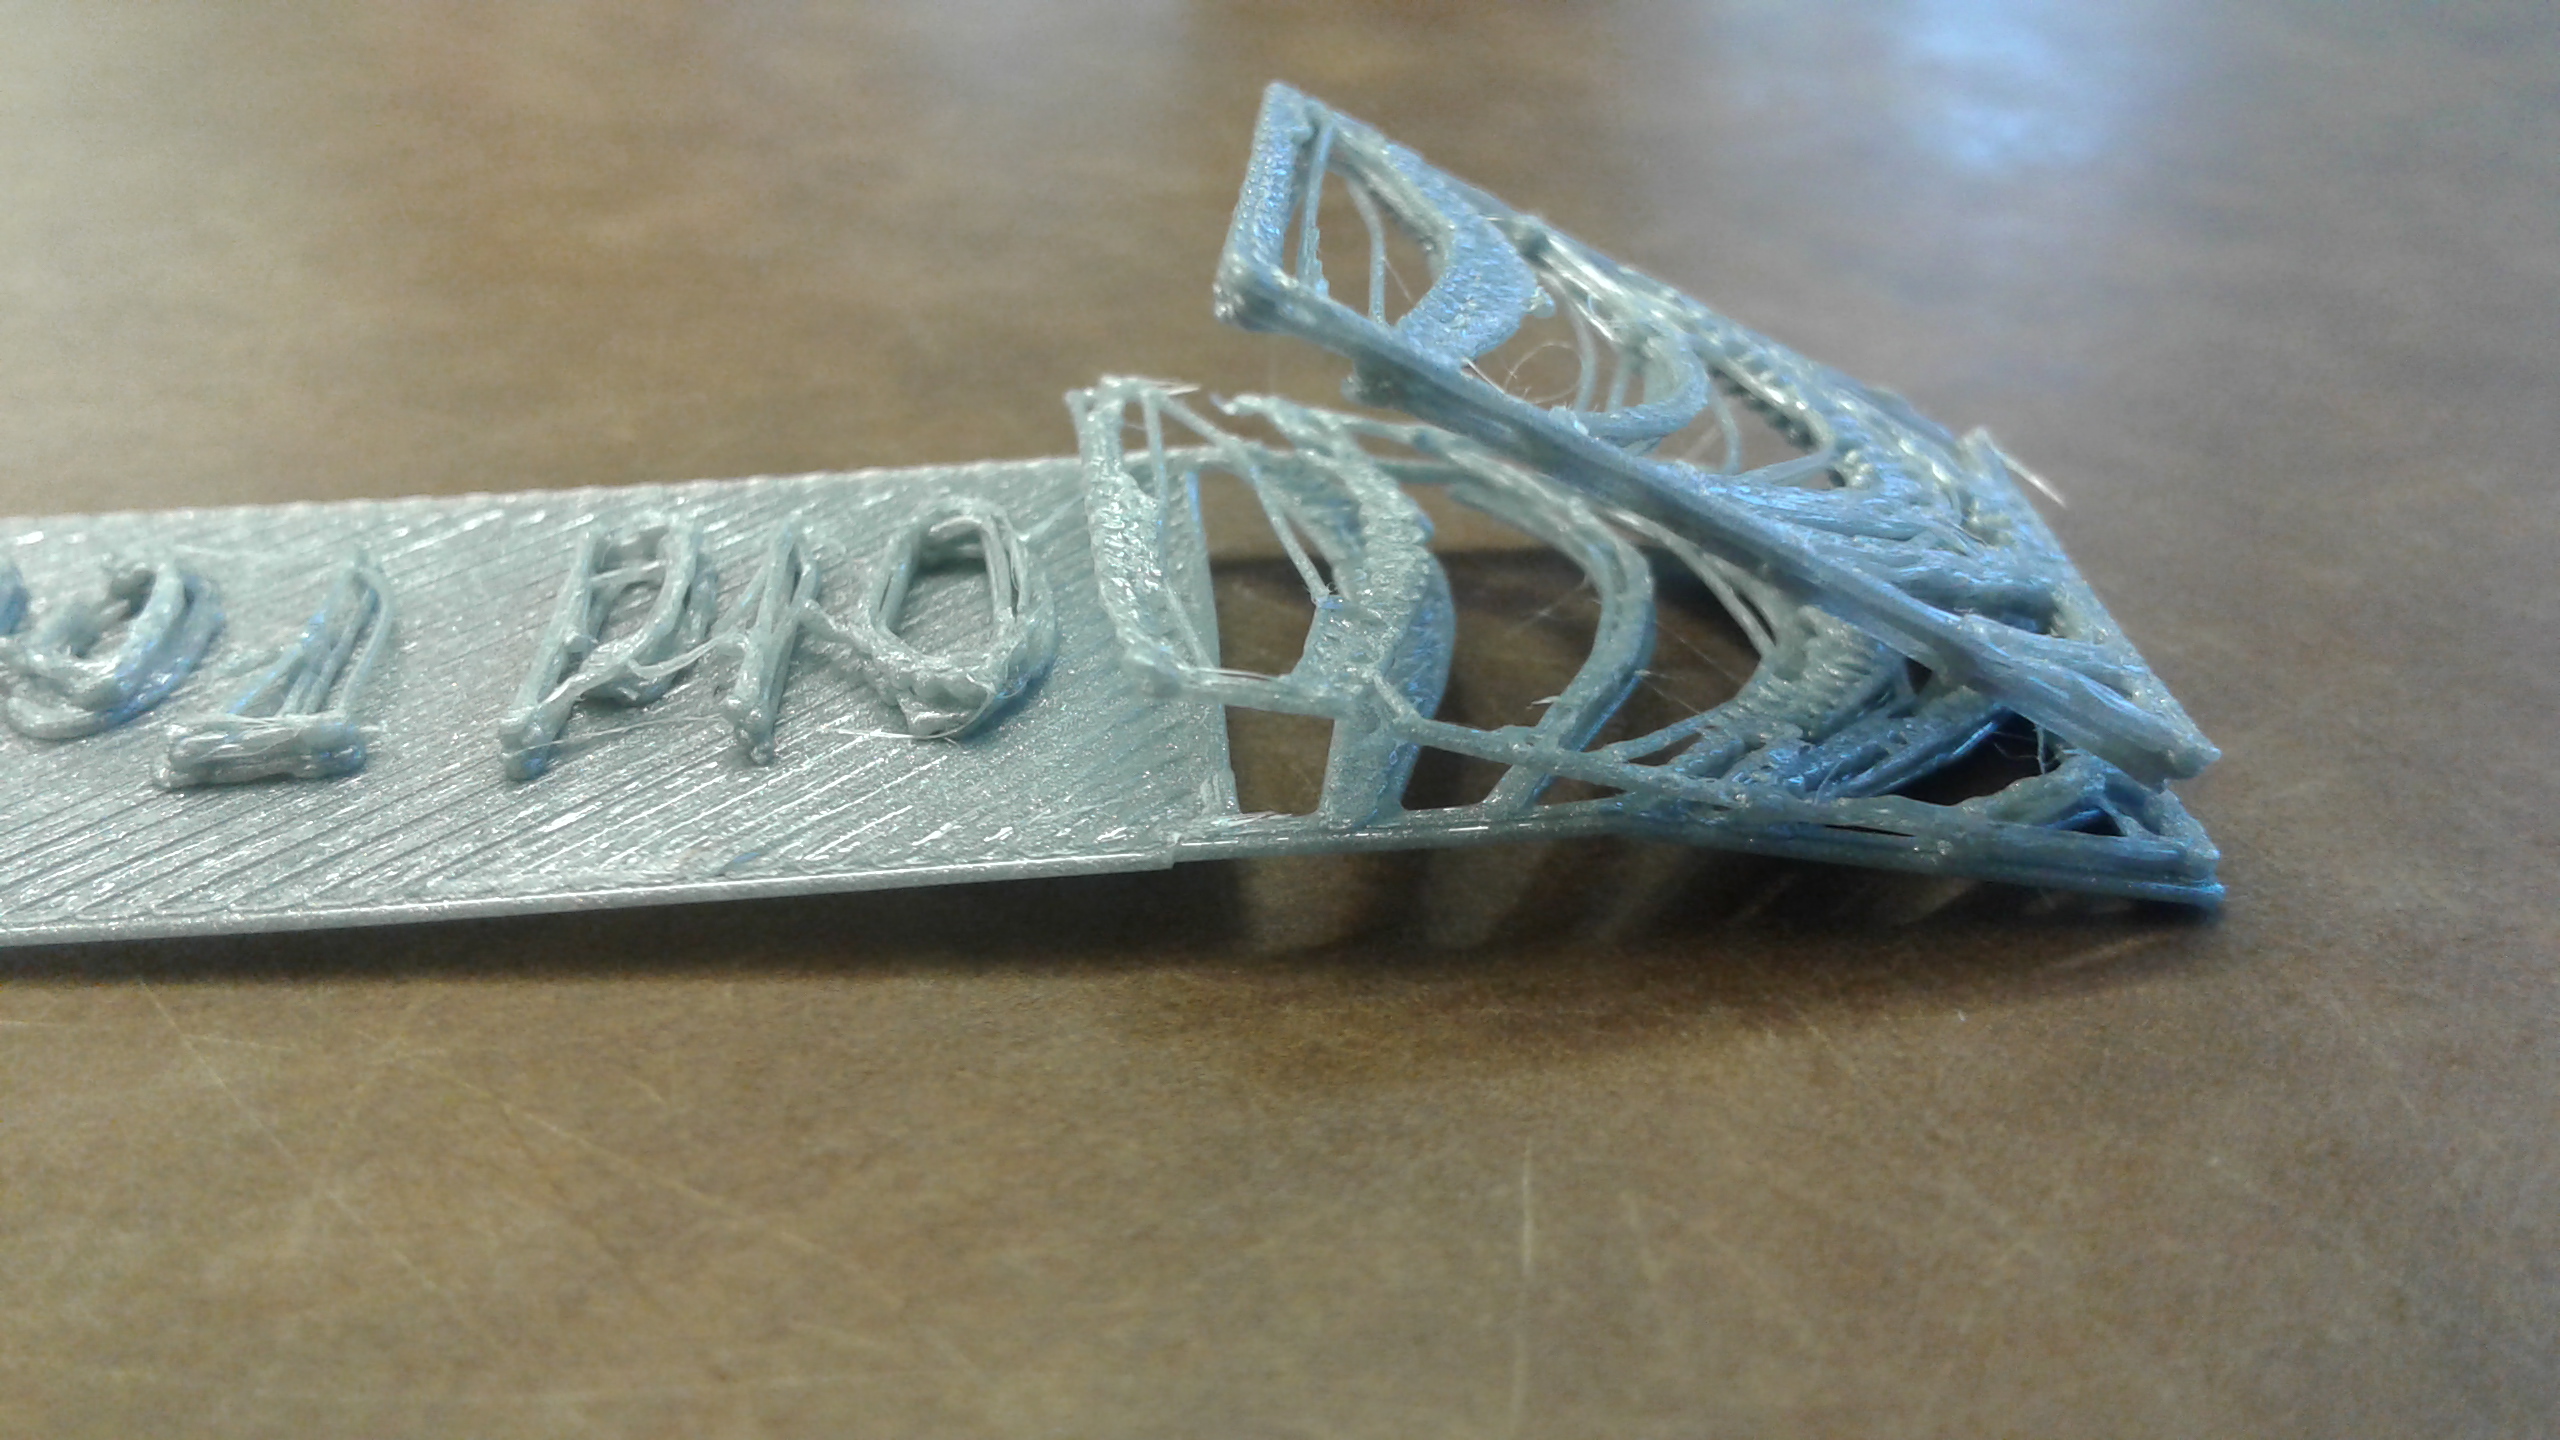
The hot end/nozzle appears to be digging in to the print itself and not rising. (See the image of brown bookmark)
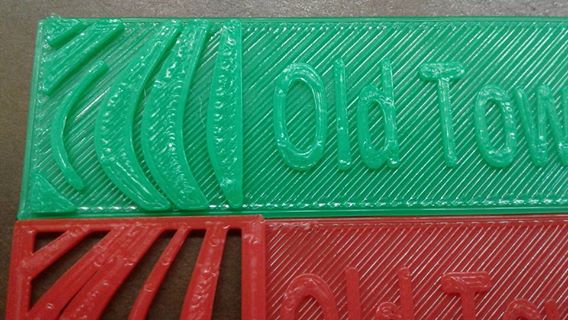
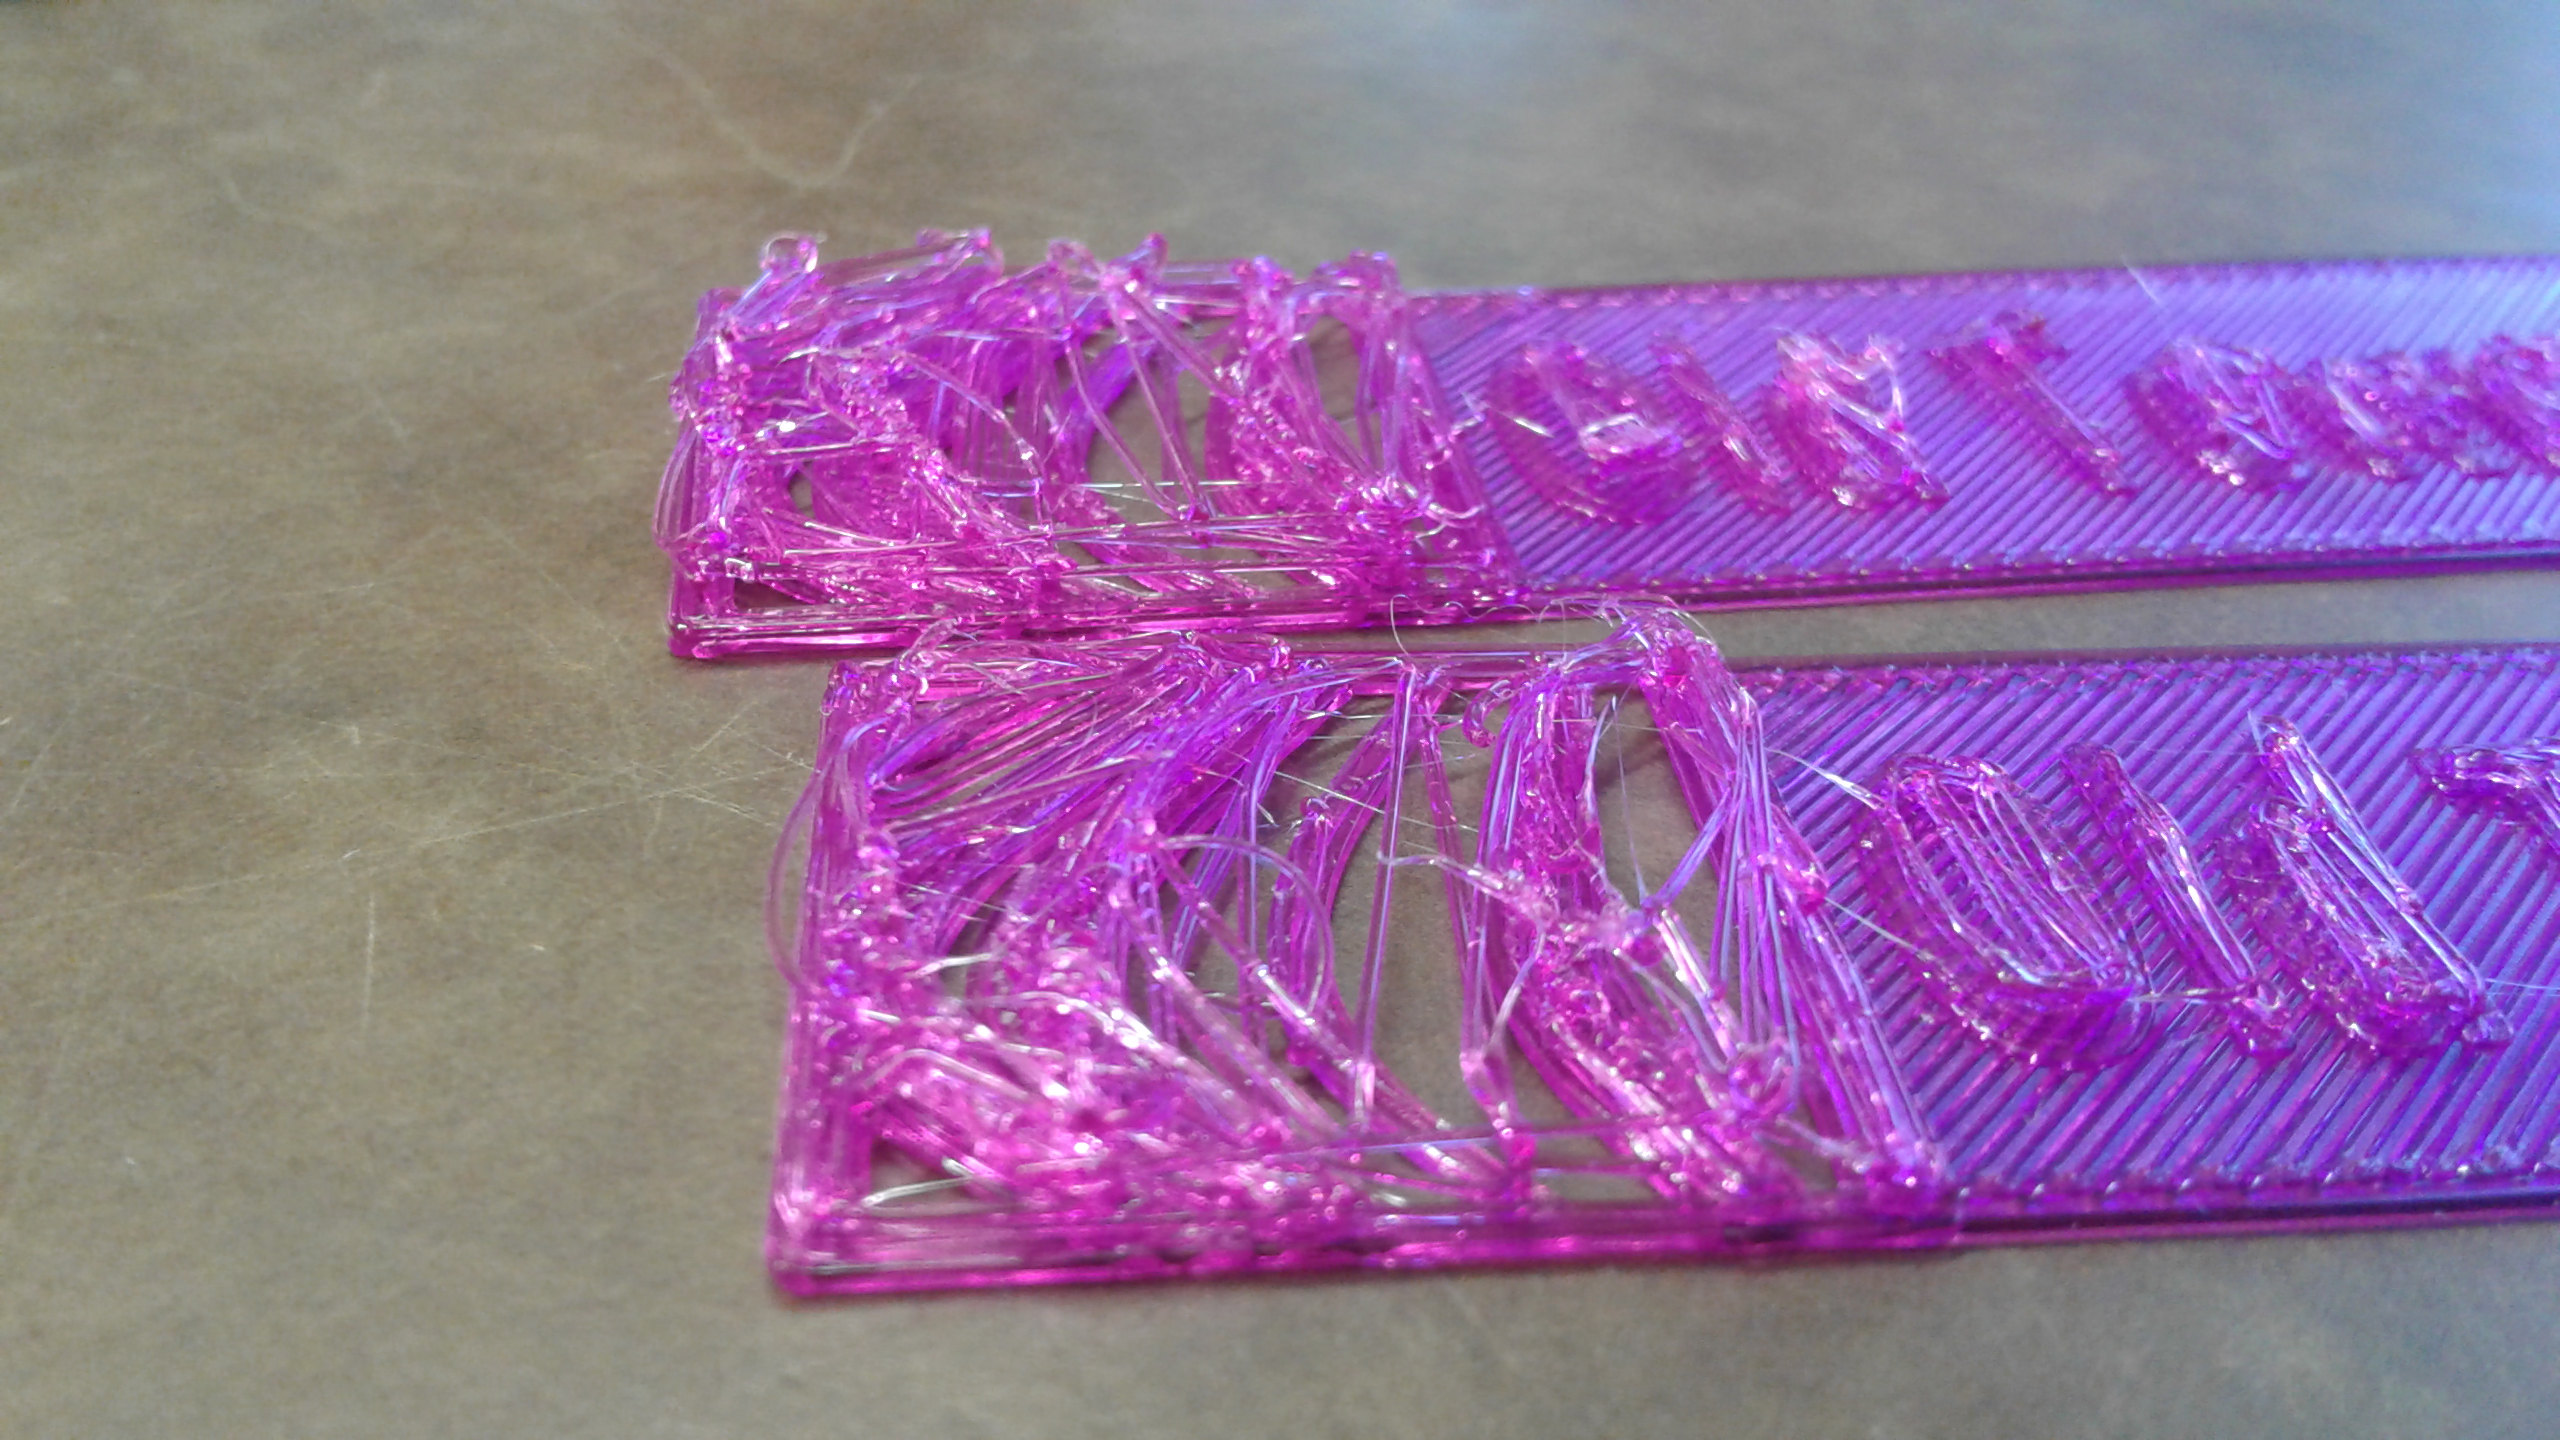
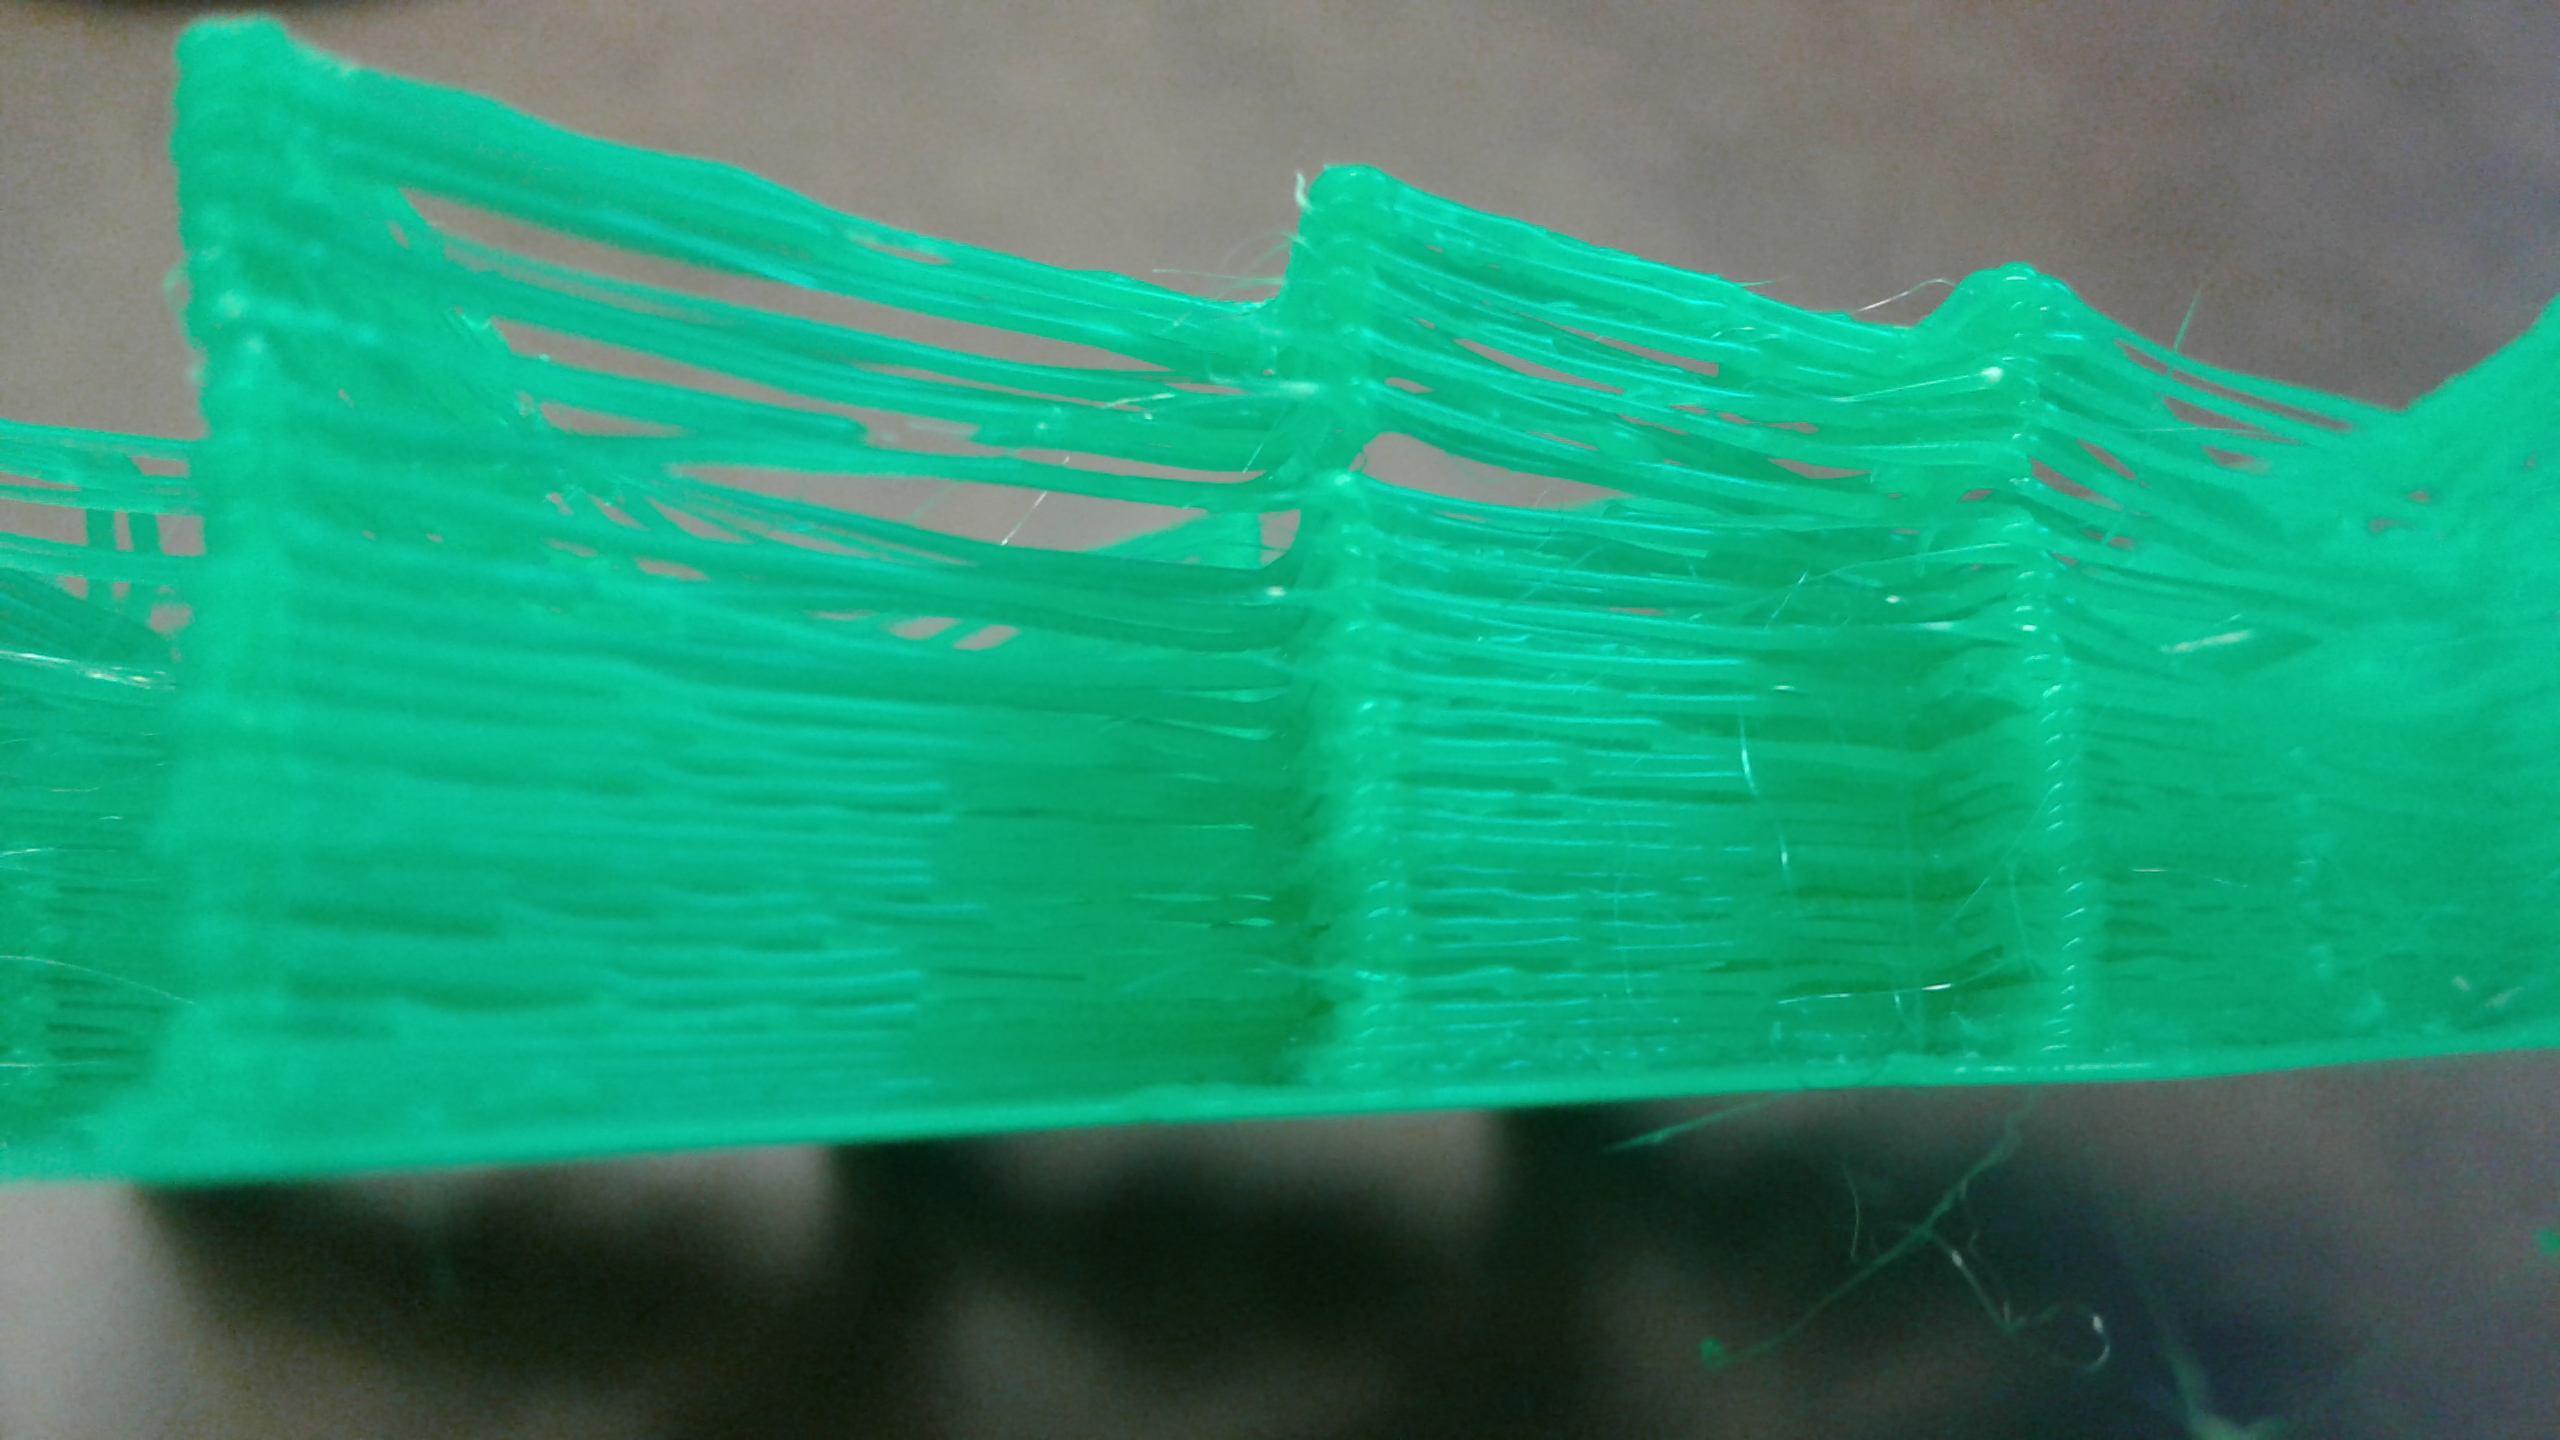
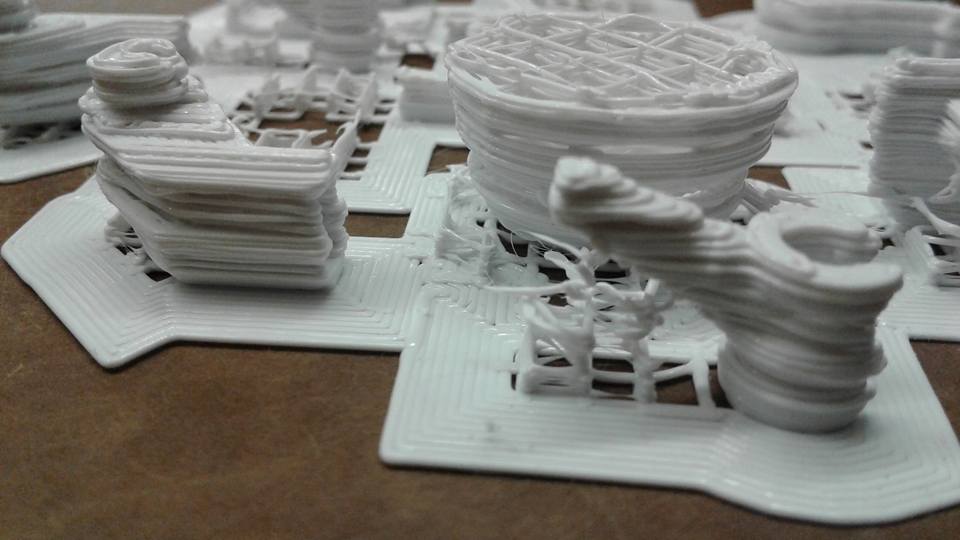
There appear to be gaps in between layers, stringing between lines, and the layers do not appear to be adhering to one another. (see photos of white object, green object, and purple/silver bookmarks)
All of these errors happen despite:
a level bed and a perfect, error-free file (that has printed flawlessly dozens of times before)
it happens despite layer thickness (we do not depart from .14mm(high detail) or .25mm(standard))
all settings are 100% set as they should be for PLA
spring tension/idler jig is set exactly to 8mm as it always has been
The motor was replaced about a month ago as was the hot end. Everything was working perfectly until about a week ago.
These items I need are actually for my employer - we have an event on the 31st that requires 200-300 of these bookmarks and thus far I’ve only gotten 25 to print before the printer went haywire. We’re desperate here!
***Attached photos of red and green bookmarks shown are how they should look and used to look until about a week ago
not sure if this is a software or hardware issue so I’m batting in the dark here
Something is majorly wrong here. In most of the pictures you are either massively underextruding, or printing on a printer where the z steps value is actually wrong, which would only occur if you managed to somehow load Taz firmware onto a mini, or something similar. I would delete your fillament profiles and start fresh with new clean ones from lulzbot. I would also check your filament diameters with calipers and make sure you aren’t trying to print 1.75mm filament inadvertently, and that cura is set properly for the actual diameter you are using, as they do vary by roll and manufacturer. 8mm spacing is a guideline, our may need to add some spring tension.
Check that the small barrel cooling fan on the extruder is still functional. They do tend to partially fail to where they do still spin, but nother fast enough to cool anything, which can cause bore lock.
Have you checked the idler arm bearing to see if it still turns freely and that the hotbed bolt teeth are clean and debris free? Have you disassembled the tool head and possibly bolted it back together offset so it is binding on the cold filament entering the hotend?
Are you printing in an enclosure? For pla you shouldn’t be.
What brand of filament is this, do you get the same result with good quality villiage plastics pla ordered from lulzbot? How are you storing it? Is it in Dessincant filled sealed containers before use?
I’ve taken some screen shots of all numerical values/settings currently on the printer. They are all basically default at this point because everything’s been so messed up we were afraid to differ at all. See attached image.
The PLA being used is eSun PLA (which we are trying to get rid of as soon as humanly possible), BUT the same thing happens when using Colorfabb’s nGen (that was the silver object in the above images). Unfortunately we have to print in an enclosure (though it is not air tight) due to a large number of customers coming in and out. In the past people have grabbed/touched the machine and this caused a whole host of problems. However, we have a small fan in the corner that we turn on for large prints, the back is open for air flow, and there are multiple desiccant packets in the enclosure itself. All filament is stored in a plastic case with packets in there as well. Keep in mind, though, that things were working just fine and we didn’t have this problem prior to about 10 days ago.
Have tried different tension spacing but it either makes it worse (will stop extruding and the filament starts shearing if too loose, or will get jammed and the filament breaks if too tight). Varying between +/- 1mm (7mm-9mm) offers no change and extrusion result is the same.
As much as I can tell, the heat sink fan (the small barrel shaped one) is operational
Idler bearing rotates smoothly and the internal hobbed bolt is clear of flakes/debris (we obsessively monitor this, as it caused issues in the past)
The drive gears (the bright lulzbot green ones) do seem to have an area where it doesn’t turn smoothly, like the teeth are slightly not fitting together as they rotate. They will rotate fine but then hitch on one small section and then rotate fine again.
I will see if we can reinstall the firmware and all the profiles and see if that helps, first of all. If the tool head was bolted back together incorrectly and is offset/skewed, then that’s probably something Lulzbot did themselves (as we had a new motor put in about a month ago). I’ve tried contacting them about this but still haven’t heard anything back and its been about 4 days.
Those settings all look reasonable. I would check the fillament diameter with a set of vernier calipers, and adjust the fillament diameter setting to match your measurements. 2.85mm is the default value, and it is very unlikely that the fillament you are using is exactly 2.85mm. In this particular case I suspect you will find that it is smaller, probably closer to 2.6mm.
The spot on the green gear that is hitching occiaionally may be due to a missing tooth on the small extruder gear, or can be caused by a gear that is out of round or has a failed tooth. those can self correct over time, or get dramatically worse quickly depending on the issue. You should inspect the small gear, and replace it if there are bad teeth.
Since this was working and has stopped, I would try a couple of things. First, temporarily remove the machine from the enclosure, and try printing another unit. If that significantly improves quality, it’s likely that the barrel cooling fan is not operating correctly, or your exhaust fan in the enclosure isn’t removing enough heat. PLA expands as it is heated before it melts, which can cause a condition known as “bore lock” where the fillament expands enough to wedge itself into the barrel, causing a reduction in flow that leads to major underextrusion.
The other thing it could be is firmware. The threaded rod in the mini uses a different Z steps value than the leadscrews in the Taz. if you somehow managed to upload the wrong firmware, it could result in the Z motors turning too many times to move up a layer. The Taz leadscrews are larger in diameter, so the motor turning the distance set for a Taz would result in the mini leadscrews positioning the head above the bed. I’d expect the auto leveling to be completely messed up if that were the case, as the bed sizes, etc. would be wrong.
The barrel cooling fan is still my main suspect at this point. That combined with the fillament diameter setting. Another thing to check is the “E-steps per 1mm” setting. That’s currently set to 0. When you changed the firmware out, it wipes the extruder e-steps value specific to your printer. That esteps value should be on the documentation that came with your printer, or on the toolhead itself. I’m not sure if thats where you would enter it in Cura though.
It looks like the driver chips are getting hot, as you have all three axis failing on the white print. Check fan in control box is working and heat sink on Z driver did not fall off.
Thanks everyone a ton for all the info.
I’m getting ready to leave and can’t dink around with it anymore tonight, but will get right on it tomorrow.
Quick question (as there are many different fans and it appears there are many names for different parts) … which fan is the one for the control box? Is it the one inside the metal casing on the left hand side underneath the big lulzbot logo? Or is it a different one? (I assume it would be this one because obviously the internal controls/chips are inside this metal housing but I wanted to check and make sure)
Yes, that’s the control box fan, the control box needs to be able to either draw in, or vent air through that fan. I forget which direction it is on a mini, but if you don’t have a direct sir inlet hole in your enclosure that corresponds to that fan location, that may be your problem right there. It’s the large fan that directs air over the control board on three left of the mini.
Yep. That fan isn’t running. Does not rotate while printing or even while it’s just sitting idle. I never noticed when it stopped running.
Let me give that shot and I will let you know how it goes. Probably makes sense why the printer would sometimes work when the desk fan in the enclosure was running… perhaps because it was pointing just enough on the control box.
So I printed a bunch of 45 minute prints and thus far things have been great. We can’t replace the fan just yet today, but I put the desk fan blowing directly on to the control box. I am attempting a longer print now (2 hours 15 minutes) and am going to see how that works.
Great to see that Lulzbot is involved! Quite happy about that. Hopefully the fan issue will just be a quick fix.