I just upgraded a Taz6 in my school’s makerspace with the m175 toolhead. I got the universal adapter, updated the flash, made sure to select the proper toolhead, and am using Cura 4.13.
When I am changing filament or just doing an autohome, it works perfectly going to the center of the disk, pressing down and then up.
However, when I tried to print the rocktopus or the benchy using stock settings, ensuring m175 toolhead, it moves the nozzle to the front of the washer and kept driving into the washer rim forcing me to force stop the print. Does anyone have a suggestion? Is there something wrong with my print settings? I have attached the file and a scuff image of the nozzle’s just before homing. 3DBenchy_T6-M175.gcode (2.1 MB)
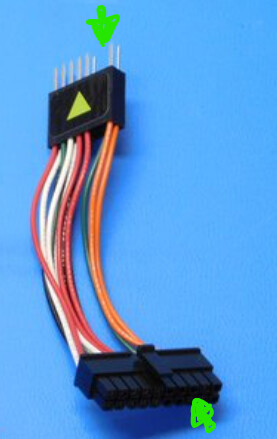
From your description, the zero sense wire for the new toolhead isn’t connected right. The center disc it presses first is a switch, so no connection goes through the toolhead. The washers use a simple circuit going from the washers, through the toolhead, and back to the circuit board to determine when contact happens.
Since the old toolhead was working (I assume) the connection from the harness to the circuit board should be good, so I’d start checking for continuity between the nozzle and the zero sense wire connector here:
To the harness pin for zero sense where it plugs into the universal harness adapter:
And then follow that wire to check check for the connection between the universal harness to the Taz 6 toolhead harness. (arrows may not be pointing at the exact pins, just follow the zero sense wire)
Also to add, if you can do a video of the homing attempt (posted to youtube), that will help if it’s not just a simple wire issue.
Thanks for the info and will check. It does home correctly though in the change filament sequence and if I select the auto home sequence, just not when I print.
Wouldn’t this imply that the zero wire works properly?
Videos definitely helped. Usually when you refer to the washers in leveling/homing you’re talking about these washers, not the rim around the button.
This is not centered on the button very well, from this angle it looks like it’s too far forward:
And it’s even more forward in your homing sequence.
There may be some adjustments in the startup GCODE for the X and Y positions. Can you post the startup GCODE from the version of CuraLE you’re using?
If there’s any M206 commands in there, (without a semicolon at the front) then it’s having it’s coordinate system shifted a bit.
If there are no M206 commands in the startup GCODE, then there may still be some lingering adjustments somebody made earlier. Go to the monitor page in CuraLE, then open the console:
Then attempt to auto-home again. If the button press is not centered, then your Y axis is not in the proper position. Loosen the thumbscrews that hold it in place, then pull the entire Y axis (not just the bed) FORWARD about 6mm and tighten them back down.
Here is the startup code and a picture of the printer settings. I did not touch any of the settings when I was flashing it.
Startup Code
;This G-Code has been generated specifically for the LulzBot TAZ 6 with a Universal Tool Head
;
;The following lines can be uncommented for printer specific fine tuning
;More information can be found at Gcode | Marlin Firmware
;
;M92 E420 ;Set Axis Steps-per-unit
;M301 P21.0 I1.78 D61.93 ;Set Hotend PID
;M906 E160 ;Digipot Motor Current ((875mA-750)/5+135) = 160
;M206 Y0 ;Set Home Offsets (default:0)
;
M73 P0 ; clear GLCD progress bar
M75 ; start GLCD timer
G26 ; clear potential ‘probe fail’ condition
M107 ; disable fans
M420 S0 ; disable leveling matrix
M900 K{linear_advance} ; set linear advance
G90 ; absolute positioning
M82 ; set extruder to absolute mode
G92 E0 ; set extruder position to 0
M140 S{material_bed_temperature_layer_0} ; start bed heating up
G28 XY ; home X and Y
G1 X-19 Y258 F1000 ; move to safe homing position
M109 R{material_soften_temperature} ; soften filament before homing Z
G28 Z ; home Z
G1 E-15 F100 ; retract filament
M109 R{material_wipe_temperature} ; wait for extruder to reach wiping temp
;M206 X0 Y0 Z0 ; uncomment to adjust wipe position (+X ~ nozzle moves left)(+Y ~ nozzle moves forward)(+Z ~ nozzle moves down)
G12 ; wiping sequence
M206 X0 Y0 Z0 ; reseting stock nozzle position ### CAUTION: changing this line can affect print quality ###
M109 R{material_probe_temperature} ; wait for extruder to reach probe temp
G1 X-10 Y293 F4000 ; move above first probe point
M204 S100 ; set probing acceleration
G29 ; start auto-leveling sequence
M420 S1 ; enable leveling matrix
M204 S500 ; restore standard acceleration
G1 X0 Y0 Z15 F5000 ; move up off last probe point
G4 S1 ; pause
M400 ; wait for moves to finish
M117 Heating… ; progress indicator message on LCD
M109 R{material_print_temperature_layer_0} ; wait for extruder to reach printing temp
M190 R{material_bed_temperature_layer_0} ; wait for bed to reach printing temp
G1 Z2 E0 F75 ; prime tiny bit of filament into the nozzle
M117 TAZ 6 Printing… ; progress indicator message on LCD
Your startup appears clean for offsets, so it looks like it’s a physical misalignment. It would be best to confirm squareness of the frame when you move the Y axis forward to compensate.
It’s likely somebody else moved the Y axis already to try and compensate for mismatched firmware settings, which is why it’s off right now, but if it got knocked when being moved, it won’t hurt to verify that everything’s square.
Thanks for all of the help. Moving the y-axis up did the trick, though I did have to unscrew the allen wrench set screws instead of using the hand twist screws.
Was able to make my first glow in the dark benchy.
Any tricks or prints that I can use to test wether both the x and y axis are squared? I inherited two machines, and I believe both the students and teachers have been hard on them.
To check for bed skew due to a out-of-square Y axis, print a 270mm x 270mm x 2 layers high square frame on the board. 270mm test frame.stl (3.8 KB)
Measure it corner to corner. If bottom right to top left measurement is the same as the bottom left to top right measurement, it should be square. If it isn’t follow the ohai.lulzbot.com install instructions for the Y axis frame.
If you have the original papers which has the factory set z offset re enter the correct z leveling unless yours is old enough to not to be coming with a magnetic bed in that case it will need to re adjust then hit save configuration three times to be sure